<?xml version="1.0" encoding="utf-8"?><feed xmlns="http://www.w3.org/2005/Atom" ><generator uri="https://jekyllrb.com/" version="3.10.0">Jekyll</generator><link href="https://bloggingforlogging.com/feed.xml" rel="self" type="application/atom+xml" /><link href="https://bloggingforlogging.com/" rel="alternate" type="text/html" /><updated>2026-10-07T04:39:06+00:00</updated><id>https://bloggingforlogging.com/feed.xml</id><title type="html">Blogging for Logging</title><subtitle>My thoughts logged into blog form</subtitle><author><name>Jordan Borean</name></author><entry><title type="html">RPC Encryption – An Exercise in Frustration</title><link href="https://bloggingforlogging.com/2023/04/28/rpc-encryption-an-exercise-in-frustration/" rel="alternate" type="text/html" title="RPC Encryption – An Exercise in Frustration" /><published>2023-04-28T05:58:50+00:00</published><updated>2023-04-28T05:58:50+00:00</updated><id>https://bloggingforlogging.com/2023/04/28/rpc-encryption-an-exercise-in-frustration</id><content type="html" xml:base="https://bloggingforlogging.com/2023/04/28/rpc-encryption-an-exercise-in-frustration/"><![CDATA[<p>Since of the release of <a href="https://learn.microsoft.com/en-us/windows-server/identity/laps/laps-overview">Windows LAPS</a> and the introduction of encrypted passwords I’ve been working towards a way of decrypting these payloads on non-Windows platforms. One of the key components of getting this working is to not only have a working RPC client but also support the RPC authentication level <code class="language-plaintext highlighter-rouge">RPC_C_AUTHN_LEVEL_PKT_PRIVACY</code>. I’ve worked with GSSAPI/SSPI before and thought this should be relatively simple, this is a tale of what is actually involved for others interested in the top. I won’t be going into too much details on the RPC process, I just wanted to focus on the authentication and subsequent message encryption details I found were not documented, or not very detailed.</p>
<h1 id="what-is-rpc">What is RPC</h1>

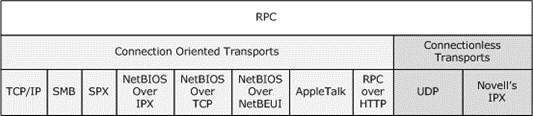
<p>RPC standard for Remote Procedure Call and is a way for programs to invoke a function that lives outside of it’s process. There are many transport protocols that RPC can operator on, the <a href="https://learn.microsoft.com/en-us/openspecs/windows_protocols/ms-rpce/b1470490-ce07-492a-ac7f-e2d5ce2333b4">MS-RPCE</a> protocol documentation even displays a nice diagram of some that are involved.</p>

<p><a href="/assets/images/2023/04/RPC_Transports.png"><img src="/assets/images/2023/04/RPC_Transports.png" alt="" /></a></p>

<p>In the past I’ve been able to use my SMB Python library to use RPC over SMB named pipes, known as <code class="language-plaintext highlighter-rouge">ncacn_np</code>, but another important transport protocol is RPC over TCP/IP (<code class="language-plaintext highlighter-rouge">ncacn_ip_tcp</code>). RPC over SMB can reuse the authentication and message protection features offered by the SMB protocol, but RPC over TCP needs to use the specifications defined by the RPC protocol. The specs define how authentication tokens are exchanged but it is quite a high level overview with a lot of the details down to the authentication provider used. There are two main components that need to be implemented:</p>

<ul>
  <li>Authentication Type</li>
  <li>Authentication Level</li>
</ul>

<h1 id="authentication-types">Authentication Types</h1>

<p>The authentication level is the authentication protocol that is used to authenticate the user and provide message protection support. There are a few types/providers supported by <a href="https://learn.microsoft.com/en-us/openspecs/windows_protocols/ms-rpce/d4097450-c62f-484b-872f-ddf59a7a0d36">MS-RPCE</a> but the ones I am focusing on are:</p>

<table>
  <thead>
    <tr>
      <th>Name</th>
      <th>Protocol</th>
      <th>Value</th>
    </tr>
  </thead>
  <tbody>
    <tr>
      <td>RPC_C_AUTHN_GSS_NEGOTIATE</td>
      <td>Negotiate/SPNEGO</td>
      <td>0x09</td>
    </tr>
    <tr>
      <td>RPC_C_AUTHN_WINNT</td>
      <td>NTLM</td>
      <td>0x0A</td>
    </tr>
    <tr>
      <td>RPC_C_AUTHN_GSS_KERBEROS</td>
      <td>Kerberos</td>
      <td>0x10</td>
    </tr>
  </tbody>
</table>

<p>The <code class="language-plaintext highlighter-rouge">RPC_C_AUTHN_GSS_NEGOTIATE</code> type will try and use <code class="language-plaintext highlighter-rouge">Kerberos</code> authentication before falling back to <code class="language-plaintext highlighter-rouge">NTLM</code>. It technically can authenticate with other protocols through the NegoEx protocol but I’m only focusing on <code class="language-plaintext highlighter-rouge">NTLM</code> and <code class="language-plaintext highlighter-rouge">Kerberos</code>. The <code class="language-plaintext highlighter-rouge">RPC_C_AUTHN_WINNT</code> and <code class="language-plaintext highlighter-rouge">RPC_C_AUTHN_GSS_KERBEROS</code> types are used when either <code class="language-plaintext highlighter-rouge">NTLM</code> or <code class="language-plaintext highlighter-rouge">Kerberos</code> are targeted explicitly outside of the <code class="language-plaintext highlighter-rouge">Negotiate</code> process. All 3 protocols follow a very basic pattern where the authentication tokens are exchanged between the client and the server with support for various authentication levels.</p>

<h1 id="authentication-levels">Authentication Levels</h1>

<p>An authentication level describes the level of protection the authentication type provides for the current connection. These levels are documented by <a href="https://learn.microsoft.com/en-us/openspecs/windows_protocols/ms-rpce/425a7c53-c33a-4868-8e5b-2a850d40dc73">MS-RPCE</a> but the important one here is <code class="language-plaintext highlighter-rouge">RPC_C_AUTHN_LEVEL_PKT_PRIVACY (0x06)</code>. The level ensures that the RPC body is encrypted so that anyone capturing the network traffic will be unable to view the contents. While it is not always required to use <code class="language-plaintext highlighter-rouge">RPC_C_AUTHN_LEVEL_PKT_PRIVACY</code>, there are certain APIs that mandate this level before they can be used and it is good practice to ensure your communication is protected.</p>

<p>There is an extra component to the authentication level added as a Microsoft extension on <code class="language-plaintext highlighter-rouge">MS-RPCE</code>, the <a href="https://learn.microsoft.com/en-us/openspecs/windows_protocols/ms-rpce/4886f349-2a73-4f9e-9262-a8404462c7e9">PFC_SUPPORT_HEADER_SIGN flag</a>. This is a flag used to indicate to the server that the RPC header and security trailer are included in the security checksum of the payload. If this flag is not set then only the RPC body will be protected by the authentication level specified. From what I can gather, a Windows client always sets this flag but as a service it will still allow other clients to communicate without this flag. This may change in the future but essentially both modes should be supported by and client wishing to communicate with a Windows RPC service.</p>

<h1 id="rpc-payload">RPC Payload</h1>

<p>Before going into the details of how the authentication and encryption process is done, it is important to talk about the structure of an RPC payload. An RPC payload is split into the following segments:</p>

<table>
  <thead>
    <tr>
      <th>Segment</th>
      <th>Purpose</th>
    </tr>
  </thead>
  <tbody>
    <tr>
      <td>PDU Header</td>
      <td>Common header information</td>
    </tr>
    <tr>
      <td>Request Header</td>
      <td>Message type specific header data</td>
    </tr>
    <tr>
      <td>PDU Body</td>
      <td>Data specific to the message type</td>
    </tr>
    <tr>
      <td>Security Trailer</td>
      <td>Authentication info</td>
    </tr>
    <tr>
      <td>Authentication Token</td>
      <td>The authentication token/signature</td>
    </tr>
  </tbody>
</table>

<p>The PDU Body is then further comprised of the following components:</p>

<table>
  <thead>
    <tr>
      <th>Segment</th>
      <th>Purpose</th>
    </tr>
  </thead>
  <tbody>
    <tr>
      <td>Stub Data</td>
      <td>Data specific to the request operation</td>
    </tr>
    <tr>
      <td>Stub Padding</td>
      <td>Padding data to align the stub</td>
    </tr>
    <tr>
      <td>Verification Trailer</td>
      <td>Additional integrity protection</td>
    </tr>
    <tr>
      <td>Authentication Padding</td>
      <td>Padding data to align the body</td>
    </tr>
  </tbody>
</table>

<p>Not all these fields are necessary for all RPC payloads but it is important to know them.</p>

<h1 id="authentication-process">Authentication Process</h1>

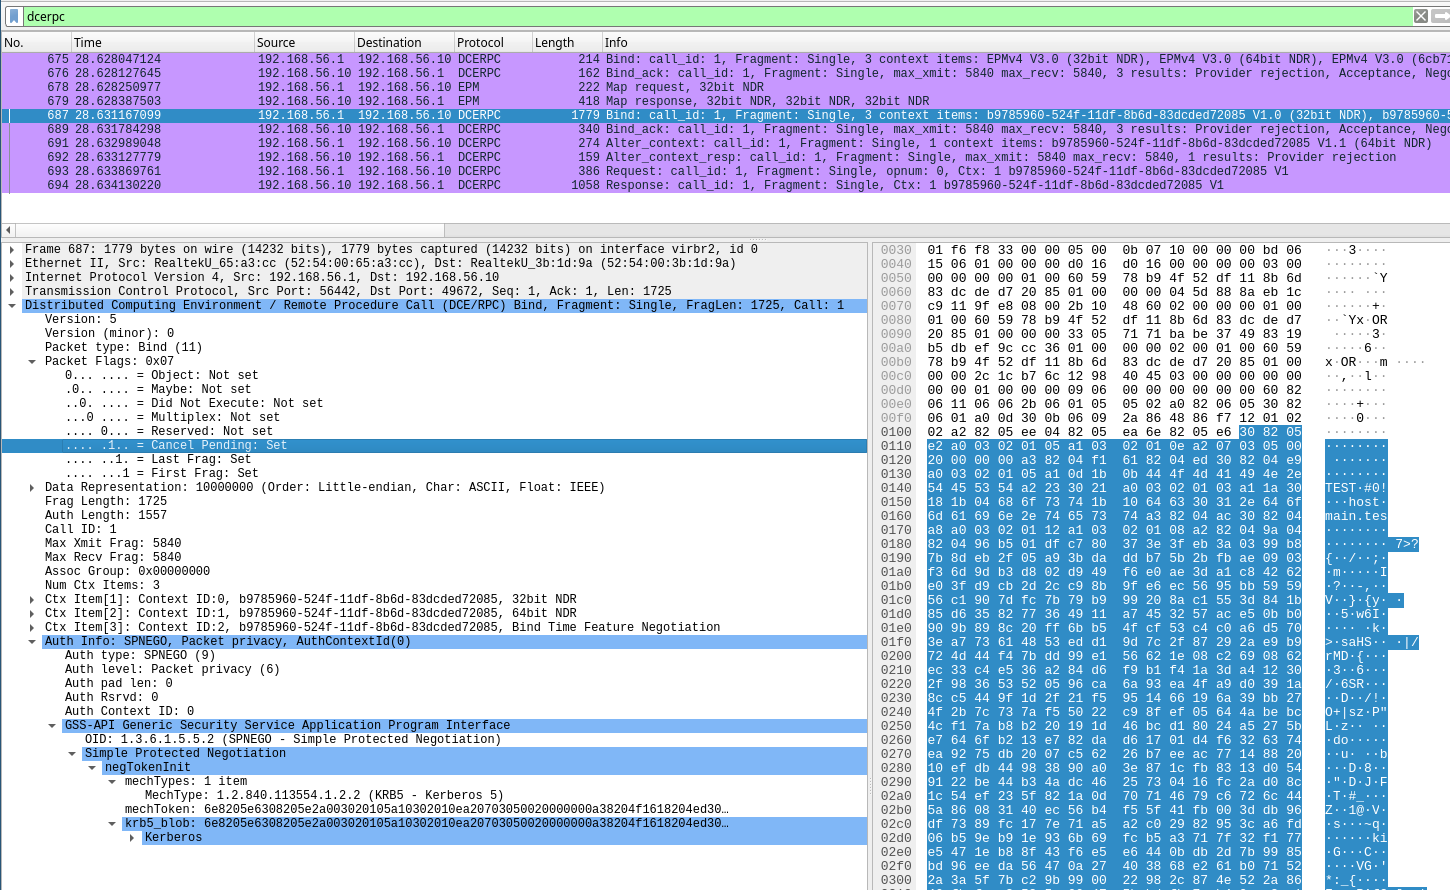
<p>The first step of an RPC connection is to authenticate the user using the authentication type desired. This is done by sending an Bind Request and subsequent Alter Context requests until the authentication is complete. The first message is the Bind Request which can be seen in this network traffic capture.</p>

<p><a href="/assets/images/2023/04/RPC_Bind.png"><img src="/assets/images/2023/04/RPC_Bind.png" alt="" /></a></p>

<p>The <code class="language-plaintext highlighter-rouge">Auth Info</code> field at the bottom is the security trailer and authentication token where the security trailer states what authentication type is used and the authentication level desired. In this case the <code class="language-plaintext highlighter-rouge">RPC_C_AUTHN_GSS_NEGOTIATE</code> type and <code class="language-plaintext highlighter-rouge">RPC_C_AUTHN_LEVEL_PKT_PRIVACY</code> level are set which indicates the authentication tokens are for the Negotiate protocol and encryption will be used. Following straight after the security trailer is the authentication token, which for a bind request is the actual Kerberos/NTLM token generated from SSPI/GSSAPI.</p>

<p>This token can be generated on SSPI through the <a href="https://learn.microsoft.com/en-us/windows/win32/secauthn/initializesecuritycontext--negotiate">InitializeSecurityContext</a> API or on GSSAPI with the <a href="https://datatracker.ietf.org/doc/html/rfc2744.html#section-5.19">gss_init_sec_context</a> API. It is important to provide the SSPI flag <code class="language-plaintext highlighter-rouge">ISC_REQ_USE_DCE_STYLE</code> or GSSAPI flag <code class="language-plaintext highlighter-rouge">GSS_C_DCE_STYLE</code> when stepping through these functions as it is used to produce DCE/RPC style tokens. This is not an exhaustive list but from observation I found the DCE flag does some of the following:</p>

<ul>
  <li>For Kerberos the exchange includes a third token will produce a third authentication token rather than the typical two</li>
  <li>For Negotiate the exchange will also include the <code class="language-plaintext highlighter-rouge">mechListMIC</code> value inside the SPNEGO envelope</li>
  <li>For NTLM no changes were observed</li>
</ul>

<p>Another key note here is that the RPC flags set the <code class="language-plaintext highlighter-rouge">PFC_SUPPORT_HEADER_SIGN (0x03)</code> bit in the flags if the client can do integrity protection on the PDU header and security trailer. This is shown in the above exchange where <code class="language-plaintext highlighter-rouge">Cancel Pending</code> (uses the same bit value) is set in the dissected output. This flag will continue to be set in both the bind request and subsequent alter context messages until the security context is complete.</p>

<p>The MS-RPCE extension also document an extension PDU called <a href="https://learn.microsoft.com/en-us/openspecs/windows_protocols/ms-rpce/a6b7b03c-4ac5-4c25-8c52-f2bec872ac97">rpc_auth_3</a> which is meant to be used instead of an alter context payload if the client is sending the last authentication token and doesn’t expect a reply back. In testing this PDU does not seem to be necessary as the alter context PDU works in the very scenario MS-RPCE described for <code class="language-plaintext highlighter-rouge">rpc_auth_3</code>.</p>

<h1 id="message-protection">Message Protection</h1>

<p>Once the authentication process is complete, the client can now send requests to the RPC service. As the authentication level <code class="language-plaintext highlighter-rouge">RPC_C_AUTHN_LEVEL_PKT_PRIVACY</code> was configured in the authentication stage, the PDU body data will need to be encrypted. Before the data can be encrypted the RPC PDU should be built as normal, more specifically:</p>

<ul>
  <li>The PDU body that is being encrypted should be padded to ensure it aligns with the authentication message block size</li>
  <li>The PDU header fragment length should be set to be the final payload size, including the authentication token at the end</li>
  <li>The PDU auth length should be set to the expected authentication token/signature size</li>
</ul>

<p>The <a href="https://learn.microsoft.com/en-us/windows/win32/secauthn/querycontextattributes--general">QueryContextAttributes</a> with <code class="language-plaintext highlighter-rouge">SECPKG_ATTR_SIZES</code> should provide the authentication token/signature length through the returned <code class="language-plaintext highlighter-rouge">cbSecurityTrailer</code> field. On GSSAPI the <a href="https://web.mit.edu/kerberos/krb5-latest/doc/appdev/gssapi.html#iov-message-wrapping">gss_wrap_iov_length</a> API can be used to return the expected authentication token/signature size.</p>

<p>Once the plaintext PDU has been generated it is time to encrypt the data. On SSPI encryption is done using the <a href="https://learn.microsoft.com/en-us/windows/win32/api/sspi/nf-sspi-encryptmessage">EncryptMessage</a> API and on GSSAPI it’s with the <a href="https://web.mit.edu/kerberos/krb5-latest/doc/appdev/gssapi.html#iov-message-wrapping">gss_wrap_iov</a> API. Both of these functions take in an array of buffers and use that to wrap the data.</p>

<p>As the documentation for this was not clear at all I ended up tracing the SSPI calls using <a href="https://github.com/jborean93/PSDetour">PSDetour</a> and was able to see the following during a real RPC exchange:</p>

<div class="language-plaintext highlighter-rouge"><div class="highlight"><pre class="highlight"><code>EncryptMessage(Context: 0x1E752D17F28, Qop: 0, Message: 0xC8EED8D878, SeqNo: 2)
        EncryptMessage Message(Version: 0, Buffers: 5)
                [1] Type: SECBUFFER_DATA | SECBUFFER_READONLY_WITH_CHECKSUM (1), Length: 24, Data: 05000003100000004C014C0008000000D800000001000000
                [2] Type: SECBUFFER_DATA (1), Length: 224, Data: 6C0000...
                [3] Type: SECBUFFER_DATA | SECBUFFER_READONLY_WITH_CHECKSUM (1), Length: 8, Data: 0906080000000000
                [4] Type: SECBUFFER_TOKEN (2), Length: 76, Data: 0000...
                [5] Type: SECBUFFER_PKG_PARAMS | SECBUFFER_READONLY (3), Length: 12, Data: 020000000000000000EBBFE8
EncryptMessage -&gt; Res: 0x00000000
        EncryptMessage Message(Version: 0, Buffers: 5)
                [1] Type: SECBUFFER_DATA | SECBUFFER_READONLY_WITH_CHECKSUM (1), Length: 24, Data: 05000003100000004C014C0008000000D800000001000000
                [2] Type: SECBUFFER_DATA (1), Length: 224, Data: E428...
                [3] Type: SECBUFFER_DATA | SECBUFFER_READONLY_WITH_CHECKSUM (1), Length: 8, Data: 0906080000000000
                [4] Type: SECBUFFER_TOKEN (2), Length: 76, Data: 0504...
                [5] Type: SECBUFFER_PKG_PARAMS | SECBUFFER_READONLY (3), Length: 12, Data: 020000000000000000EBBFE8
</code></pre></div></div>

<p>In summary the RPC client on Windows provides 5 buffers to the <code class="language-plaintext highlighter-rouge">EncryptMessage</code> function:</p>

<ul>
  <li>[1] – The PDU header + request header data is marked as <code class="language-plaintext highlighter-rouge">SECBUFFER_READONLY_WITH_CHECKSUM</code></li>
  <li>[2] – The PDU body (including the verification trailer and padding)</li>
  <li>[3] – The Security trailer is marked as <code class="language-plaintext highlighter-rouge">SECBUFFER_READONLY_WITH_CHECKSUM</code></li>
  <li>[4] – An output buffer that will store the signature generated from the first 3 buffers</li>
  <li>[5] – Extra metadata about the payload marked as <code class="language-plaintext highlighter-rouge">SECBUFFER_PKG_PARAMS</code></li>
</ul>

<p>The data in the 2nd buffer will be encrypted in place and the 3rd buffer will contain the generated signature. With the resulting information it is possible to now replace the PDU body with the encrypted output from <code class="language-plaintext highlighter-rouge">EncryptMessage</code> and include the signature generated as the RPC authentication token value.</p>

<p>It was trickier to figure out the buffer types needed when <code class="language-plaintext highlighter-rouge">PFC_SUPPORT_HEADER_SIGN</code> was not used as the Windows client always set this flag, but in the end I was able to get a trace on the server as it responded to a client that didn’t set these flags. This is what the <code class="language-plaintext highlighter-rouge">EncryptMessage</code> trace looked like</p>

<div class="language-plaintext highlighter-rouge"><div class="highlight"><pre class="highlight"><code>EncryptMessage(Context: 0x1AA7EBF95F8, Qop: 0, Message: 0x842F47F5C0, SeqNo: 1)
    EncryptMessage Message(Version: 0, Buffers: 5)
        [1] Type: SECBUFFER_DATA | SECBUFFER_READONLY (1), Length: 24, Data: 0500020310000000B0031000010000007403000001000000
        [2] Type: SECBUFFER_DATA (1), Length: 896, Data: 5603...
        [3] Type: SECBUFFER_DATA | SECBUFFER_READONLY (1), Length: 8, Data: 09060C0000000000
        [4] Type: SECBUFFER_TOKEN (2), Length: 16, Data: 0000000000000000C0E40A75FC7F0000
        [5] Type: SECBUFFER_PKG_PARAMS | SECBUFFER_READONLY (3), Length: 12, Data: 01000000030000000273FFFC
EncryptMessage -&gt; Res: 0x00000000
    EncryptMessage Message(Version: 0, Buffers: 5)
        [1] Type: SECBUFFER_DATA | SECBUFFER_READONLY (1), Length: 24, Data: 0500020310000000B0031000010000007403000001000000
        [2] Type: SECBUFFER_DATA (1), Length: 896, Data: 193B...
        [3] Type: SECBUFFER_DATA | SECBUFFER_READONLY (1), Length: 8, Data: 09060C0000000000
        [4] Type: SECBUFFER_TOKEN (2), Length: 16, Data: 01000000500B6FDD07DA479100000000
        [4] Type: SECBUFFER_PKG_PARAMS | SECBUFFER_READONLY (3), Length: 12, Data: 01000000030000000273FFFC
</code></pre></div></div>

<p>The buffers are essentially the same as before except now buffer 1 and 3 have the flag <code class="language-plaintext highlighter-rouge">SECBUFFER_READONLY</code> and not <code class="language-plaintext highlighter-rouge">SECBUFFER_READONLY_WITH_CHECKSUM</code>. NTLM doesn’t seem to differentiate between these flags which means <code class="language-plaintext highlighter-rouge">PFC_SUPPORT_HEADER_SIGN</code> doesn’t add any protection for NTLM but for Kerberos it does adjust how the signature is calculated.</p>

<p>Now that I am know what Windows is doing I was then able to figure out what the equivalent buffer types were for GSSAPI. Here is what I’ve mapped out</p>

<table>
  <thead>
    <tr>
      <th>SSPI</th>
      <th>GSSAPI</th>
    </tr>
  </thead>
  <tbody>
    <tr>
      <td>SECBUFFER_DATA</td>
      <td>GSS_IOV_BUFFER_TYPE_DATA</td>
    </tr>
    <tr>
      <td>SECBUFFER_TOKEN</td>
      <td>GSS_IOV_BUFFER_TYPE_HEADER</td>
    </tr>
    <tr>
      <td>SECBUFFER_READONLY_WITH_CHECKSUM</td>
      <td>GSS_IOV_BUFFER_TYPE_SIGN_ONLY</td>
    </tr>
    <tr>
      <td>SECBUFFER_READONLY</td>
      <td>GSS_IOV_BUFFER_TYPE_EMPTY</td>
    </tr>
  </tbody>
</table>

<p>Unlike SSPI the GSSAPI buffer type <code class="language-plaintext highlighter-rouge">GSS_IOV_BUFFER_TYPE_SIGN_ONLY</code> is not a flag attribute but an actual type. From testing it acts like the equivalent of <code class="language-plaintext highlighter-rouge">SECBUFFER_DATA | SECBUFFER_READONLY_WITH_CHECKSUM</code>. The <code class="language-plaintext highlighter-rouge">SECBUFFER_DATA | SECBUFFER_READONLY</code> combination does not have a direct equivalent in GSSAPI but by using <code class="language-plaintext highlighter-rouge">GSS_IOV_BUFFER_TYPE_EMPTY</code>, the wrapping function will effectively ignore those fields like SSPI does.</p>

<p>Putting this together these are the buffer used for an encryption step when <code class="language-plaintext highlighter-rouge">PFC_SUPPORT_HEADER_SIGN</code> is negotiated:</p>

<table>
  <thead>
    <tr>
      <th>Buffer Idx</th>
      <th>SSPI</th>
      <th>GSSAPI</th>
      <th>Data</th>
    </tr>
  </thead>
  <tbody>
    <tr>
      <td>1</td>
      <td>SECBUFFER_DATA | SECBUFFER_READONLY_WITH_CHECKSUM</td>
      <td>GSS_IOV_BUFFER_TYPE_SIGN_ONLY</td>
      <td>The PDU header up to the body</td>
    </tr>
    <tr>
      <td>2</td>
      <td>SECBUFFER_DATA</td>
      <td>GSS_IOV_BUFFER_TYPE_DATA</td>
      <td>The PDU body</td>
    </tr>
    <tr>
      <td>3</td>
      <td>SECBUFFER_DATA | SECBUFFER_READONLY_WITH_CHECKSUM</td>
      <td>GSS_IOV_BUFFER_TYPE_SIGN_ONLY</td>
      <td>The security trailer</td>
    </tr>
    <tr>
      <td>4</td>
      <td>SECBUFFER_TOKEN</td>
      <td>GSS_IOV_BUFFER_TYPE_HEADER</td>
      <td>Empty, signature will be allocated here</td>
    </tr>
  </tbody>
</table>

<p>These are the buffers used when <code class="language-plaintext highlighter-rouge">PFC_SUPPORT_HEADER_SIGN</code> was not negotiated:</p>

<table>
  <thead>
    <tr>
      <th>Buffer Idx</th>
      <th>SSPI</th>
      <th>GSSAPI</th>
      <th>Data</th>
    </tr>
  </thead>
  <tbody>
    <tr>
      <td>1</td>
      <td>SECBUFFER_DATA | SECBUFFER_READONLY</td>
      <td>GSS_IOV_BUFFER_TYPE_EMPTY</td>
      <td>The PDU header up to the body</td>
    </tr>
    <tr>
      <td>2</td>
      <td>SECBUFFER_DATA</td>
      <td>GSS_IOV_BUFFER_TYPE_DATA</td>
      <td>The PDU body</td>
    </tr>
    <tr>
      <td>3</td>
      <td>SECBUFFER_DATA | SECBUFFER_READONLY</td>
      <td>GSS_IOV_BUFFER_TYPE_EMPTY</td>
      <td>The security trailer</td>
    </tr>
    <tr>
      <td>4</td>
      <td>SECBUFFER_TOKEN</td>
      <td>GSS_IOV_BUFFER_TYPE_HEADER</td>
      <td>Empty, signature will be allocated here</td>
    </tr>
  </tbody>
</table>

<p>It is also possible to just not include buffer 1 and 3 for GSSAPI, but it is important to keep them present for NTLM support on SSPI as it uses those values to generate the signature.</p>

<p>The decryption process uses the identical buffers on the <a href="https://learn.microsoft.com/en-us/windows/win32/api/sspi/nf-sspi-decryptmessage">DecryptMessage</a> and <a href="https://web.mit.edu/kerberos/krb5-latest/doc/appdev/gssapi.html#iov-message-wrapping">gss_unwrap_iov</a> APIs. The only difference is that the final buffer will contain the signature from the response for it to validate.</p>

<p>This may not be correct for all authentication protocols available but this combination works for both Kerberos and NTLM.</p>

<p>There are more scenarios, like fragmentation and integrity only protection, I have not considered during my investigation so the details in this post may not be 100% correct. Hopefully it’s enough to help you on your RPC client implementation if you ever go down this deep and dark road. I was able to use this information and package it up into my Python authentication library <a href="https://github.com/jborean93/pyspnego">pyspnego</a>. The RPC/DCE components was just added with <a href="https://github.com/jborean93/pyspnego/pull/63">this PR</a> and should be available in the upcoming release.</p>]]></content><author><name>Jordan Borean</name></author><summary type="html"><![CDATA[Since of the release of Windows LAPS and the introduction of encrypted passwords I’ve been working towards a way of decrypting these payloads on non-Windows platforms. One of the key components of getting this working is to not only have a working RPC client but also support the RPC authentication level RPC_C_AUTHN_LEVEL_PKT_PRIVACY. I’ve worked with …]]></summary></entry><entry><title type="html">Kerberos Delegation</title><link href="https://bloggingforlogging.com/2021/11/03/kerberos-delegation/" rel="alternate" type="text/html" title="Kerberos Delegation" /><published>2021-11-03T06:52:37+00:00</published><updated>2021-11-03T06:52:37+00:00</updated><id>https://bloggingforlogging.com/2021/11/03/kerberos-delegation</id><content type="html" xml:base="https://bloggingforlogging.com/2021/11/03/kerberos-delegation/"><![CDATA[<p>When authenticating against a server across the network a common problem that people encounter is the inability to access downstream servers like a file share. This is because the network session that is running the code does not have access to the account’s secret to regenerate the network tokens required to access that downstream server. This is commonly known as the double-hop problem in WinRM and is common enough to warrant <a href="https://docs.microsoft.com/en-us/powershell/scripting/learn/remoting/ps-remoting-second-hop?view=powershell-7.1#resource-based-kerberos-constrained-delegation">its own docs</a> to demonstrate the problem and mention workarounds. Some of those workarounds are:</p>

<ul>
  <li>Use CredSSP authentication</li>
  <li>Use Kerberos delegation</li>
  <li>Set up a Just Enough Administration (JEA) endpoint that runs as a domain account</li>
  <li>Pass through the username/password on commands that attempt to replicate how thing would run locally</li>
</ul>

<p>The Kerberos delegation workaround comes in 3 flavours:</p>

<ul>
  <li>Resource-based Constrained</li>
  <li>Constrained</li>
  <li>Unconstrained</li>
</ul>

<p>This doc will explain these 3 types and how to set them up. It will also cover how these can be used from Ansible when using the <a href="https://docs.ansible.com/ansible/latest/collections/ansible/builtin/psrp_connection.html">psrp</a> connection plugin.</p>

<p>The following principals will be referenced in this doc to illustrate the delegation scenarios:</p>

<ul>
  <li>Client <code class="language-plaintext highlighter-rouge">user@DOMAIN.COM</code></li>
  <li>WinRM server <code class="language-plaintext highlighter-rouge">ServerA</code></li>
  <li>SMB server <code class="language-plaintext highlighter-rouge">ServerB</code></li>
</ul>

<p>In this scenario a user <code class="language-plaintext highlighter-rouge">user@DOMAIN.COM</code> will be connecting to <code class="language-plaintext highlighter-rouge">ServerA</code> using WinRM PSRemoting trying to access files in <code class="language-plaintext highlighter-rouge">ServerB</code>. In a PowerShell script this will look like:</p>

<div class="language-powershell highlighter-rouge"><div class="highlight"><pre class="highlight"><code><span class="nv">$cred</span><span class="w"> </span><span class="o">=</span><span class="w"> </span><span class="n">Get-Credential</span><span class="w"> </span><span class="nx">user</span><span class="err">@</span><span class="nx">DOMAIN.COM</span><span class="w">
</span><span class="n">Invoke-Command</span><span class="w"> </span><span class="nx">ServerA</span><span class="w"> </span><span class="nt">-ScriptBlock</span><span class="w"> </span><span class="p">{</span><span class="w">
    </span><span class="n">Get-ChildItem</span><span class="w"> </span><span class="nt">-Path</span><span class="w"> </span><span class="nx">\\ServerB\share\folder</span><span class="w">
</span><span class="p">}</span><span class="w"> </span><span class="nt">-Credential</span><span class="w"> </span><span class="nv">$cred</span><span class="w">
</span></code></pre></div></div>

<p>In a normal environment <code class="language-plaintext highlighter-rouge">user@DOMAIN.COM</code> will be able to connect to <code class="language-plaintext highlighter-rouge">ServerA</code> using Kerberos but due to the double-hop problem it is unable to then access the fileshare on <code class="language-plaintext highlighter-rouge">ServerB</code>. Running that command without any delegation set up will result in the following error:</p>

<div class="language-powershell highlighter-rouge"><div class="highlight"><pre class="highlight"><code><span class="n">Access</span><span class="w"> </span><span class="nx">is</span><span class="w"> </span><span class="nx">denied</span><span class="w">
</span><span class="o">+</span><span class="w"> </span><span class="n">CategoryInfo</span><span class="w"> </span><span class="p">:</span><span class="w"> </span><span class="nx">PermissionDenied:</span><span class="w"> </span><span class="p">(</span><span class="n">\\ServerB\share\folder:String</span><span class="p">)</span><span class="w"> </span><span class="p">[</span><span class="n">Get</span><span class="nt">-ChildItem</span><span class="p">],</span><span class="w"> </span><span class="n">UnauthorizedAccessException</span><span class="w">
</span><span class="o">+</span><span class="w"> </span><span class="nx">FullyQualifiedErrorId</span><span class="w"> </span><span class="p">:</span><span class="w"> </span><span class="nx">ItemExistsUnauthorizedAccessError</span><span class="p">,</span><span class="nx">Microsoft.PowerShell.Commands.GetChildItemCommand</span><span class="w">
</span><span class="o">+</span><span class="w"> </span><span class="n">PSComputerName</span><span class="w"> </span><span class="p">:</span><span class="w"> </span><span class="nx">ServerA</span><span class="w">

</span><span class="n">Cannot</span><span class="w"> </span><span class="nx">find</span><span class="w"> </span><span class="nx">path</span><span class="w"> </span><span class="s1">'\\ServerB\share\folder'</span><span class="w"> </span><span class="nx">because</span><span class="w"> </span><span class="nx">it</span><span class="w"> </span><span class="nx">does</span><span class="w"> </span><span class="nx">not</span><span class="w"> </span><span class="nx">exist.</span><span class="w">
</span><span class="o">+</span><span class="w"> </span><span class="n">CategoryInfo</span><span class="w"> </span><span class="p">:</span><span class="w"> </span><span class="nx">ObjectNotFound:</span><span class="w"> </span><span class="p">(</span><span class="n">\\ServerB\share\folder:String</span><span class="p">)</span><span class="w"> </span><span class="p">[</span><span class="n">Get</span><span class="nt">-ChildItem</span><span class="p">],</span><span class="w"> </span><span class="n">ItemNotFoundE</span><span class="w">
</span><span class="nx">xception</span><span class="w">
</span><span class="o">+</span><span class="w"> </span><span class="n">FullyQualifiedErrorId</span><span class="w"> </span><span class="p">:</span><span class="w"> </span><span class="nx">PathNotFound</span><span class="p">,</span><span class="nx">Microsoft.PowerShell.Commands.GetChildItemCommand</span><span class="w">
</span><span class="o">+</span><span class="w"> </span><span class="n">PSComputerName</span><span class="w"> </span><span class="p">:</span><span class="w"> </span><span class="nx">ServerA</span><span class="w">
</span></code></pre></div></div>

<p>One important note before going into the delegation types are that any account marked as <code class="language-plaintext highlighter-rouge">Account is sensitive and cannot be delegated</code> cannot use any of these delegation scenarios. Windows AD will not permit a service to delegate these accounts so this is an important option to set for highly privileged accounts like <code class="language-plaintext highlighter-rouge">Domain Admins</code>.</p>

<h1 id="resource-based-constrained-delegation">Resource-based Constrained Delegation</h1>

<p>Resource-based constrained delegation was introduced with Server 2012 as a way for the target service to specify what principals can delegate to. This is in contrast with the original constrained delegation method mentioned below where AD designates what target principals a service can delegate to. In a practical sense it means that <code class="language-plaintext highlighter-rouge">ServerB</code> specifies that <code class="language-plaintext highlighter-rouge">ServerA</code> can delegate a Kerberos credential to it. Even more importantly it does not require sensitive rights in the domain to set up the trusted source principals allowing the service itself to configure itself.</p>

<p>To set this up for the scenario mentioned above run the following in PowerShell:</p>

<div class="language-powershell highlighter-rouge"><div class="highlight"><pre class="highlight"><code><span class="c"># This is the host Kerberos authenticates with first</span><span class="w">
</span><span class="c"># I.e. the host that is allowed to delegate to the target</span><span class="w">
</span><span class="nv">$host1</span><span class="w"> </span><span class="o">=</span><span class="w"> </span><span class="n">Get-ADComputer</span><span class="w"> </span><span class="nt">-Identity</span><span class="w"> </span><span class="nx">ServerA</span><span class="w">

</span><span class="c"># This is the host where the delegation is configured</span><span class="w">
</span><span class="c"># I.e. the host the double-hop scenario is trying to connect to</span><span class="w">
</span><span class="nv">$host2</span><span class="w"> </span><span class="o">=</span><span class="w"> </span><span class="n">Get-ADComputer</span><span class="w"> </span><span class="nt">-Identity</span><span class="w"> </span><span class="nx">ServerB</span><span class="w">

</span><span class="c"># Grant the delegation on the AD Object.</span><span class="w">
</span><span class="n">Set-ADComputer</span><span class="w"> </span><span class="nv">$host2</span><span class="w"> </span><span class="nt">-PrincipalsAllowedToDelegateToAccount</span><span class="w"> </span><span class="nv">$host1</span><span class="w">
</span></code></pre></div></div>

<p>Internally these details are stored on the <code class="language-plaintext highlighter-rouge">msDS-AllowedToActOnBehalfOfOtherIdentity</code> attribute as a security descriptor. The Attribute Editor in <code class="language-plaintext highlighter-rouge">dsa.msc</code> can show the raw value but it’s easier to see existing allowed principals with:</p>

<div class="language-powershell highlighter-rouge"><div class="highlight"><pre class="highlight"><code><span class="nv">$property</span><span class="w"> </span><span class="o">=</span><span class="w"> </span><span class="s1">'msDS-AllowedToActOnBehalfOfOtherIdentity'</span><span class="w">
</span><span class="p">(</span><span class="n">Get-ADComputer</span><span class="w"> </span><span class="nt">-Identity</span><span class="w"> </span><span class="nx">ServerB</span><span class="w"> </span><span class="nt">-Properties</span><span class="w"> </span><span class="nv">$property</span><span class="w"> </span><span class="o">|</span><span class="w">
    </span><span class="n">Select-Object</span><span class="w"> </span><span class="nt">-ExpandProperty</span><span class="w"> </span><span class="nv">$property</span><span class="w">
</span><span class="p">)</span><span class="o">.</span><span class="nf">Access</span><span class="w">

</span><span class="c"># ActiveDirectoryRights : GenericAll</span><span class="w">
</span><span class="c"># InheritanceType : None</span><span class="w">
</span><span class="c"># ObjectType : 00000000-0000-0000-0000-000000000000</span><span class="w">
</span><span class="c"># InheritedObjectType : 00000000-0000-0000-0000-000000000000</span><span class="w">
</span><span class="c"># ObjectFlags : None</span><span class="w">
</span><span class="c"># AccessControlType : Allow</span><span class="w">
</span><span class="c"># IdentityReference : DOMAIN\SERVERA$</span><span class="w">
</span><span class="c"># IsInherited : False</span><span class="w">
</span><span class="c"># InheritanceFlags : None</span><span class="w">
</span><span class="c"># PropagationFlags : None</span><span class="w">
</span></code></pre></div></div>

<p>In this scenario both the initial host and final destination host are running as the computer account in AD so <code class="language-plaintext highlighter-rouge">Get-ADComputer</code> is used. If accessing a service that is running under a separate domain account then the cmdlet <code class="language-plaintext highlighter-rouge">Get-ADUser</code> and <code class="language-plaintext highlighter-rouge">Set-ADUser</code> should be used instead. The value of <code class="language-plaintext highlighter-rouge">-PrincipalsAllowedToDelegateToAccount</code> accepts either <code class="language-plaintext highlighter-rouge">$null</code> to remove all existing principals or a list of accounts. This list will replace any existing value so make sure to retrieve the existing principals before adding new ones. There are more example of this which can be found <a href="https://docs.microsoft.com/en-us/powershell/scripting/learn/remoting/ps-remoting-second-hop?view=powershell-7.1#example">here</a>.</p>

<p>Once this has been set the Kerberos cache the front facing host should be reset. This will happen naturally after around 15 minutes but it can be forced with a reboot or by using <code class="language-plaintext highlighter-rouge">klist.exe</code>. In this scenario the following should be run on <code class="language-plaintext highlighter-rouge">ServerA</code> to reset it’s cache <code class="language-plaintext highlighter-rouge">klist purge -li 0x3e7</code>.</p>

<p>From there things should just work without any further configuration on the client:</p>

<div class="language-powershell highlighter-rouge"><div class="highlight"><pre class="highlight"><code><span class="nv">$cred</span><span class="w"> </span><span class="o">=</span><span class="w"> </span><span class="n">Get-Credential</span><span class="w"> </span><span class="nx">user</span><span class="err">@</span><span class="nx">DOMAIN.COM</span><span class="w">
</span><span class="n">Invoke-Command</span><span class="w"> </span><span class="nx">ServerA</span><span class="w"> </span><span class="nt">-ScriptBlock</span><span class="w"> </span><span class="p">{</span><span class="w">
    </span><span class="n">Get-ChildItem</span><span class="w"> </span><span class="nt">-Path</span><span class="w"> </span><span class="nx">\\ServerB\share\folder</span><span class="w">
</span><span class="p">}</span><span class="w"> </span><span class="nt">-Credential</span><span class="w"> </span><span class="nv">$cred</span><span class="w">

</span><span class="c"># Directory: \\ServerB\share\folder</span><span class="w">
</span><span class="c">#</span><span class="w">
</span><span class="c"># Mode LastWriteTime Length Name PSComputerName</span><span class="w">
</span><span class="c"># ---- ------------- ------ ---- --------------</span><span class="w">
</span><span class="c"># -a---- 11/3/2021 11:16 AM 0 file.txt ServerB</span><span class="w">
</span></code></pre></div></div>

<p>The same applies to Ansible, there’s no extra setting that needs to be set, just authenticate with Kerberos and things will work. Resource-based constrained delegation will even work when the client authenticated with another protocol, like NTLM. This means the initial WinRM connection could have been completed with NTLM and the remote session is able to use the delegated context to authenticate to <code class="language-plaintext highlighter-rouge">ServerB</code>.</p>

<p>Because the server added to <code class="language-plaintext highlighter-rouge">PrincipalsAllowedToDelegateToAccount</code> is allowed to delegate any account this can be a very powerful attack vector. It means that if anything compromised <code class="language-plaintext highlighter-rouge">ServerA</code> it is allowed to present to be any domain account when it talks to <code class="language-plaintext highlighter-rouge">ServerB</code>. The exception to this rule are accounts that are marked as <code class="language-plaintext highlighter-rouge">sensitive and account be delegated</code> as they do not allow themselves to be delegated at all.</p>

<h1 id="constrained-delegation">Constrained Delegation</h1>

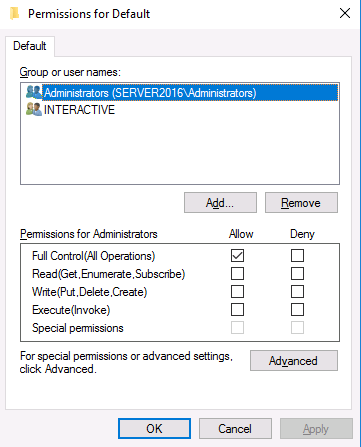
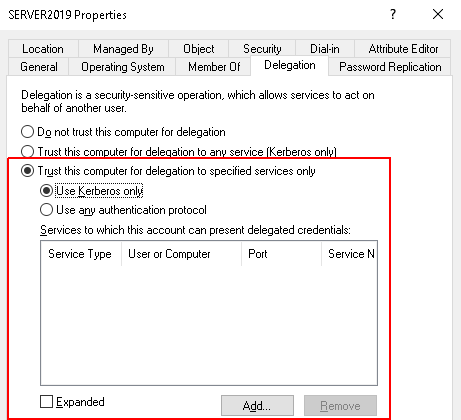
<p>Constrained delegation was introduced with Server 2003 and it is used to specify what services a service can delegate credentials to. This is the opposite of resource-based delegation which is where the target host specifies who can delegate to it. In the active directory editor constrained delegation is configured with the <code class="language-plaintext highlighter-rouge">Trust this computer for delegation to specified services only</code> option on the host you are delegating from.</p>

<p><a href="/assets/images/2021/11/kerberos_constrained.png"><img src="/assets/images/2021/11/kerberos_constrained.png" alt="" /></a></p>

<p>In this panel there are 2 options to further control when delegation can occur</p>

<ul>
  <li><code class="language-plaintext highlighter-rouge">Use Kerberos only</code> – do not allow protocol transition</li>
  <li><code class="language-plaintext highlighter-rouge">Use any authentication protocol</code> – allows protocol transition</li>
</ul>

<p>Protocol transition in this case allows clients to authenticate with any protocol and have the service delegate those credentials to the subsequent host. For example allowing any authentication protocol will allow a client to authenticate using NTLM and the service will then retrieve the Kerberos ticket itself for further delegation. By disabling protocol transition only clients that have authenticated with Kerberos initially will be delegated to the hosts specified.</p>

<p>Theoretically this means that <code class="language-plaintext highlighter-rouge">Use Kerberos only</code> should work with WinRM when using Kerberos but that does not seem to be the case. This requires further investigation but I’ve only ever been able to get this to work with the <code class="language-plaintext highlighter-rouge">Use any authentication protocol</code> option being set. At a guess WinRM is set up in a way that requires protocol transition for using delegation like this.</p>

<p>The values added correlate to the Service Principal Name (SPN) of the hosts that can be delegated to. In the example above, accessing the file share over SMB will use the SPN <code class="language-plaintext highlighter-rouge">cifs/ServerB</code> so that is what is added to the <code class="language-plaintext highlighter-rouge">ServerA</code> computer account in Active Directory. The service portion (<code class="language-plaintext highlighter-rouge">cifs</code>) is highly dependent on the desired delegation target and what SPN that host is registered to.</p>

<p>The settings for constrained delegation are stored in 2 attributes in AD:</p>

<ul>
  <li><code class="language-plaintext highlighter-rouge">userAccountControl</code></li>
  <li>Bitmask field that contains multiple settings</li>
  <li><code class="language-plaintext highlighter-rouge">UF_TRUSTED_TO_AUTHENTICATE_FOR_DELEGATION 0x1000000</code> is set when `Use any authentication protocol is set</li>
  <li><code class="language-plaintext highlighter-rouge">msDS-AllowedToDelegateTo</code></li>
  <li>List of SPNs that the account is allowed to delegate to</li>
  <li>The SPN is in the form <code class="language-plaintext highlighter-rouge">service/hostname</code> and typically contains an entry for both the netbios and DNS name</li>
  <li>If the attribute is not set then constrained delegation is not enabled</li>
</ul>

<p>To allow <code class="language-plaintext highlighter-rouge">ServerA</code> to delegate to <code class="language-plaintext highlighter-rouge">ServerB</code> for SMB using any authentication protocol the following PowerShell script can be used:</p>

<div class="language-powershell highlighter-rouge"><div class="highlight"><pre class="highlight"><code><span class="nv">$spnListProp</span><span class="w"> </span><span class="o">=</span><span class="w"> </span><span class="s1">'msDS-AllowedToDelegateTo'</span><span class="w">

</span><span class="c"># This is the initial host the client connects to</span><span class="w">
</span><span class="nv">$host1</span><span class="w"> </span><span class="o">=</span><span class="w"> </span><span class="n">Get-ADComputer</span><span class="w"> </span><span class="nt">-Identity</span><span class="w"> </span><span class="nx">ServerA</span><span class="w"> </span><span class="nt">-Properties</span><span class="w"> </span><span class="nv">$spnListProp</span><span class="w">

</span><span class="c"># Adds the services ServerA is allowed to delegate to</span><span class="w">
</span><span class="n">Set-ADComputer</span><span class="w"> </span><span class="nv">$host1</span><span class="w"> </span><span class="nt">-Add</span><span class="w"> </span><span class="p">@{</span><span class="w">
    </span><span class="s2">"</span><span class="nv">$spnListProp</span><span class="s2">"</span><span class="w"> </span><span class="o">=</span><span class="w"> </span><span class="p">@(</span><span class="s1">'cifs/ServerB'</span><span class="p">,</span><span class="w"> </span><span class="s1">'cifs/ServerB.domain.com'</span><span class="p">)</span><span class="w">
</span><span class="p">}</span><span class="w">

</span><span class="c"># Enabled protocol transition on the constrained delegation settings</span><span class="w">
</span><span class="nv">$adControlParams</span><span class="w"> </span><span class="o">=</span><span class="w"> </span><span class="p">@{</span><span class="w">
    </span><span class="c"># Sets the "Use any authentication protocol"</span><span class="w">
    </span><span class="nx">TrustedToAuthForDelegation</span><span class="w"> </span><span class="o">=</span><span class="w"> </span><span class="bp">$true</span><span class="w">

    </span><span class="c"># Ensure unconstrained delegation is not enabled - will override the</span><span class="w">
    </span><span class="c"># constrained settings</span><span class="w">
    </span><span class="nx">TrustedForDelegation</span><span class="w"> </span><span class="o">=</span><span class="w"> </span><span class="bp">$false</span><span class="w">
</span><span class="p">}</span><span class="w">
</span><span class="n">Set-ADAccountControl</span><span class="w"> </span><span class="nv">$host1</span><span class="w"> </span><span class="err">@</span><span class="nx">adControlParams</span><span class="w">
</span></code></pre></div></div>

<p>Like with resource-based constrained delegation once the settings have been applied the initial service principal needs to update it’s cache. This can be done by waiting for 15 minutes, rebooting the host, or running <code class="language-plaintext highlighter-rouge">klist purge -li 0x3e7</code>.</p>

<p>Once the changes have propagated the command is not able to succeed:</p>

<div class="language-powershell highlighter-rouge"><div class="highlight"><pre class="highlight"><code><span class="nv">$cred</span><span class="w"> </span><span class="o">=</span><span class="w"> </span><span class="n">Get-Credential</span><span class="w"> </span><span class="nx">user</span><span class="err">@</span><span class="nx">DOMAIN.COM</span><span class="w">
</span><span class="n">Invoke-Command</span><span class="w"> </span><span class="nx">ServerA</span><span class="w"> </span><span class="nt">-ScriptBlock</span><span class="w"> </span><span class="p">{</span><span class="w">
    </span><span class="n">Get-ChildItem</span><span class="w"> </span><span class="nt">-Path</span><span class="w"> </span><span class="nx">\\ServerB\share\folder</span><span class="w">
</span><span class="p">}</span><span class="w"> </span><span class="nt">-Credential</span><span class="w"> </span><span class="nv">$cred</span><span class="w">

</span><span class="c"># Directory: \\ServerB\share\folder</span><span class="w">
</span><span class="c">#</span><span class="w">
</span><span class="c"># Mode LastWriteTime Length Name PSComputerName</span><span class="w">
</span><span class="c"># ---- ------------- ------ ---- --------------</span><span class="w">
</span><span class="c"># -a---- 11/3/2021 11:16 AM 0 file.txt ServerB</span><span class="w">
</span></code></pre></div></div>

<p>Like with resource-based constrained delegation there are no client settings that need to be configured. This means that Ansible is able to automatically delegate its credentials without further changes needed on its end. Because the <code class="language-plaintext highlighter-rouge">Use any authentication protocol</code> seems to be required for WinRM the client can authenticate using another protocol, like NTLM, and still be able to delegate to the next host.</p>

<p>This type of constrained delegation can be dangerous as it allows the host with the delegation settings to authenticate as any user (except the sensitive marked accounts) to the SPNs specified. This means if <code class="language-plaintext highlighter-rouge">ServerA</code> was compromised it will be able to present to be any user using SMB authentication on the host specified. Using the SMB example a compromised host will be able to use a PSExec style method to run a process as any domain computer on the delegated hosts specified. If allowing delegation to an <code class="language-plaintext highlighter-rouge">LDAP</code> SPN then the compromised host is able to do a DC sync and retrieve further credentials from there.</p>

<h1 id="unconstrained-delegation">Unconstrained Delegation</h1>

<p>Unconstrained delegation is the last type of Kerberos delegation that can be used. This type of delegation will allow the host to use the same Kerberos Ticket Granting Ticket (TGT) to re-authenticate itself against any subsequent hosts. Because it involves forwarding the Kerberos TGT from the client to the server it can only work when the client authenticates itself with Kerberos in the first place.</p>

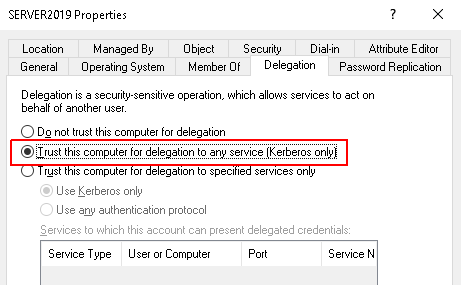
<p>In the active directory editor constrained delegation is configured with the <code class="language-plaintext highlighter-rouge">Trust this computer for delegation to any service (Kerberos only)</code> option on the host you are delegating from.</p>

<p><a href="/assets/images/2021/11/kerberos_unconstrained.png"><img src="/assets/images/2021/11/kerberos_unconstrained.png" alt="" /></a></p>

<p>This option is stored under the <code class="language-plaintext highlighter-rouge">userAccountControl</code> property under the bit mask <code class="language-plaintext highlighter-rouge">UF_TRUSTED_FOR_DELEGATION 0x80000</code>.<br />
Setting this in PowerShell is done like so:</p>

<div class="language-powershell highlighter-rouge"><div class="highlight"><pre class="highlight"><code><span class="nv">$host1</span><span class="w"> </span><span class="o">=</span><span class="w"> </span><span class="n">Get-ADComputer</span><span class="w"> </span><span class="nt">-Identity</span><span class="w"> </span><span class="nx">ServerA</span><span class="w"> </span><span class="nt">-Properties</span><span class="w"> </span><span class="nv">$spnListProp</span><span class="w">

</span><span class="c"># Clear constrained delegation rules if any are set</span><span class="w">
</span><span class="n">Set-ADComputer</span><span class="w"> </span><span class="nv">$host1</span><span class="w"> </span><span class="nt">-Clear</span><span class="w"> </span><span class="s1">'msDS-AllowedToDelegateTo'</span><span class="w">

</span><span class="c"># Enable unconstrained delegation</span><span class="w">
</span><span class="n">Set-ADAccountControl</span><span class="w"> </span><span class="nt">-Identity</span><span class="w"> </span><span class="nv">$host1</span><span class="w"> </span><span class="nt">-TrustedForDelegation</span><span class="w"> </span><span class="bp">$true</span><span class="w">
</span></code></pre></div></div>

<p>Once the settings have been enabled, the cache of the initial service principal needs to be cleared. The client’s cache should also be cleared with <code class="language-plaintext highlighter-rouge">klist purge</code> on Windows or <code class="language-plaintext highlighter-rouge">kdestroy</code> on Linux. This is because unconstrained delegation changes the service ticket the client sends to the service and it cannot use whatever was cached beforehand.<br />
Once cleared the PowerShell command will work just like the other scenarios.</p>

<div class="language-powershell highlighter-rouge"><div class="highlight"><pre class="highlight"><code><span class="nv">$cred</span><span class="w"> </span><span class="o">=</span><span class="w"> </span><span class="n">Get-Credential</span><span class="w"> </span><span class="nx">user</span><span class="err">@</span><span class="nx">DOMAIN.COM</span><span class="w">
</span><span class="n">Invoke-Command</span><span class="w"> </span><span class="nx">ServerA</span><span class="w"> </span><span class="nt">-ScriptBlock</span><span class="w"> </span><span class="p">{</span><span class="w">
    </span><span class="n">Get-ChildItem</span><span class="w"> </span><span class="nt">-Path</span><span class="w"> </span><span class="nx">\\ServerB\share\folder</span><span class="w">
</span><span class="p">}</span><span class="w"> </span><span class="nt">-Credential</span><span class="w"> </span><span class="nv">$cred</span><span class="w">

</span><span class="c"># Directory: \\ServerB\share\folder</span><span class="w">
</span><span class="c">#</span><span class="w">
</span><span class="c"># Mode LastWriteTime Length Name PSComputerName</span><span class="w">
</span><span class="c"># ---- ------------- ------ ---- --------------</span><span class="w">
</span><span class="c"># -a---- 11/3/2021 11:16 AM 0 file.txt ServerB</span><span class="w">
</span></code></pre></div></div>

<p>Getting this to work from Ansible requires 2 things:</p>

<ul>
  <li>The TGT must be marked as forwardable</li>
  <li>The variable <code class="language-plaintext highlighter-rouge">ansible_psrp_negotiate_delegate</code> to be <code class="language-plaintext highlighter-rouge">True</code></li>
</ul>

<p>When using Ansible to get the TGT (explicit credentials defined) then the TGT will always be requested as forwardable. If calling <code class="language-plaintext highlighter-rouge">kinit</code> manually to get the TGT then either <code class="language-plaintext highlighter-rouge">-f</code> must be used or <code class="language-plaintext highlighter-rouge">forwardable = true</code> is set in <code class="language-plaintext highlighter-rouge">/etc/krb5.conf</code> under <code class="language-plaintext highlighter-rouge">[libdefault]</code>.</p>

<p>Once both conditions are met then Ansible will be able to utilise unconstrained delegation. One important note to call out is that the AD account does not need to be marked as <code class="language-plaintext highlighter-rouge">Trusted for delegation</code> for Ansible to utilise unconstrained delegation. Even if the AD computer account of the initial target (<code class="language-plaintext highlighter-rouge">ServerA</code>) is not trusted for delegation or has enabled any other delegation types Ansible will still send the TGT to the server for unconstrained delegation if it’s requested by Ansible.</p>

<p>The reason for this is that Ansible uses GSSAPI and <code class="language-plaintext highlighter-rouge">ansible_psrp_negotiate_delegate=True</code> will ensure the <code class="language-plaintext highlighter-rouge">GSS_C_DELEG_FLAG</code> is set when exchanging the Kerberos tokens. Due to historical behaviour <code class="language-plaintext highlighter-rouge">GSS_C_DELEG_FLAG</code> will ignore the delegation settings in the AD computer account of the service. There does exist <code class="language-plaintext highlighter-rouge">GSS_C_DELEG_POLICY_FLAG</code> which acts like <code class="language-plaintext highlighter-rouge">GSS_C_DELEG_FLAG</code> but honours the delegate policy set in AD but the libraries that Ansible uses do not expose this option. The only way to have Ansible honour the AD side policy is to set the following in the <code class="language-plaintext highlighter-rouge">/etc/krb5.conf</code> file:</p>

<div class="language-ini highlighter-rouge"><div class="highlight"><pre class="highlight"><code><span class="nn">[libdefault]</span>
  <span class="py">enforce_ok_as_delegate</span> <span class="p">=</span> <span class="s">true</span>
</code></pre></div></div>

<p>This is a relatively recent option added in <code class="language-plaintext highlighter-rouge">1.18</code> of MIT Kerberos and what it does is treats <code class="language-plaintext highlighter-rouge">GSS_C_DELEG_FLAG</code> as <code class="language-plaintext highlighter-rouge">GSS_C_DELEG_POLICY_FLAG</code>. Heimdal implementations of GSSAPI have also added this setting but at present there is no released version that includes this option.</p>

<p>With unconstrained delegation, the server principal is able to use the forwarded TGT to authenticate with any service downstream which is very similar to how <code class="language-plaintext highlighter-rouge">CredSSP</code> works. It is generally recommended to not use unconstrained delegation as if the target host is compromised it is able to pretend to be the client when connecting to any other host.</p>

<h1 id="security-risks">Security Risks</h1>

<p>While briefly mentioned in each section delegation does have it’s own security risks. Any highly privileged account should have the <code class="language-plaintext highlighter-rouge">Account is sensitive and cannot be delegated</code> option set as these can never be delegated. Some key security risks of each delegation type are:</p>

<h2 id="unconstrained">Unconstrained</h2>

<ul>
  <li>A compromised service principal can use the credentials of any user that has connected to it</li>
  <li>There are no limitations with what it can re-authenticate with</li>
  <li>For computer accounts this means any local admin can impersonate a non-sensitive account that has authenticated with it</li>
  <li>Because of this risk unconstrained delegation should generally be avoided</li>
</ul>

<h2 id="constrained--use-any-authentication-protocol">Constrained – Use any authentication protocol</h2>

<ul>
  <li>A compromised service principal can use the credentials of any domain user</li>
  <li>The user doesn’t even need to have authenticated with the host</li>
  <li>The amount of damage that can be done dependends on the SPNs allowed for delegation</li>
  <li><code class="language-plaintext highlighter-rouge">cifs</code> can be used for SMB and can access files and even start processes on hosts</li>
  <li><code class="language-plaintext highlighter-rouge">host</code> essentially full control of the host in question</li>
  <li><code class="language-plaintext highlighter-rouge">ldap</code> can be used to sync a DC and retrieve sensitive information</li>
  <li><code class="language-plaintext highlighter-rouge">MSSQL</code> authenticate with an MS SQL database</li>
</ul>

<h2 id="constrained--use-kerberos-only">Constrained – Use Kerberos only</h2>

<ul>
  <li>Same considerations as the above but,</li>
  <li>Instead of allowing it to delegate any domain account without authentication the account must first authenticate using Kerberos</li>
</ul>

<h2 id="resource-based-constrained">Resource-based Constrained</h2>

<ul>
  <li>Users with write access to the <code class="language-plaintext highlighter-rouge">msDS-AllowedToActOnBehalfOfOtherIdentity</code> on a service principal can connect to that host as any user</li>
  <li>This allows malicious actors to become any domain account when authenticating against the compromised host</li>
  <li>Further damage is dependent on what the target service principal can do</li>
  <li>This attribute is not as locked down as <code class="language-plaintext highlighter-rouge">msDS-AllowedToDelegateTo</code> which could lead to easier infiltration methods</li>
  <li>One method, known as <code class="language-plaintext highlighter-rouge">Wagging the dog</code> is one to watch out for</li>
</ul>

<p>A final note, I am not a security expert in these matters so please do your own research before trying one of these delegation models. There are numerous guides that go into a lot of detail around delegation and cover possible exploits as well as mitigations to use.</p>]]></content><author><name>Jordan Borean</name></author><category term="ansible" /><category term="windows" /><category term="winrm" /><summary type="html"><![CDATA[When authenticating against a server across the network a common problem that people encounter is the inability to access downstream servers like a file share. This is because the network session that is running the code does not have access to the account’s secret to regenerate the network tokens required to access that downstream server. …]]></summary></entry><entry><title type="html">Wacky WSMan on Linux</title><link href="https://bloggingforlogging.com/2020/08/21/wacky-wsman-on-linux/" rel="alternate" type="text/html" title="Wacky WSMan on Linux" /><published>2020-08-21T00:50:07+00:00</published><updated>2020-08-21T00:50:07+00:00</updated><id>https://bloggingforlogging.com/2020/08/21/wacky-wsman-on-linux</id><content type="html" xml:base="https://bloggingforlogging.com/2020/08/21/wacky-wsman-on-linux/"><![CDATA[<p>A few years ago I jumped from doing all my dev work on Windows to Linux. This migration has had a few challenges but one of the things I struggled with initially was the lack of native tooling that can be used to easily and seamlessly interact with other Microsoft products. I’ve typically found some great open source products that fill in that gap quite nicely, but one area that has always felt a bit lacking was support for PSRemoting. There are some fantastic WSMan/WinRM client libraries out there which are pretty close to feature parity with WSMan on Windows but typically lack 2 main features, being interactive and directly integrated in PowerShell.</p>

<p>I thought that with Microsoft joining the fray and creating an open source and cross platform release of PowerShell that this gap would be filled nicely. My main desire was being able to do <code class="language-plaintext highlighter-rouge">Enter-PSSession</code> to target some of my dev Windows boxes just like I could do from a Windows workstation. Much to my disappointment, this has not lived up to my expectations. In this post, I will talk about my journey in trying to get WSMan as a client working on PowerShell from a Linux host, and what I’ve learnt along the way.</p>

<h1 id="current-landscape">Current Landscape</h1>

<p>PowerShell Remoting (PSRemoting) is a protocol that PowerShell uses to execute PowerShell on another PowerShell instance. This can be another PowerShell process on the same host, or even another host altogether. PSRemoting works by encapsulating .NET objects, serialised in CLIXML, inside another remoting protocol like WSMan or SSH. If you are interested in learning more about PSRemoting, my <a href="/2018/08/14/powershell-remoting-on-python/">PowerShell Remoting on Python</a> post goes into more detail.</p>

<p>Historically WSMan was the sole transport option due to it being the de facto protocol used by Windows for remote management. Over time more protocols have been added, like SSH, to take advantage of PowerShell’s move to open source and the new target audience that comes with that. Ultimately I feel like SSH is the superior transport option over WSMan but there are a few times where WSMan is still needed like:</p>

<ul>
  <li>Targeting Windows hosts
    <ul>
      <li>WSMan works out of the box</li>
      <li>SSH requires the SSH server and PowerShell 6+ to be installed</li>
    </ul>
  </li>
  <li>The Win32-OpenSSH fork that comes with Windows does not support Kerberos authentication
    <ul>
      <li>With Kerberos authentication you can easily solve the double hop limitation without sending your actual password across the wire</li>
      <li>A newer release will add support for this, negating this requirement somewhat</li>
    </ul>
  </li>
  <li>Just Enough Administration (JEA) only works on WSMan
    <ul>
      <li>There is talk about adding support for JEA on SSH but nothing it out as of yet</li>
    </ul>
  </li>
  <li>Exchange Online and Exchange on premise only work with WSMan, no SSH at all</li>
</ul>

<p>This wouldn’t be too much of an issue if the WSMan client that ships with PowerShell on Linux and macOS wasn’t so horribly broken and outdated. After quickly browsing the PowerShell repo for issues related to WSMan on Linux and macOS, a common pattern emerges:</p>

<ul>
  <li><a href="https://github.com/PowerShell/PowerShell/issues/4952">#4952</a> – general issues</li>
  <li><a href="https://github.com/PowerShell/PowerShell/issues/5561">#5561</a> – old linked OpenSSL library on macOS</li>
  <li><a href="https://github.com/PowerShell/PowerShell/issues/5634">#5634</a> – old linked OpenSSL library on macOS</li>
  <li><a href="https://github.com/PowerShell/PowerShell/issues/5686">#5686</a> – GSSAPI issues</li>
  <li><a href="https://github.com/PowerShell/PowerShell/issues/5970">#5970</a> – old linked OpenSSL library on macOS</li>
  <li><a href="https://github.com/PowerShell/PowerShell/issues/6173">#6173</a> – Decryption failure when targeting an on-prem Exchange target</li>
  <li><a href="https://github.com/PowerShell/PowerShell/issues/6647">#6647</a> – trouble getting GSSAPI auth working</li>
  <li><a href="https://github.com/PowerShell/PowerShell/issues/7342">#7342</a> – fails in Docker image due to incorrect getaddrinfo() usage</li>
  <li><a href="https://github.com/PowerShell/PowerShell/issues/7425">#7425</a> – no GSSAPI support on macOS</li>
  <li><a href="https://github.com/PowerShell/PowerShell/issues/7896">#7896</a> – segfault on macOS due to GSSAPI code</li>
  <li><a href="https://github.com/PowerShell/PowerShell/issues/10225">#10225</a> – library unavailable on Alpine</li>
  <li><a href="https://github.com/PowerShell/PowerShell/issues/10600">#10600</a> – old linked OpenSSL library on macOS</li>
  <li><a href="https://github.com/PowerShell/PowerShell/issues/11216">#11216</a> – old linked OpenSSL library on macOS</li>
  <li><a href="https://github.com/PowerShell/PowerShell/issues/12219">#12219</a> – general issues</li>
</ul>

<p>Adding more salt to the wound is the PowerShell team’s stance of WSMan in PowerShell is that it is deprecated and there are no plans on trying to fix any of the existing bugs that people are encountering. There is an <a href="https://github.com/MicrosoftDocs/PowerShell-Docs/issues/6491">issue</a> that states OMI is deprecated and there are no plans for any future bugfixes or features.</p>

<blockquote>
  <p>OMI will not fix PowerShell bugs meaning PowerShell cannot offer any level of support<br />
Known and unknown security issues will not be fixed<br />
OMI does not load OpenSSL correctly causing segfaults</p>
</blockquote>

<p>Don’t get me wrong, I understand their stance on this issue. They are a small team and need to prioritise their focus based on things that bring benefits to most users. There are some scattered comments stating that there are plans on creating a new WSMan client in .NET for PowerShell that fix a lot of these problems but so far these just seem to be plans with no concrete work.</p>

<p>So instead I thought “this is all open source, why don’t I fix the bugs and contribute it back?”. I fixed a few of the major issues like getting things to compile on some newer versions of macOS and some of the bigger GSSAPI problems. I opened <a href="https://github.com/microsoft/omi/pull/669">PR 1</a> and <a href="https://github.com/microsoft/omi/pull/670">PR 2</a> on the OMI repo but unfortunately these PRs were subsequently rejected by whatever team in Microsoft manages OMI, not the same as the PowerShell team, mostly on the grounds that “support” for PowerShell was dropped in 2018 and “new features” need to be internally prioritised. So ultimately even if someone wanted to try and improve OMI, any changes will be stonewalled when trying to get those fixes into the actual codebase.</p>

<p>So we are stuck in a situation where the library PowerShell uses has known issues and problems due to its reliance on older libraries, among other problems, and no way to get fixes for those issues into the codebase. You might be thinking, big deal, WSMan is only used for legacy Windows products. Just use your existing Windows hosts to manage those. Unfortunately even new products in development today, like the <a href="https://docs.microsoft.com/en-us/powershell/exchange/exchange-online-powershell-v2?view=exchange-ps">Exchange Online V2 PowerShell Module</a> are still based on WSMan only. If you wanted to use this new module you are stuck with running it on Windows only. While this may not be a feature that’s massively in demand, I personally find the whole situation unfortunate and just leads to more barriers of entry for the adoption of PowerShell on Linux.</p>

<p>In the end, I decided to just continue on with fixing the bugs in the existing client and take advantage of the code being open sourced. I <a href="https://github.com/jborean93/omi">forked the OMI repo</a> and starting fixing any of the bugs I encountered there. I’ll talk more about using this fork later on, first I want to talk about these bugs and what I did to fix them. I’ve found that the existing bugs in OMI can be split into 3 different categories:</p>

<ol>
  <li>Dynamic linking library problems</li>
  <li>GSSAPI (authentication and encryption) problems</li>
  <li>Client behaviour problems</li>
</ol>

<h2 id="dynamic-linking">Dynamic Linking</h2>

<p>OMI is written in C and is compiled to various shared library objects for the different functionality that it offers. PowerShell is only interested in using the <code class="language-plaintext highlighter-rouge">mi</code> library that is produced as that is where the WSMan client code is stored. If you look into your PowerShell directory on your Linux/macOS host you will see two different <code class="language-plaintext highlighter-rouge">lib&lt;name&gt;</code> libraries that affect WSMan:</p>

<ul>
  <li><a href="https://github.com/PowerShell/psl-omi-provider">psrpclient</a></li>
  <li><a href="https://github.com/microsoft/omi">mi</a></li>
</ul>

<p>The <code class="language-plaintext highlighter-rouge">psrpclient</code> is basically a compatibility layer to translate the public interface that <code class="language-plaintext highlighter-rouge">mi</code> exposes to the same interface as the Win32 WSMan API calls. This compat layer mostly just allows PowerShell to call one interface for any WSMan calls across the various platforms. We can see the actual PInvoke definitions in the <a href="https://github.com/PowerShell/PowerShell/blob/3de9069ca799fd5f67ef3dc44198a5e9833c2a68/src/System.Management.Automation/engine/remoting/fanin/WSManNativeAPI.cs#L2339-L2360">PowerShell codebase</a></p>

<div class="language-csharp highlighter-rouge"><div class="highlight"><pre class="highlight"><code><span class="cp">#if !UNIX
</span>        <span class="k">internal</span> <span class="k">const</span> <span class="kt">string</span> <span class="n">WSManClientApiDll</span> <span class="p">=</span> <span class="s">@"WsmSvc.dll"</span><span class="p">;</span>
        <span class="k">internal</span> <span class="k">const</span> <span class="kt">string</span> <span class="n">WSManProviderApiDll</span> <span class="p">=</span> <span class="s">@"WsmSvc.dll"</span><span class="p">;</span>
<span class="cp">#else
</span>        <span class="k">internal</span> <span class="k">const</span> <span class="kt">string</span> <span class="n">WSManClientApiDll</span> <span class="p">=</span> <span class="s">@"libpsrpclient"</span><span class="p">;</span>
        <span class="k">internal</span> <span class="k">const</span> <span class="kt">string</span> <span class="n">WSManProviderApiDll</span> <span class="p">=</span> <span class="s">@"libpsrpomiprov"</span><span class="p">;</span>
<span class="cp">#endif
</span>
        <span class="p">[</span><span class="nf">DllImport</span><span class="p">(</span><span class="n">WSManNativeApi</span><span class="p">.</span><span class="n">WSManClientApiDll</span><span class="p">,</span> <span class="n">SetLastError</span> <span class="p">=</span> <span class="k">false</span><span class="p">,</span> <span class="n">CharSet</span> <span class="p">=</span> <span class="n">CharSet</span><span class="p">.</span><span class="n">Unicode</span><span class="p">)]</span>
        <span class="k">internal</span> <span class="k">static</span> <span class="k">extern</span> <span class="kt">int</span> <span class="nf">WSManInitialize</span><span class="p">(</span><span class="kt">int</span> <span class="n">flags</span><span class="p">,</span>
          <span class="p">[</span><span class="n">In</span><span class="p">,</span> <span class="n">Out</span><span class="p">]</span>  <span class="k">ref</span> <span class="n">IntPtr</span> <span class="n">wsManAPIHandle</span><span class="p">);</span>
</code></pre></div></div>

<p>In this case it is calling the <code class="language-plaintext highlighter-rouge">WSManInitialize</code> function, along with many others, that is exposed in <code class="language-plaintext highlighter-rouge">WsmSvc.dll</code> on Windows and <code class="language-plaintext highlighter-rouge">libpsrpclient</code> on other platforms. We can see in the <a href="https://github.com/PowerShell/psl-omi-provider/blob/59ab42f3bc769b1aa31c1181e3a97ea3e1b1c96e/src/Client.c#L126-L149">psrpclient repo</a> that <code class="language-plaintext highlighter-rouge">WSManInitialize</code> is mostly a shim for <code class="language-plaintext highlighter-rouge">MI_Application_InitializeV1</code> which is the public interface exposed by <code class="language-plaintext highlighter-rouge">mi</code>.</p>

<div class="language-c highlighter-rouge"><div class="highlight"><pre class="highlight"><code><span class="n">MI_EXPORT</span> <span class="n">MI_Uint32</span> <span class="n">WINAPI</span> <span class="nf">WSManInitialize</span><span class="p">(</span>
    <span class="n">MI_Uint32</span> <span class="n">flags</span><span class="p">,</span>
    <span class="n">_Out_</span> <span class="n">WSMAN_API_HANDLE</span> <span class="o">*</span><span class="n">apiHandle</span>
    <span class="p">)</span>
<span class="p">{</span>
    <span class="n">MI_Result</span> <span class="n">miResult</span><span class="p">;</span>

    <span class="n">_GetLogOptionsFromConfigFile</span><span class="p">(</span><span class="n">SHELL_LOGGING_FILE</span><span class="p">);</span>

    <span class="n">LogFunctionStart</span><span class="p">(</span><span class="s">"WSManInitialize"</span><span class="p">);</span>

    <span class="p">(</span><span class="o">*</span><span class="n">apiHandle</span><span class="p">)</span> <span class="o">=</span> <span class="n">calloc</span><span class="p">(</span><span class="mi">1</span><span class="p">,</span> <span class="k">sizeof</span><span class="p">(</span><span class="k">struct</span> <span class="n">WSMAN_API</span><span class="p">));</span>
    <span class="k">if</span> <span class="p">(</span><span class="o">*</span><span class="n">apiHandle</span> <span class="o">==</span> <span class="nb">NULL</span><span class="p">)</span>
        <span class="k">return</span> <span class="n">MI_RESULT_SERVER_LIMITS_EXCEEDED</span><span class="p">;</span>

    <span class="n">miResult</span> <span class="o">=</span> <span class="n">MI_Application_InitializeV1</span><span class="p">(</span><span class="mi">0</span><span class="p">,</span> <span class="nb">NULL</span><span class="p">,</span> <span class="nb">NULL</span><span class="p">,</span> <span class="o">&amp;</span><span class="p">(</span><span class="o">*</span><span class="n">apiHandle</span><span class="p">)</span><span class="o">-&gt;</span><span class="n">application</span><span class="p">);</span>
    <span class="k">if</span> <span class="p">(</span><span class="n">miResult</span> <span class="o">!=</span> <span class="n">MI_RESULT_OK</span><span class="p">)</span>
    <span class="p">{</span>
        <span class="n">free</span><span class="p">(</span><span class="o">*</span><span class="n">apiHandle</span><span class="p">);</span>
        <span class="o">*</span><span class="n">apiHandle</span> <span class="o">=</span> <span class="nb">NULL</span><span class="p">;</span>
    <span class="p">}</span>
    <span class="n">LogFunctionEnd</span><span class="p">(</span><span class="s">"WSManInitialize"</span><span class="p">,</span> <span class="n">miResult</span><span class="p">);</span>
    <span class="k">return</span> <span class="n">miResult</span><span class="p">;</span>
<span class="p">}</span>
</code></pre></div></div>

<p>So for PowerShell to be able to create WSMan instances on Linux it needs to be able to load <code class="language-plaintext highlighter-rouge">psrpclient</code> which in turn relies on <code class="language-plaintext highlighter-rouge">mi</code> being available. If any one of those libraries, or any of their linked dependencies are not present then PowerShell will fail with the following error:</p>

<blockquote>
  <p>Enter-PSSession: This parameter set requires WSMan, and no supported WSMan client library was found. WSMan is either not installed or unavailable for this system.</p>
</blockquote>

<p>It’s not very helpful in telling you what actually failed to load as it could be either <code class="language-plaintext highlighter-rouge">psrpclient</code>, <code class="language-plaintext highlighter-rouge">mi</code>, or one of their deps not being available. To investigate this a bit more, you can run the following to list the dynamic linked libraries of both libraries</p>

<div class="language-bash highlighter-rouge"><div class="highlight"><pre class="highlight"><code><span class="nv">PWSHDIR</span><span class="o">=</span><span class="s2">"</span><span class="si">$(</span> <span class="nb">dirname</span> <span class="s2">"</span><span class="si">$(</span> <span class="nb">readlink</span> <span class="s2">"</span><span class="si">$(</span> which pwsh <span class="si">)</span><span class="s2">"</span> <span class="si">)</span><span class="s2">"</span> <span class="si">)</span><span class="s2">"</span>

<span class="c"># On macOS</span>
otool <span class="nt">-L</span> <span class="s2">"</span><span class="k">${</span><span class="nv">PWSHDIR</span><span class="k">}</span><span class="s2">/libpsrpclient.dylib"</span>
otool <span class="nt">-L</span> <span class="s2">"</span><span class="k">${</span><span class="nv">PWSHDIR</span><span class="k">}</span><span class="s2">/libmi.dylib"</span>

<span class="c"># On Linux</span>
ldd <span class="s2">"</span><span class="k">${</span><span class="nv">PWSHDIR</span><span class="k">}</span><span class="s2">/libpsrpclient.so"</span>
ldd <span class="s2">"</span><span class="k">${</span><span class="nv">PWSHDIR</span><span class="k">}</span><span class="s2">/libmi.so"</span>
</code></pre></div></div>

<p>On macOS we can see that the shipped <code class="language-plaintext highlighter-rouge">libmi.dylib</code> is linked to a custom OpenSSL path.</p>

<div class="language-text highlighter-rouge"><div class="highlight"><pre class="highlight"><code>/usr/local/microsoft/powershell/7/libmi.dylib:
    @rpath/libmi.dylib (compatibility version 0.0.0, current version 0.0.0)
    /usr/lib/libSystem.B.dylib (compatibility version 1.0.0, current version 1238.60.2)
    /usr/lib/libpam.2.dylib (compatibility version 3.0.0, current version 3.0.0)
    /usr/local/opt/openssl/lib/libssl.1.0.0.dylib (compatibility version 1.0.0, current version 1.0.0)
    /usr/local/opt/openssl/lib/libcrypto.1.0.0.dylib (compatibility version 1.0.0, current version 1.0.0)
    /usr/lib/libz.1.dylib (compatibility version 1.0.0, current version 1.2.8)
</code></pre></div></div>

<p>There are 2 problems here:</p>

<ol>
  <li>It’s linked to a hardcoded location <code class="language-plaintext highlighter-rouge">/usr/local/opt/lib/libssl.1.0.0.dylib</code> that isn’t a system library</li>
  <li>It’s linked to OpenSSL 1.0.0 which is an old, outdated, and probably insecure library</li>
</ol>

<p>So when you try and load <code class="language-plaintext highlighter-rouge">mi</code> on macOS it will most likely fail as you more than likely do not have the OpenSSL 1.0.0 libs at <code class="language-plaintext highlighter-rouge">/usr/local/opt/openssl/lib</code>. You can’t even install this version of OpenSSL using <code class="language-plaintext highlighter-rouge">brew</code> anymore unless you find a custom formula. Even if you use a custom formula, or manually compile your own OpenSSL to this location, it’s not going to change the fact the OpenSSL 1.0.0 is not an ideal library to use for creating secure backends due to its age. So to fix this problem on macOS we need to make sure we compile <code class="language-plaintext highlighter-rouge">mi</code> against a newer version of OpenSSL and hopefully with one that is easily available on most systems.</p>

<p>For Linux, I tested with CentOS 7, we can see that we have a similar setup.</p>

<div class="language-text highlighter-rouge"><div class="highlight"><pre class="highlight"><code>[user@hostname /home/user]# ldd "${PWSHDIR}/libmi.so"
ldd: warning: you do not have execution permission for `/opt/microsoft/powershell/7/libmi.so'
    linux-vdso.so.1 =&gt;  (0x00007ffd2f1eb000)
    libpthread.so.0 =&gt; /lib64/libpthread.so.0 (0x00007fe4775bf000)
    libdl.so.2 =&gt; /lib64/libdl.so.2 (0x00007fe4773bb000)
    libpam.so.0 =&gt; /lib64/libpam.so.0 (0x00007fe4771ac000)
    libssl.so.1.0.0 =&gt; /opt/microsoft/powershell/7/libssl.so.1.0.0 (0x00007fe476f3a000)
    libcrypto.so.1.0.0 =&gt; /opt/microsoft/powershell/7/libcrypto.so.1.0.0 (0x00007fe476ad7000)
    libc.so.6 =&gt; /lib64/libc.so.6 (0x00007fe476709000)
    /lib64/ld-linux-x86-64.so.2 (0x00007fe4777db000)
    libaudit.so.1 =&gt; /lib64/libaudit.so.1 (0x00007fe4764e0000)
    libgssapi_krb5.so.2 =&gt; /lib64/libgssapi_krb5.so.2 (0x00007fe476293000)
    libkrb5.so.3 =&gt; /lib64/libkrb5.so.3 (0x00007fe475faa000)
    libcom_err.so.2 =&gt; /lib64/libcom_err.so.2 (0x00007fe475da6000)
    libk5crypto.so.3 =&gt; /lib64/libk5crypto.so.3 (0x00007fe475b73000)
    libz.so.1 =&gt; /lib64/libz.so.1 (0x00007fe47595d000)
    libcap-ng.so.0 =&gt; /lib64/libcap-ng.so.0 (0x00007fe475757000)
    libkrb5support.so.0 =&gt; /lib64/libkrb5support.so.0 (0x00007fe475547000)
    libkeyutils.so.1 =&gt; /lib64/libkeyutils.so.1 (0x00007fe475343000)
    libresolv.so.2 =&gt; /lib64/libresolv.so.2 (0x00007fe475129000)
    libselinux.so.1 =&gt; /lib64/libselinux.so.1 (0x00007fe474f02000)
    libpcre.so.1 =&gt; /lib64/libpcre.so.1 (0x00007fe474ca0000)

[user@hostname /home/user]# ls -al /opt/microsoft/powershell/7/libssl.so.1.0.0
lrwxrwxrwx 1 root root 19 Aug 19 11:16 /opt/microsoft/powershell/7/libssl.so.1.0.0 -&gt; /lib64/libssl.so.10
</code></pre></div></div>

<p>It is still linked to OpenSSL 1.0.0 but now it’s through a symlink to <code class="language-plaintext highlighter-rouge">/lib64/libssl.so.10</code>. While it is still bad to use OpenSSL 1.0.0 if you can avoid it. It’s still less difficult to source OpenSSL 1.0.0 on most Linux distributions. As time goes on this will become more of an issue on Linux as newer distributions drop OpenSSL 1.0.0 altogether so it’s something to keep in mind.</p>

<p>Luckily the underlying OMI repo does actually compile and work against OpenSSL 1.1.0, we just need to make sure the compiled library we use was built against OpenSSL 1.1.0. By recompiling the code as is, we automatically solve this problem and the build process automtically selects the OpenSSL library that’s already installed and in the <code class="language-plaintext highlighter-rouge">PATH</code> of the host.</p>

<h2 id="gssapi">GSSAPI</h2>

<p>So once we sole the linking problem and have gotten PowerShell to load <code class="language-plaintext highlighter-rouge">mi</code>, we move onto the next major problem with the library, the authentication process. The WSMan protocol supports the following authentication protocols:</p>

<ul>
  <li>Basic</li>
  <li>Certificate</li>
  <li>Negotiate – Kerberos with an NTLM fallback</li>
  <li>Kerberos – with no NTLM fallback</li>
  <li>CredSSP</li>
</ul>

<p>If you want to learn more about how this works in WSMan, you can have a read of my <a href="/2018/01/24/demystifying-winrm/">Demystifying WinRM</a> post. WSMan on Windows supports all these protocols out of the box but <code class="language-plaintext highlighter-rouge">mi</code> is only designed to work with Basic, Negotiate, and pure Kerberos authentication. Even if Certificate and CredSSP auth was implemented in the future in <code class="language-plaintext highlighter-rouge">mi</code>, there is a <a href="https://github.com/PowerShell/psl-omi-provider/blob/59ab42f3bc769b1aa31c1181e3a97ea3e1b1c96e/src/Client.c#L255-L268">hardcoded check</a> in the <code class="language-plaintext highlighter-rouge">psrpclient</code> library that returns an error if another authentication option was specified.</p>

<p>Typically <code class="language-plaintext highlighter-rouge">Basic</code> authentication is used for connections to Exchange Online and is the simplest protocol overall. Negotiate/Kerberos is used for actual Windows endpoints and is required if you are authenticating with a domain account. Windows users are spoiled with a nice security provider called <a href="https://docs.microsoft.com/en-us/windows/win32/rpc/security-support-provider-interface-sspi-">SSPI</a> which does a wonderful job of abstracting all the complexities of Negotiate authentication. It is practically invisible to the end user and essentially just works. If they want to access a file on a file share, Windows will typically automatically authenticate using the user’s credentials without any further prompts.</p>

<p>On Linux the equivalent to SSPI is something called GSSAPI. GSSAPI typically comes in 2 different implementations, one called <a href="http://web.mit.edu/kerberos/">MIT krb5</a> and another called <a href="https://github.com/heimdal/heimdal">Heimdal</a>. Typically on Linux you would find MIT whereas BSD based distributions use Heimdal, macOS uses a forked version of Heimdal with some Apple specific changes made to it. While GSSAPI can provide both Kerberos and NTLM authentication it is not included out of the box, requires domain specific config files to be created, DNS working properly, and probably most importantly it doesn’t normally integrate with your logon account. While these problems can be an obstacle for users who are new to GSSAPI on Linux, they are not insurmountable and once solved you can have GSSAPI act in a similar way to SSPI on your Linux host.</p>

<p>When trying to figure out why I was getting <code class="language-plaintext highlighter-rouge">MI_RESULT_ACCESS_DENIED</code> errors on Linux I came across a the following problems with how authentication was implemented in <code class="language-plaintext highlighter-rouge">mi</code>:</p>

<ul>
  <li>There is a hardcoded password length of 1024 bytes
    <ul>
      <li>This is a problem with modern auth for Exchange Online</li>
      <li>Modern auth uses JSON Web Tokens (JWT) which can exceed this length causing a failure</li>
      <li>The limitation has been increased to 8 KiB</li>
    </ul>
  </li>
  <li>OMI tries to import the wrong symbols when targeting Heimdal
    <ul>
      <li>This breaks Negotiate authentication completely on macOS</li>
      <li>By using the correct symbol names, GSSAPI will load properly and can be used on macOS</li>
    </ul>
  </li>
  <li>OMI constructs the Service Principal Name (SPN) in a very strict fashion
    <ul>
      <li>This makes Kerberos auth even harder to be used on Linux</li>
      <li>When Kerberos fails, Negotiate auth is designed to fallback to NTLM</li>
      <li>NTLM is not provided by MIT krb5 and is another optional package to install</li>
      <li>Now the SPN is constructed by passing in the name type <code class="language-plaintext highlighter-rouge">GSS_C_NT_HOSTBASED_SERVICE</code> with the value <code class="language-plaintext highlighter-rouge">http@&lt;hostname&gt;</code></li>
    </ul>
  </li>
  <li>No support for using an implicit Kerberos credential, you always have to provide explicit credentials
    <ul>
      <li>The hardcoded check that makes sure a username was set has now been removed</li>
    </ul>
  </li>
  <li>The <code class="language-plaintext highlighter-rouge">GSS_C_DELEG_POLICY_FLAG</code> was not in the req_flags
    <ul>
      <li>This meant that Kerberos delegation was never enabled even when the SPN was trusted for delegation</li>
      <li>By adding that flag, the credential will be delegated if the SPN is trusted for delegation</li>
    </ul>
  </li>
  <li>OMI resolves the target hostname to the Fully Qualified Domain Name (FQDN) of the target
    <ul>
      <li>This invalidates the Kerberos server authentication model</li>
      <li>The code even causes a segfault if the hostname was not resolvable</li>
      <li>This whole process was removed due to it breaking the security model for Kerberos</li>
    </ul>
  </li>
</ul>

<p>Essentially this means that <code class="language-plaintext highlighter-rouge">mi</code> as provided by PowerShell works only in a very specific setup, namely on Linux where Kerberos is configured in a very specific way. Fixing these problems were relatively simple and the end result is that modern auth is now working and Negotiate/Kerberos auth works in more situations than before. The only remaining holdout is supporting the NTLM fallback on macOS when connecting over HTTP. There is a bug in the macOS’ GSSAPI implementation that causes an interop failure and this issue sits in a place that I cannot touch. Luckily NTLM auth is old and insecure and you should really get Kerberos working. If you really want to use NTLM auth on macOS you are stuck with connecting over HTTPS with <code class="language-plaintext highlighter-rouge">-UseSSL</code>.</p>

<h2 id="client-behaviour">Client Behaviour</h2>

<p>So now that we’ve been able to authenticate with our servers over WSMan the last remaining issue is dealing with some invalid client behaviour assumptions. The biggest problem I encountered here was dealing with the message encryption payload that WSMan uses when connecting over HTTP. Message encryption in WSMan encrypts the raw WSMan payload and encodes it as a MIME multipart message. This MIME payload follows the format</p>

<div class="language-text highlighter-rouge"><div class="highlight"><pre class="highlight"><code>--EncryptedBoundary
Content-Type: application/HTTP-SPNEGO-session-encrypted
OriginalContent: type=application/soap+xml;charset=UTF-8;Length=&lt;plaintext length&gt;
--EncryptedBoundary
Content-Type: application/octet-stream
&lt;header length&gt;&lt;header&gt;&lt;encrypted payload&gt;--EncryptedBoundary--\r\n
</code></pre></div></div>

<p>Some of these values depend on the authentication method chosen or how the client actually formats the data but the basic structure stays the same. On premise Exchange hosts changes the boundary to <code class="language-plaintext highlighter-rouge">-- EncryptedBoundary</code> (with the space) which is technically against the spec and <code class="language-plaintext highlighter-rouge">mi</code> was never able to handle that change breaking connections on those endpoints.</p>

<p>The decryption code in OMI was very temperamental in whether it worked or not. I was able to get it working from my main dev host but as soon as I was testing on a container host it was failing with the very unhelpful error:</p>

<blockquote>
  <p>MI_RESULT_FAILED For more information, see the about_Remote_Troubleshooting Help topic.</p>
</blockquote>

<p>When stepping through the code I found that the <a href="https://github.com/microsoft/omi/blob/9f4a212e06656dcd6b0ca2ddd34f181623965b28/Unix/http/httpclientauth.c#L1013">HttpClient_DecryptData</a> function was failing to find the encrypted payload in the MIME data causing that failure. To solve this issue I decided to refactor the MIME parser logic in this function and came up with a solution that works everytime I run it and even handles the <code class="language-plaintext highlighter-rouge">-- Encrypted Boundary</code> setup that on premise Exchange endpoints send back.</p>

<h1 id="solution">Solution</h1>

<p>So I’ve identified the bugs and have fixed them, how do I share the work I’ve done for others to use. I eventually decided on creating <a href="https://github.com/jborean93/omi">a fork</a> of the OMI repository and contributing my changes back there. This repo had to satisfy the following criteria I set out for myself:</p>

<ul>
  <li>Make it easy to merge any upstream changes, if any are done in the future</li>
  <li>Document the reasons for the fork and what was changed</li>
  <li>Provide an easy way to build the library for various Linux distributions</li>
  <li>Provide a compiled “release” version for those distributions for easier consumption</li>
  <li>Actually test out the changes with PowerShell targeting both Windows endpoints and Exchange Online</li>
  <li>Add CI integration to run on every change</li>
</ul>

<p>I’ve mostly succeeded in achieving these goals, any PR will automatically be run in Azure Pipelines to make sure the code will still build for the distributions. While I can’t run the actual integration tests in CI I did create some scripts that will set up an environment and test out the various distributions with the libraries built in CI. The <a href="https://github.com/jborean93/omi/blob/main/libmi.tests.ps1">tests</a> that are run just cover a basic set of scenarios and ensure the code can connect using Kerberos and optionally with Exchange Online. With this setup I can make a change in a PR then subsequently check if it still works when running from PowerShell itself.</p>

<h1 id="building">Building</h1>

<p>If you are wanting to build the code, you can either compile it manually just like you would with the upstream OMI repo with the following:</p>

<div class="language-bash highlighter-rouge"><div class="highlight"><pre class="highlight"><code><span class="nb">cd </span>Unix
./configure <span class="nt">--outputdirname</span><span class="o">=</span>build <span class="nt">--prefix</span><span class="o">=</span>/opt/omi
make
</code></pre></div></div>

<p>You can then find the <code class="language-plaintext highlighter-rouge">libmi</code> file in <code class="language-plaintext highlighter-rouge">Unix/build/lib/libmi.so</code>. Building the code is quite simple, the hardest part is getting all the dependencies required to build OMI. I decided to write a Python script <code class="language-plaintext highlighter-rouge">build.py</code> that reads the metadata for a “known” distribution and then generate the build code for you. You can even use <code class="language-plaintext highlighter-rouge">build.py</code> to build the code in a Docker container for the distribution of your choice and not pollute your local environment. For example if you wanted to compile the code for CentOS 8 in an ephemeral Docker container, you can run the following:</p>

<div class="language-bash highlighter-rouge"><div class="highlight"><pre class="highlight"><code>./build.py centos8 <span class="nt">--docker</span>
</code></pre></div></div>

<p>The <code class="language-plaintext highlighter-rouge">build.py</code> script will read the <a href="https://github.com/jborean93/omi/blob/main/distribution_meta/centos8.json">centos8.json</a> distribution meta file and create a bash script on the fly that will handle the deps for you. If you use the <code class="language-plaintext highlighter-rouge">--output-script</code> argument, the process will output the bash script that will build <code class="language-plaintext highlighter-rouge">mi</code> for you.</p>

<div class="language-text highlighter-rouge"><div class="highlight"><pre class="highlight"><code>$&gt; /build.py centos8 --output-script
#!/usr/bin/env bash

set -o pipefail -eu
echo ""
echo "-------------------------------------------"
echo "| Installing build pre-requisite packages |"
echo "-------------------------------------------"
echo ""
yum install -y -q \
    bind-utils \
    gcc \
    gcc-c++ \
    krb5-devel \
    make \
    openssl \
    openssl-devel \
    pam-devel \
    redhat-lsb-core \
    rpm-build \
    rpm-devel \
    which

echo ""
echo "----------------------------------------"
echo "|        Clearing build folder         |"
echo "----------------------------------------"
echo ""
if [ -d "build-centos8" ]; then
    rm -rf "build-centos8"
fi

echo ""
echo "----------------------------------------"
echo "|          Running configure           |"
echo "----------------------------------------"
echo ""
./configure \
    --outputdirname="build-centos8" \
    --prefix="/opt/omi"

echo ""
echo "----------------------------------------"
echo "|             Running make             |"
echo "----------------------------------------"
echo ""
make
</code></pre></div></div>

<p>When you run the <code class="language-plaintext highlighter-rouge">build.py</code> script, the compiled library is stored at <code class="language-plaintext highlighter-rouge">Unix/build-{distribution}/lib/libmi.so</code> (or <code class="language-plaintext highlighter-rouge">libmi.dylib</code> for macOS). If one of your favourite distributions is missing you can add your own <code class="language-plaintext highlighter-rouge">distribution_meta/{distribution}.json</code> file with the relevant details. I’m happy to add any more distributions to the list of ones built in CI.</p>

<h1 id="installation">Installation</h1>

<p>If you haven’t compiled it yourself you can even get a prebuilt copy from the <a href="https://github.com/jborean93/omi/releases">releases page</a>. Make sure you select the correct distribution you want to use it on. Now that you’ve gotten a copy of the <code class="language-plaintext highlighter-rouge">libmi</code> file, you simply need to copy it into the PowerShell directory. I recommend you copy the existing file in case you need to revert back to what was shipped with PowerShell at some point in the future.</p>

<div class="language-bash highlighter-rouge"><div class="highlight"><pre class="highlight"><code><span class="nv">PWSHDIR</span><span class="o">=</span><span class="s2">"</span><span class="si">$(</span> <span class="nb">dirname</span> <span class="s2">"</span><span class="si">$(</span> <span class="nb">readlink</span> <span class="s2">"</span><span class="si">$(</span> which pwsh <span class="si">)</span><span class="s2">"</span> <span class="si">)</span><span class="s2">"</span> <span class="si">)</span><span class="s2">"</span>
<span class="nv">LIBMI_NAME</span><span class="o">=</span><span class="s2">"</span><span class="si">$(</span> <span class="nb">basename</span> <span class="s2">"</span><span class="si">$(</span> <span class="nb">ls</span> <span class="s2">"</span><span class="k">${</span><span class="nv">PWSHDIR</span><span class="k">}</span><span class="s2">/libmi."</span><span class="k">*</span> | <span class="nb">head</span> <span class="nt">-n1</span> | <span class="nb">awk</span> <span class="s1">'{print $1;}'</span> <span class="si">)</span><span class="s2">"</span> <span class="si">)</span><span class="s2">"</span>

<span class="c"># Will probably need sudo for these 2 commands</span>
<span class="nb">cp</span> <span class="s2">"</span><span class="k">${</span><span class="nv">PWSHDIR</span><span class="k">}</span><span class="s2">/</span><span class="k">${</span><span class="nv">LIBMI_NAME</span><span class="k">}</span><span class="s2">"</span> <span class="s2">"</span><span class="k">${</span><span class="nv">PWSHDIR</span><span class="k">}</span><span class="s2">/</span><span class="k">${</span><span class="nv">LIBMI_NAME</span><span class="k">}</span><span class="s2">.bak"</span>
<span class="nb">cp</span> <span class="s2">"Unix/build-{distribution}/lib/</span><span class="k">${</span><span class="nv">LIBMI_NAME</span><span class="k">}</span><span class="s2">"</span> <span class="s2">"</span><span class="k">${</span><span class="nv">PWSHDIR</span><span class="k">}</span><span class="s2">/"</span>
</code></pre></div></div>

<p>Once copied, any new PowerShell processes will now load the new library unlocking WSMan on Linux to it’s close to full potential. If you are wanting to make sure you have done this correctly, simply run the <a href="https://github.com/jborean93/omi/blob/main/tools/Get-OmiVersion.ps1">Get-OmiVersion.ps1</a> script that is in the repo.</p>

<div class="language-powershell highlighter-rouge"><div class="highlight"><pre class="highlight"><code><span class="err">$&gt;</span><span class="w"> </span><span class="n">pwsh</span><span class="w"> </span><span class="nt">-File</span><span class="w"> </span><span class="nx">tools/Get-OmiVersion.ps1</span><span class="w">

</span><span class="n">Major</span><span class="w">  </span><span class="nx">Minor</span><span class="w">  </span><span class="nx">Build</span><span class="w">  </span><span class="nx">Revision</span><span class="w">
</span><span class="o">-----</span><span class="w">  </span><span class="o">-----</span><span class="w">  </span><span class="o">-----</span><span class="w">  </span><span class="o">--------</span><span class="w">
</span><span class="mi">1</span><span class="w">      </span><span class="mi">0</span><span class="w">      </span><span class="mi">1</span><span class="w">      </span><span class="mi">0</span><span class="w">
</span></code></pre></div></div>

<p>If that fails then you are still using the builtin version without any of the changes in the fork.</p>

<h1 id="in-action">In Action</h1>

<p>So now that I’ve got the new <code class="language-plaintext highlighter-rouge">mi</code> library installed it’s time to use it in PowerShell. I don’t want to bore you with the details so here is it in action.</p>

<p><a href="/assets/images/2020/08/wsman-with-creds.gif"><img src="/assets/images/2020/08/wsman-with-creds.gif" alt="" /></a></p>

<p>In this example I am connecting using explicit credentials and have specified the <code class="language-plaintext highlighter-rouge">Negotiate</code> protocol. The WSMan client will attempt to get a Kerberos ticket for those credentials and then start the Kerberos authentication process for SPN <code class="language-plaintext highlighter-rouge">HTTP/server2019.domain.local</code>. If any of those steps fail it will automatically fallback to using NTLM for the authentication exchange if the NTLM library is installed, otherwise it will fail. I could have also set <code class="language-plaintext highlighter-rouge">-Authentication Kerberos</code> instead of <code class="language-plaintext highlighter-rouge">Negotiate</code> if I wanted to ensure only Kerberos was used without the NTLM fallback. This could be ideal in your environments as NTLM is an old protocol and should be avoided where possible.</p>

<p>For example if I tried to connect using an IP address and Kerberos with <code class="language-plaintext highlighter-rouge">Enter-PSSession 192.168.56.15 -Authentication Kerberos -Credential $cred</code>, it will fail to find the target SPN in the domain.</p>

<blockquote>
  <p>Enter-PSSession: Connecting to remote server 192.168.56.15 failed with the following error message : Authorization failed Unspecified GSS failure. Minor code may provide more information Server not found in Kerberos database For more information, see the about_Remote_Troubleshooting Help topic</p>
</blockquote>

<p>Finally, a new addition in my <code class="language-plaintext highlighter-rouge">mi</code> fork is the ability to utilise the existing Kerberos ticket cache and credential delegation. If you’ve already gotten a Kerberos ticket for a user account using something like <code class="language-plaintext highlighter-rouge">kinit</code>, you can omit the credential altogether when creating your PSRemoting session like so.</p>

<p><a href="/assets/images/2020/08/wsman-with-kinit.gif"><img src="/assets/images/2020/08/wsman-with-kinit.gif" alt="" /></a></p>

<p>You can even bypass the <code class="language-plaintext highlighter-rouge">kinit</code> step yourself and automatically get a Kerberos ticket as part of the login process for your Linux account using the <code class="language-plaintext highlighter-rouge">pam-krb5</code> package. In this last example I also made sure I requested a forwardable ticket using the <code class="language-plaintext highlighter-rouge">-f</code> flag to <code class="language-plaintext highlighter-rouge">kinit</code>. When you have a forwardable ticket and the SPN you are targeting is set as trusted for delegation in your domain then the PSRemoting session will be able to delegate your credentials. This means my credentials were delegated to the remote process allowing me to re-authenticate as that user for any outbound connections in that PSRemoting session. You can’t do that with SSH public key authentication :).</p>

<p>While you still cannot use the new <a href="https://docs.microsoft.com/en-us/powershell/exchange/exchange-online-powershell-v2?view=exchange-ps">Exchange Online v2 Modules</a> you can still use something like <a href="https://gist.github.com/jborean93/d50041c2a0fed20e87aa46ba32381754">New-EXOPSSession</a> to connect to Exchange Online using modern auth. With that script you can import that Exchange Online PSSession and use many of the cmdlets to manage your Exchange instance.</p>

<h1 id="limitations">Limitations</h1>

<p>While the changes I’ve made in the fork solve a lot of the limitations with WSMan on Linux, there are a few problems that cannot be reasonably fixed. Some of the limitations are:</p>

<ul>
  <li>Basic auth over HTTP will always be disabled
    <ul>
      <li>There is a <a href="https://github.com/PowerShell/PowerShell/blob/d8f8f0a8bcbadb357f9eaafbb797278ebe07d7cc/src/System.Management.Automation/engine/remoting/fanin/WSManTransportManager.cs#L1543-L1547">hard coded check in PowerShell</a> that disables this</li>
      <li>Honestly this is a good thing, using Basic auth over HTTP has no encryption so everything would be in plaintext</li>
    </ul>
  </li>
  <li>HTTPS connections have no certificate verification, reducing the effectiveness the protocol brings
    <ul>
      <li>This is another <a href="https://github.com/PowerShell/PowerShell/blob/d8f8f0a8bcbadb357f9eaafbb797278ebe07d7cc/src/System.Management.Automation/engine/remoting/fanin/WSManTransportManager.cs#L1549-L1553">hard coded check in PowerShell</a></li>
      <li>Even if cert verification was implemented in OMI we cannot remove that check in PowerShell</li>
      <li>This is unfortunate but also understandable, better to make people explicitly opt into disabling cert verification than think it is working</li>
      <li>Edit: This has been fixed since v1.2.0 of the fork release where cert verification is now enabled by default</li>
      <li>Edit2: Since the v2.0.0 release when used in conjunction with the PowerShell 7.2.0 release, it is no longer required to set the skip check options</li>
    </ul>
  </li>
  <li>No CredSSP authentication
    <ul>
      <li>While you could add this to <code class="language-plaintext highlighter-rouge">mi</code> there is <a href="https://github.com/PowerShell/psl-omi-provider/blob/59ab42f3bc769b1aa31c1181e3a97ea3e1b1c96e/src/Client.c#L255-L268">another check</a> in <code class="language-plaintext highlighter-rouge">psrpclient</code> that fails when <code class="language-plaintext highlighter-rouge">-Authentication</code> is not <code class="language-plaintext highlighter-rouge">Basic</code>, <code class="language-plaintext highlighter-rouge">Negotiate</code>, or <code class="language-plaintext highlighter-rouge">Kerberos</code></li>
    </ul>
  </li>
  <li>You always need to set <code class="language-plaintext highlighter-rouge">-Authentication Basic|Negotiate|Kerberos</code> unlike Windows where omiting the parameter uses <code class="language-plaintext highlighter-rouge">Negotiate</code> auth
    <ul>
      <li>Due to the same check above, only those 3 will work</li>
      <li>Edit: Since the v2.0.0 release, <code class="language-plaintext highlighter-rouge">libpsrpclient</code> has also been forked and changed to fix this problem, now the default auth is <code class="language-plaintext highlighter-rouge">Negotiate</code> removing the need to set this for default scenarios.</li>
    </ul>
  </li>
  <li>NTLM auth on macOS only works over HTTPS
    <ul>
      <li>This is due to a problem in macOS’ GSSAPI implementation which doesn’t implement NTLM wrapping when used in SPNEGO properly</li>
      <li>Once again nothing we can do about this</li>
    </ul>
  </li>
</ul>

<p>So even if I implement the features in OMI, PowerShell or <code class="language-plaintext highlighter-rouge">psrpclient</code> will still fail due to those hardcoded checks.</p>

<h1 id="future">Future</h1>

<p>The MVP that I wanted out of this whole process was a library I can use to connect over WSMan to Windows targets and to Exchange Online. I think what I have right now meets that requirements but there is always room to improve things in the future. Some of the things that I think would be nice to add in the future are</p>

<ul>
  <li>More distributions, maybe even a “universal” release like the one that OMI provides</li>
  <li>Improve the error messages for some known problems, right now failures can be quite vague in the error messages it reports</li>
  <li>Improve the logging situation, right now it requires a config file at <code class="language-plaintext highlighter-rouge">/opt/omi/etc/omicli.conf</code> to configure the logging details</li>
</ul>

<p>If you decide to try out these changes, I’m happy to help as best as I can with any issues you find. Feel free to <a href="https://github.com/jborean93/omi/issues/new">open a new issue</a> but keep in mind this is work I do in my spare time. I cannot guarantee I will look at the issue in a timely fashion or even come up with a fix.</p>

<p>As for trying to get these changes included in PowerShell itself, I doubt there would be any appetite in the PowerShell team to do this. There is no guarantee of support and the general consensus is that WSMan is deprecated on Linux and what it ships with will be it. If, in the future, they would like to pursue this further and look into getting these changes in their version of <code class="language-plaintext highlighter-rouge">mi</code> then I’m more than happy to work together to achieve that goal.</p>

<p>Edit: Since publishing this blog and officially releasing these changes there’s been a few changes and additions made to my fork. These changes are</p>

<ul>
  <li>The forked libraries have been published under the <a href="https://www.powershellgallery.com/packages/PSWSMan/">PSWSMan</a> module on the PowerShell Gallery
    <ul>
      <li>People wishing to use my fork can install this module and run (as root) <code class="language-plaintext highlighter-rouge">Install-WSMan</code> to install my changes</li>
    </ul>
  </li>
  <li>HTTPS cert validation is enabled by default
    <ul>
      <li>To disable cert validation you can use the <code class="language-plaintext highlighter-rouge">Disable-WSManCertVerification</code> cmdlet included with <code class="language-plaintext highlighter-rouge">PSWSMan</code></li>
      <li>When PowerShell 7.2.0 is released, you will also be able to disable cert verification per session using the <code class="language-plaintext highlighter-rouge">-SessionOption (New-PSSessionOption -SkipCACheck -SkipCNCheck)</code> options</li>
    </ul>
  </li>
  <li>More distributions like Arch Linux and Alpine have been added
    <ul>
      <li>With <code class="language-plaintext highlighter-rouge">libpsrpclient</code> being shipped with <code class="language-plaintext highlighter-rouge">PSWSMan</code> it will now be easier to add more distributions not supported by PowerShell directly</li>
    </ul>
  </li>
</ul>]]></content><author><name>Jordan Borean</name></author><category term="powershell" /><category term="winrm" /><summary type="html"><![CDATA[A few years ago I jumped from doing all my dev work on Windows to Linux. This migration has had a few challenges but one of the things I struggled with initially was the lack of native tooling that can be used to easily and seamlessly interact with other Microsoft products. I’ve typically found some …]]></summary></entry><entry><title type="html">Windows mapped drives – what the hell is going on?</title><link href="https://bloggingforlogging.com/2018/11/22/windows-mapped-drives-what-the-hell-is-going-on/" rel="alternate" type="text/html" title="Windows mapped drives – what the hell is going on?" /><published>2018-11-22T06:47:07+00:00</published><updated>2018-11-22T06:47:07+00:00</updated><id>https://bloggingforlogging.com/2018/11/22/windows-mapped-drives-what-the-hell-is-going-on</id><content type="html" xml:base="https://bloggingforlogging.com/2018/11/22/windows-mapped-drives-what-the-hell-is-going-on/"><![CDATA[<p>Mapped drives have always been a curiosity for me, I’ve used them before in the past but usually come across an issue that forces me to abandon them. Alongside my curiosity, there has also been some demand in Ansible to be able to manage mapped drives and in my naivety I created a very basic module <a href="https://docs.ansible.com/ansible/latest/modules/win_mapped_drive_module.html">win_mapped_drive</a> to do this. At the time it worked for what I needed to do and I had to use some hacks and workarounds to actually enumerate the existing mappings when running in WinRM. I should have read the warning signs then and given up but I pushed on ahead and the module was released with Ansible 2.4. We are now in the 2.8 development phase and there’s been a few issues crop up on GitHub saying the module doesn’t work as expected. I decided to take the time to look into the complex world of mapped drives and come up with a more satisfactory solution for managing them with Ansible.</p>

<p>The end result was <a href="https://github.com/ansible/ansible/pull/48642">a complete rewrite of win_mapped_drive</a> and a really bad headache from trying to understand how this all fits together. I decided to try and put down what I learnt to help anybody who needs to deal with mapped drives as it isn’t easy.</p>

<h1 id="what-is-a-mapped-drive">What is a mapped drive</h1>

<p>At a very high level, a mapped drive is a redirected network resource to a local device, e.g. redirects a UNC path <code class="language-plaintext highlighter-rouge">\\SERVER\share</code> to a local drive <code class="language-plaintext highlighter-rouge">Z:</code>. This allows a user to access network resources like they would with a local file. In modern days this is less of an issue as you can use the full UNC path to access a file but there are still other benefits for using mapped drives from an end user perspective. Delving a bit deeper, a mapped drive is actually a <a href="https://docs.microsoft.com/en-us/windows-hardware/drivers/kernel/introduction-to-ms-dos-device-names">DOS Device Name</a> that points to an NT device that does all the redirection for you.</p>

<h1 id="dos-device-names">DOS Device Names</h1>

<p>You might be saying “DOS? I thought DOS was a bygone product that was removed from existence with the introduction of Windows NT”. This is mostly true but its legacy still lives on and DOS Devices is a concept that was transferred to Windows NT. A DOS device is basically an object name that exists in the NT Object Manager namespace and is used by various file management functions to redirect DOS names to the underlying NT object. In a more simplistic manner, a DOS device is an object that represents a traditional DOS device name, such as <code class="language-plaintext highlighter-rouge">NUL</code>, <code class="language-plaintext highlighter-rouge">CON</code>, <code class="language-plaintext highlighter-rouge">C:</code>, and links those object names to the actual NT object that handles the IO functions. For example, the path <code class="language-plaintext highlighter-rouge">C:\Windows\System32\cmd.exe</code> is expanded to <code class="language-plaintext highlighter-rouge">\DosDevices\C:\Windows\System32\cmd.exe</code>, <code class="language-plaintext highlighter-rouge">\DosDevices\C:</code> is a symlink to <code class="language-plaintext highlighter-rouge">\Device\HarddiskVolumex</code> which means <code class="language-plaintext highlighter-rouge">cmd.exe</code> can be accessed at the NT path <code class="language-plaintext highlighter-rouge">\Device\HarddiskVolumex\Windows\System32\cmd.exe</code>.</p>

<p>To add some more complexity to these devices, there exists a local and global scope to a device where a global scope is accessible to all users on the host and a local scope is only accessible to the logon session that created it. A physical hard drive device, like <code class="language-plaintext highlighter-rouge">C:</code>, is a global device and is accessible to all users on the host. We can see this by using the program <a href="https://docs.microsoft.com/en-us/sysinternals/downloads/winobj">WinObj</a>, under <code class="language-plaintext highlighter-rouge">\GLOBAL??</code> we can see many objects including our <code class="language-plaintext highlighter-rouge">C:</code> device and where it links to:</p>

<p><a href="/assets/images/2018/11/Dos-Device-C.png"><img src="/assets/images/2018/11/Dos-Device-C.png" alt="" /></a></p>

<p>We can also see some other global DOS devices like <code class="language-plaintext highlighter-rouge">CON</code>, <code class="language-plaintext highlighter-rouge">AUX</code> and the relevant NT object they link to. Local DOS devices are scoped to a specific logon session ID and a device name in the local scope takes priority over a global DOS device. More details on the local vs global scopes can be found <a href="https://docs.microsoft.com/en-us/windows-hardware/drivers/kernel/local-and-global-ms-dos-device-names">here</a>. When a user creates a new mapped drive the DOS device that is created will exist under the local scope and thus only accessible to that particular logon session. The only exception to this rule is when running or impersonating the <code class="language-plaintext highlighter-rouge">SYSTEM</code> account, a mapped drive will be created in the global scope and thus accessible to all the users on the host.</p>

<p>Having DOS devices scoped to an individual logon session is pretty much the main source of confusion of when mapped drives are accessible.</p>

<h1 id="logon-sessions">Logon sessions</h1>

<p>Not to be confused with a <a href="https://blogs.technet.microsoft.com/askperf/2007/07/24/sessions-desktops-and-windows-stations/">Windows Session</a>, a logon session is created whenever the Local Security Authority (LSA) processes a new logon request. A logon can be anything, such as;</p>

<ul>
  <li>a user logging in directory on the host</li>
  <li>through an RDP logon</li>
  <li>a scheduled task with explicit user credential</li>
  <li>using runas.exe</li>
  <li>SMB network logon</li>
  <li>a WinRM process</li>
  <li>using some Win32 APIs like <a href="https://docs.microsoft.com/en-us/windows/desktop/api/winbase/nf-winbase-createprocesswithlogonw">CreateProcessWithLogon</a>, <a href="https://docs.microsoft.com/en-us/windows/desktop/api/winbase/nf-winbase-logonuserw">LogonUser</a>, <a href="https://docs.microsoft.com/en-us/windows/desktop/api/ntsecapi/nf-ntsecapi-lsalogonuser">LsaLogonUser</a></li>
</ul>

<p>When LSA processes the logon, it will build the access token based on the rights and groups that are assigned to the account and create a unique identifier that links the access token to a unique, to LSA, logon session identifier. This ID is stored in the access token and can be queried by anyone who has the rights to but cannot be changed (well not officially). Complicating matter further, an access token has a one to one relation to a logon session but a user may have one or two access tokens that are linked together to a single logon event.</p>

<h2 id="token-elevation-types">Token Elevation Types</h2>

<p>Before Windows Vista and the introduction of User Account Control (UAC), a user had only one token which contains all the groups and privileges that it had the rights to. With Windows Vista, an access token now has a flag under the <a href="https://docs.microsoft.com/en-us/windows/desktop/api/winnt/ne-winnt-_token_elevation_type">TOKEN_ELEVATION_TYPE</a> enum with one of the following values;</p>

<ul>
  <li><code class="language-plaintext highlighter-rouge">TokenElevationTypeDefault</code>: This is like the Windows XP days, the token is not linked to anything else and contains all the groups and privileges that is assigned to the user</li>
  <li><code class="language-plaintext highlighter-rouge">TokenElevationTypeFull</code>: The token is part of a linked pair and contains all the groups and privileges for the user</li>
  <li><code class="language-plaintext highlighter-rouge">TokenElevationTypeLimited</code>: The token is part of a linked pair and contains a limited set of groups and privileges for the user</li>
</ul>

<p>The <code class="language-plaintext highlighter-rouge">TokenElevationTypeDefault</code> is used in, but not limited to, these scenarios;</p>

<ul>
  <li>UAC is disabled</li>
  <li>You are using the <code class="language-plaintext highlighter-rouge">BUILTIN\Administrator</code> account and <a href="https://docs.microsoft.com/en-us/windows/security/identity-protection/user-account-control/user-account-control-group-policy-and-registry-key-settings">FilterAdministratorToken</a> is set to <code class="language-plaintext highlighter-rouge">Disabled</code> (default behaviour)</li>
  <li>You are logging in with a standard user account</li>
  <li>You are logging in through a network logon, like SMB or WinRM, with a domain account</li>
  <li>You are logging in through a network logon with a local account and <a href="https://support.microsoft.com/en-au/help/951016/description-of-user-account-control-and-remote-restrictions-in-windows">LocalAccountTokenFilterPolicy</a> is set to <code class="language-plaintext highlighter-rouge">1</code></li>
</ul>

<p>In you are using an admin account and one of the above does not match your setup then LSA will produce two access tokens and logon sessions that are linked together for a single logon. The default access token will have a type of <code class="language-plaintext highlighter-rouge">TokenElevationTypeLimited</code> while the linked token will have a type of <code class="language-plaintext highlighter-rouge">TokenElevationTypeFull</code>. To find out what the current process token type is, run the following PowerShell script;</p>

<div class="language-plaintext highlighter-rouge"><div class="highlight"><pre class="highlight"><code>Add-Type -TypeDefinition @'
using Microsoft.Win32.SafeHandles;
using System;
using System.ComponentModel;
using System.Runtime.ConstrainedExecution;
using System.Runtime.InteropServices;
using System.Security.Principal;

namespace PInvoke
{
    internal class NativeMethods
    {
        [DllImport("kernel32.dll", SetLastError = true)]
        public static extern bool CloseHandle(
            IntPtr hObject);

        [DllImport("kernel32.dll")]
        public static extern SafeNativeHandle GetCurrentProcess();

        [DllImport("advapi32.dll", SetLastError = true)]
        public static extern bool GetTokenInformation(
            SafeNativeHandle TokenHandle,
            UInt32 TokenInformationClass,
            SafeMemoryBuffer TokenInformation,
            UInt32 TokenInformationLength,
            out UInt32 ReturnLength);

        [DllImport("advapi32.dll", SetLastError = true)]
        public static extern bool OpenProcessToken(
            SafeNativeHandle ProcessHandle,
            TokenAccessLevels DesiredAccess,
            out SafeNativeHandle TokenHandle);
    }

    internal class SafeMemoryBuffer : SafeHandleZeroOrMinusOneIsInvalid
    {
        public SafeMemoryBuffer() : base(true) { }
        public SafeMemoryBuffer(int cb) : base(true)
        {
            base.SetHandle(Marshal.AllocHGlobal(cb));
        }
        public SafeMemoryBuffer(IntPtr handle) : base(true)
        {
            base.SetHandle(handle);
        }

        [ReliabilityContract(Consistency.WillNotCorruptState, Cer.MayFail)]
        protected override bool ReleaseHandle()
        {
            Marshal.FreeHGlobal(handle);
            return true;
        }
    }

    internal class SafeNativeHandle : SafeHandleZeroOrMinusOneIsInvalid
    {
        public SafeNativeHandle() : base(true) { }
        public SafeNativeHandle(IntPtr handle) : base(true) { this.handle = handle; }

        [ReliabilityContract(Consistency.WillNotCorruptState, Cer.MayFail)]
        protected override bool ReleaseHandle()
        {
            return NativeMethods.CloseHandle(handle);
        }
    }

    public enum TokenElevationType
    {
        TokenElevationTypeDefault = 1,
        TokenElevationTypeFull,
        TokenElevationTypeLimited
    }

    public class AccessToken
    {
        public static TokenElevationType GetTokenElevationType()
        {
            using(SafeNativeHandle hProcess = NativeMethods.GetCurrentProcess())
            {
                SafeNativeHandle hToken;
                NativeMethods.OpenProcessToken(hProcess, TokenAccessLevels.Query, out hToken);
                if (hToken.IsInvalid)
                    throw new Win32Exception();

                using (hToken)
                {
                    UInt32 tokenLength;
                    NativeMethods.GetTokenInformation(hToken, 18, new SafeMemoryBuffer(IntPtr.Zero), 0, out tokenLength);

                    using (SafeMemoryBuffer tokenInfo = new SafeMemoryBuffer((int)tokenLength))
                    {
                        if (!NativeMethods.GetTokenInformation(hToken, 18, tokenInfo, tokenLength, out tokenLength))
                            throw new Win32Exception();
                        return (TokenElevationType)Marshal.ReadInt32(tokenInfo.DangerousGetHandle());
                    }
                }
            }
        }
    }
}
'@
[PInvoke.AccessToken]::GetTokenElevationType()
</code></pre></div></div>

<p>So why is this important? Having a split token means there are two DOS device local scopes a user may use and each are separate from each other. In laymans terms an admin process will not be able to see drives mapped under a limited token and vice versa. This gets even more complicated when persistence is added into the mix but I’ll cover that later. If you received <code class="language-plaintext highlighter-rouge">TokenElevationTypeDefault</code> then you don’t have to worry about the next few sections.</p>

<h2 id="enabledlinkedconnections">EnabledLinkedConnections</h2>

<p>While local DOS devices are scoped to the current logon session, Windows does expose a policy to help deal with mapped drives and split tokens. The <a href="https://support.microsoft.com/en-us/help/3035277/mapped-drives-are-not-available-from-an-elevated-prompt-when-uac-is-co">EnableLinkedConnections</a> can be set and it will change the behaviour when running with the <code class="language-plaintext highlighter-rouge">TokenElevationTypeFull</code> and <code class="language-plaintext highlighter-rouge">TokenElevationTypeLimited</code> elevation types to be more like <code class="language-plaintext highlighter-rouge">TokenElevationTypeDefault</code>. When it is set, any drives created in one logon session will then be added to the logon session of the split token. This makes things a bit more uniform across the various token elevation types but does have some potential security implications. The rest of this post will continue under the assumption that this policy is either not defined or is disabled.</p>

<h2 id="logon-session-with-a-split-token">Logon session with a split token</h2>

<p>Because it is the more common scenario in a locked down host I want to delve a bit deeper into split tokens and how it affects mapped drives. I mentioned above that with a split token, LSA has created two different access tokens each with their own unique logon session ID as we can see from the output below;</p>

<p><a href="/assets/images/2018/11/Split-Token-Logon-Sessions.png"><img src="/assets/images/2018/11/Split-Token-Logon-Sessions.png" alt="" /></a></p>

<p><em>We can also see different groups and privileges in each token</em></p>

<p>In this example, I’ve started a PowerShell process normally and another by right clicking and selecting <code class="language-plaintext highlighter-rouge">Run as administrator</code>. We can see the limited access token has a logon session of <code class="language-plaintext highlighter-rouge">bd3f6</code> while the “linked” admin token has a logon session of <code class="language-plaintext highlighter-rouge">bd3c0</code>. As I stated above, a locally scoped DOS device is only accessible for the logon session it was created for, because of this my process running with an admin token is unable to see DOS devices created by the limited token and vice versa. To prove my point, run <code class="language-plaintext highlighter-rouge">net use Z: \\127.0.0.1\c$</code> in the limited PowerShell session then run <code class="language-plaintext highlighter-rouge">net use</code> in both processes.</p>

<p><a href="/assets/images/2018/11/net-use-split.png"><img src="/assets/images/2018/11/net-use-split.png" alt="" /></a></p>

<p><em>Limited (left) vs Admin (right)</em></p>

<p>We can see that the limited PowerShell process is able to see our newly mapped drive while the admin PowerShell process cannot due to the isolation of DOS devices per logon session. To further prove our point, we can use WinObj to view the local DOS Devices. We know global devices are located in <code class="language-plaintext highlighter-rouge">\GLOBAL??</code> but to find local devices we need to look at <code class="language-plaintext highlighter-rouge">\Sessions\0\DosDevices\{logon session id}</code>. In our case our limited device location is <code class="language-plaintext highlighter-rouge">\Sessions\0\DosDevices\00000000-000bd3f6</code> while our admin device location is <code class="language-plaintext highlighter-rouge">\Sessions\0\DosDevices\00000000-000bd3c0</code>.</p>

<p><a href="/assets/images/2018/11/DOS-Device-Sessions.png"><img src="/assets/images/2018/11/DOS-Device-Sessions.png" alt="" /></a></p>

<p><em>Limited (left) vs Admin (right)</em></p>

<p>So we can see that created mapped drives exist only in the logon session it was creating in. Having the <code class="language-plaintext highlighter-rouge">EnabledLinkedConnections</code> policy set changes this behaviour to have it defined in both logon sessions.</p>

<p>This explains how mapped drives are created in an adhoc fashion but another areas we haven’t talked about is persisting these mapped drives across new logons and reboots.</p>

<h1 id="drive-persistence">Drive persistence</h1>

<p>Using the <code class="language-plaintext highlighter-rouge">net use</code> command above we have created a mapped drive for the logon session when the user logs off and back on, the logon session ID will be different and it will no longer be able to access the mapped drive from before. Windows offers a way to persist these drives so that the user can continue to use them even after a new logon or reboot. To try this out, run <code class="language-plaintext highlighter-rouge">net use * /delete</code> to clear out any existing mappings and then run <code class="language-plaintext highlighter-rouge">net use Z: \\127.0.0.1\c$ /persistent:yes</code> in our limited PowerShell process and then <code class="language-plaintext highlighter-rouge">net use Y: \\127.0.0.1\c$ /persistent:yes</code> in our admin PowerShell process. When using the <code class="language-plaintext highlighter-rouge">/persistent:yes</code> option, <code class="language-plaintext highlighter-rouge">net use</code> will create a registry key at <code class="language-plaintext highlighter-rouge">HKCU:\Network\{letter}</code> and store the info required to rebuild the mapped drive when needed.</p>

<p><a href="/assets/images/2018/11/Mapped-Drives-Registry.png"><img src="/assets/images/2018/11/Mapped-Drives-Registry.png" alt="" /></a></p>

<p><em>The values match up to the WNetAddConnection2 API</em></p>

<p>We can see our drive mapping for <code class="language-plaintext highlighter-rouge">Z:</code> but not for <code class="language-plaintext highlighter-rouge">Y:</code> which is an ominous sign and just like before our limited PowerShell process can only see the <code class="language-plaintext highlighter-rouge">Z:</code> drive whereas our admin PowerShell process can only see our <code class="language-plaintext highlighter-rouge">Y:</code> drive. Log off and back on again and we will continue to see that <code class="language-plaintext highlighter-rouge">Z:</code> is mapped based on the values in the registry key and is still accessible from other limited processes like Windows Explorer. When using <code class="language-plaintext highlighter-rouge">net use</code> in an admin process we can no longer see <code class="language-plaintext highlighter-rouge">Y:</code> so that was not persisted.</p>

<p>In short, only drives mapped with an access token of the elevation type <code class="language-plaintext highlighter-rouge">TokenElevationTypeDefault</code> or <code class="language-plaintext highlighter-rouge">TokenElevationTypeLimited</code> can create a persisted mapped drive whereas <code class="language-plaintext highlighter-rouge">TokenElevationTypeFull</code>cannot persist a mapped drive. Having the <code class="language-plaintext highlighter-rouge">EnableLinkedConnections</code> set means <code class="language-plaintext highlighter-rouge">TokenElevationTypeFull</code> access tokens will be able to see and persisted mapped network drives like the other token elevation types but this isn’t set by default.</p>

<p>So we know why admin processes are unable to see and persist mapped drives by default we still need to figure out why we can’t do the same for other limited interactive processes, like ones spawned from <code class="language-plaintext highlighter-rouge">runas.exe</code>. These processes will run with the limited access token but when using <code class="language-plaintext highlighter-rouge">Get-PSDrive</code> we can no longer see the actual mapped drive while <code class="language-plaintext highlighter-rouge">net use</code> shows it as Unavailable.</p>

<p><a href="/assets/images/2018/11/Mapped-Drive-runas.png"><img src="/assets/images/2018/11/Mapped-Drive-runas.png" alt="" /></a></p>

<p><em>Same Windows session but different logon session</em></p>

<p>When looking at the access token for the <code class="language-plaintext highlighter-rouge">runas.exe</code> spawned process we can see that while it has the same Windows Session, groups, and privileges, the logon session ID is different. Because the it is part of a different logon session it is no longer able to see the locally scopped mapped drives of my current interactive token. The only reason why they come up as unavailable with <code class="language-plaintext highlighter-rouge">net use</code> is because that tool is scanning the registry for persistent configurations but then cannot find the locally scoped DOS device with that name. You can even prove that no devices have been created using <code class="language-plaintext highlighter-rouge">WinObj</code> by checking under <code class="language-plaintext highlighter-rouge">\Sessions\0\DosDevices\{logon session id}</code>. When running a task through Ansible, or any other WinRM process like <code class="language-plaintext highlighter-rouge">Enter-PSSession</code>, you will see the exact same behaviour which indicates the automatic mapping on a logon is not done when LSA creates a new logon session but by something else.</p>

<p>I don’t have access to the Windows source code to confirm this but after reading the <a href="https://www.microsoftpressstore.com/store/windows-internals-part-1-system-architecture-processes-9780735684188">Windows Internals Book Part 1</a> book this is what I believe happens;</p>

<ul>
  <li>Interactive logons are handled by the <code class="language-plaintext highlighter-rouge">Winlogon</code> executable of the Windows Session</li>
  <li>This may be an existing session when logging on through the console or a new session when logging on through RDP</li>
  <li>Part of the Winlogon process is to notify the <a href="https://docs.microsoft.com/en-us/windows/desktop/SecAuthN/multiple-provider-router">Multiple Provider Router</a> (MPR) that a new logon has occurred</li>
  <li>MPR will then check the registry and load the various network providers, one of them being the <code class="language-plaintext highlighter-rouge">Microsoft Windows Network</code> provider</li>
  <li>The <code class="language-plaintext highlighter-rouge">Microsoft Windows Network</code> provider will scan the registry at <code class="language-plaintext highlighter-rouge">HKCU:\Network</code> and then attempt to map each mapped drive configuration for the current logon token by using <a href="https://docs.microsoft.com/en-us/windows/desktop/api/winnetwk/nf-winnetwk-wnetaddconnection2w">WNetAddConnection2W</a></li>
  <li>If the logon token is <code class="language-plaintext highlighter-rouge">TokenElevationTypeLimited</code> and the <code class="language-plaintext highlighter-rouge">EnableLinkedConnections</code> policy is set, then the network provider will also map the same drive to the split token with the <code class="language-plaintext highlighter-rouge">TokenElevationTypeFull</code> type</li>
</ul>

<p>The key component that starts this whole process is <code class="language-plaintext highlighter-rouge">Winlogon</code> and because runas.exe, WinRM, scheduled tasks don’t use <code class="language-plaintext highlighter-rouge">Winlogon</code>, the persistent drive mapping is never automatically run. Because of this it will not be possible for applications that use WinRM, like Ansible, to automatically access the user’s mapped drives. They can manually call <code class="language-plaintext highlighter-rouge">net use</code> or read the registry and call <code class="language-plaintext highlighter-rouge">WNetAddConnection2W</code> but this will not be handled by Windows automatically.</p>

<h1 id="credentials">Credentials</h1>

<p>I’ve covered mapped drives and how they are defined and used within Windows but one key component of mapped drives is the authentication process. Here is the order in which credentials are used when connecting to a network resource;</p>

<ul>
  <li>When calling <a href="https://docs.microsoft.com/en-us/windows/desktop/api/winnetwk/nf-winnetwk-wnetaddconnection2w">WNetAddConnection2W</a>, it will use the credentials specified by <code class="language-plaintext highlighter-rouge">lpUserName</code> and <code class="language-plaintext highlighter-rouge">lpPassword</code> if set</li>
  <li>If the current access token has access to the user’s Credential store and a credential exists for the remote target then that is used</li>
  <li>If the current access token has access to the user’s credentials then it will use those. This is the typical interactive or RDP logon scenario</li>
  <li>No credentials could be accessed so Windows will authenticate as an anonymous user</li>
</ul>

<p>I’ve covered logon types and credentials within WinRM in my <a href="/2018/01/24/demystifying-winrm/">Demystifying WinRM</a> blog if you want to learn more about logon types, but typically a WinRM connection will not have access to the user’s credentials so the last scenario applies. Ansible does offer a few different ways to bypass the credential limitation which will allow a WinRM process access delegate its credential or access to the credential vault. These include;</p>

<ul>
  <li>Using CredSSP as an authentication option, this will allow the user to access its credential vault as well as delegate its own credentials</li>
  <li>Using Kerberos with delegation to allow the user to delegate its own credentials</li>
  <li>Using <a href="https://docs.ansible.com/ansible/latest/user_guide/become.html">Ansible become</a> to create a pseudo interactive session with access to its credential vault and delegation rights</li>
</ul>

<p>When using the <code class="language-plaintext highlighter-rouge">net use Z: \\server\share /user:username password /persistence:yes</code> command, Windows actually calls <code class="language-plaintext highlighter-rouge">WNetAddConnection2W</code> API with the <code class="language-plaintext highlighter-rouge">lpUserName</code> and <code class="language-plaintext highlighter-rouge">lpPassword</code> set based on our input so it’s able to authenticate with the network resource. If successful the registry key at <code class="language-plaintext highlighter-rouge">HKCU:\Network\Z</code> will be populated with the details to remap on the next logon and the <code class="language-plaintext highlighter-rouge">UserName</code> property will be set to the value of <code class="language-plaintext highlighter-rouge">lpUserName</code>. We can continue to use the mapped drive with these credentials for the current logon session but as soon as we log off and back on it will fail to connect. Through trial and error I have found that while <code class="language-plaintext highlighter-rouge">WNetAddConnection2W</code> will use the credentials to create the initial logon session’s mapped drive, the <code class="language-plaintext highlighter-rouge">lpPassword</code> value is not stored anywhere so subsequent logons will fail as Windows is sending a blank password as per this security event log entry.</p>

<p><a href="/assets/images/2018/11/Network-logon-failure.png"><img src="/assets/images/2018/11/Network-logon-failure.png" alt="" /></a></p>

<p><em>0xc000006a == STATUS_WRONG_PASSWORD</em></p>

<p>Because of this issue, the only way I’ve found to automatically map a network drive that requires credentials is to store the required credential in the Windows Credential Manager for each user who needs that mapped drive. This can be done through the GUI but the <code class="language-plaintext highlighter-rouge">cmdkey</code> executable can be used to achieve the same thing. In this case I would run <code class="language-plaintext highlighter-rouge">cmdkey.exe /add:&lt;server&gt; /user:&lt;username&gt; /pass:&lt;password&gt;</code> before running my <code class="language-plaintext highlighter-rouge">net use</code>.</p>

<p><a href="/assets/images/2018/11/cmdkey-net-use.png"><img src="/assets/images/2018/11/cmdkey-net-use.png" alt="" /></a></p>

<p><em>To prompt for a pass, omit the password after /pass</em></p>

<p>I can now log off and back on and have my mapped drive automatically connect with the credentials specified as well as manually manage the credentials in the Credential Manager.</p>

<p><a href="/assets/images/2018/11/Credential-manager.png"><img src="/assets/images/2018/11/Credential-manager.png" alt="" /></a></p>

<p>Credentials are stored per user account so you cannot share credentials or create a global credential and each network resource can only have one credential assigned to it. The credentials themselves are stored in a reversible encrypted format that can only be read by a LSA authentication providers, in reality it’s really trivial to use an application like <a href="https://github.com/gentilkiwi/mimikatz">mimikatz</a> to dump passwords from the Credential Manager. The best defense is to not save credentials at all and just input them when it’s needed but if you need to save credentials then make sure the account isn’t used for anything else.</p>

<h1 id="global-mapped-drives">Global mapped drives</h1>

<p>I briefly touched on the global scope for network drives but I’ve mostly left this alone as the majority of the work focuses on per user mapped drives. It is possible to create a mapped drive that works for accounts on the current host and this is done by creating a globally scoped DOS device. Creating a globally scoped DOS device is as simple as running <code class="language-plaintext highlighter-rouge">net use</code> as the system account but having that persist on a reboot involves modifying the registry at <code class="language-plaintext highlighter-rouge">HKLM:\SYSTEM\CurrentControlSet\Control\Session Manager\DOS Devices</code>. By creating a new string property where the name is the drive letter and the value is a NT Object path you want to redirect it to, Windows will automatically create this global DOS device during the <code class="language-plaintext highlighter-rouge">smss.exe</code> startup process. You can use this handy PowerShell cmdlet to build the Windows Object path and set the registry key for you.</p>

<div class="language-plaintext highlighter-rouge"><div class="highlight"><pre class="highlight"><code>Function New-GlobalMappedDrive {
    [CmdletBinding()]
    param(
        [Parameter(Mandatory=$true)][String]$Drive,
        [Parameter(Mandatory=$true)][String]$Path,
        [Switch]$Force
    )
    if ($Drive -notmatch "^[a-zA-z]{1}[:]?$") {
        throw [System.ArgumentException]"Drive must either be a single letter or a letter with a :"
    } elseif ($Drive.Length -eq 1) {
        $Drive = "$($Drive):"
    }

    if ((-not [System.IO.Path]::IsPathRooted($Path)) -or (-not $Path.StartsWith("\\"))) {
        throw [System.ArgumentException]"Path must be a UNC path starting with \\"
    }

    $reg_key = "HKLM:\SYSTEM\CurrentControlSet\Control\Session Manager\DOS Devices"
    # The SYSTEM account always has a logon session of 00000000-000003e7
    $dos_path = "\Device\LanmanRedirector\;$($Drive)00000000000003e7\$($Path.Substring(2))"
    $existing_property = Get-ItemProperty -Path $reg_key -Name $Drive -ErrorAction SilentlyContinue

    if ($null -ne $existing_property) {
        $existing_dos_path = $existing_property.$Drive
        if ($existing_dos_path -eq $dos_path) {
            Write-Verbose -Message "The Global DOS Device '$Drive' is already pointing to '$Path'"
        } elseif (-not $Force) {
            Write-Error -Message "Global DOS Device '$Drive' already exists, use -Force to override"
        } else {
            Write-Verbose -Message "The Global DOS Device '$Drive' will be repointed from '$existing_dos_path' to '$dos_path'"
            Set-ItemProperty -Path $reg_key -Name $Drive -Value $dos_path &gt; $null
        }
    } else {
        Write-Verbose -Message "Creating new Global DOS Device '$Drive' pointing to '$Path'"
        New-ItemProperty -Path $reg_key -Name $Drive -Value $dos_path &gt; $null
    }
}
</code></pre></div></div>

<p>On the next reboot you will see the mapped drive in Windows Explorer that is disconnected but you can still double click and open it. I’m not sure why it shows up as disconnected by I believe it may be because the state of a network drive is handled by the actual network provider whereas we have bypassed it entirely by defining the global DOS device manually. Even better, since we’ve created a global DOS device, we should now be able to see this drive in a WinRM task as we are no longer restricted to an individual logon session.</p>

<p><a href="/assets/images/2018/11/Global-mapped-drive.png"><img src="/assets/images/2018/11/Global-mapped-drive.png" alt="" /></a></p>

<p><em>We can still access the drive even though it shows up as disconnected</em></p>

<p>If the network resource requires authentication with a different account, the same rules that apply to a locally scoped DOS device also apply to a globally scoped one. That is, the user account must have a credential for that network host defined in it’s own credential vault as there is no global credential vault that I’m aware of.</p>

<h1 id="ansible">Ansible</h1>

<p>Throughout this post I’ve mostly covered Windows only topics but the main reason why I worked through this was to be able to easily manage network drives in Ansible. If you were able to use the devel branch in Ansible, or 2.8 once released, you can simply create a network drive with the following task</p>

<div class="language-plaintext highlighter-rouge"><div class="highlight"><pre class="highlight"><code>- name: create a drive with no authentication
  win_mapped_drive:
    letter: Z
    path: \\server\share
    state: present
</code></pre></div></div>

<p>This achieves the same result as running <code class="language-plaintext highlighter-rouge">net use Z: \\server\share /persistent:yes</code> but it includes all the idempotency checks and abstracts all the complex code required to achieve this through WinRM. If you need to create a mapped drive that requires authentication you can achieve this in two tasks;</p>

<div class="language-plaintext highlighter-rouge"><div class="highlight"><pre class="highlight"><code>- name: create a credential for the network resource
  win_credential:
    name: server
    type: domain_password
    username: username
    secret: password
    state: present
  # become is required to access the credential manager
  become: yes
  become_method: runas
  vars:
    # this is not the credential username/pass but the user
    # who's vault you want to save the credential in
    ansible_become_user: '{{ ansible_user }}'  
    ansible_become_pass: '{{ ansible_password }}'

- name: create a mapped drive that requires authentication
  win_mapped_drive:
    letter: Z
    path: \\server\share
    state: present
  # unless running with CredSSP, you need to run this task
  # with become so it can access the credentials above
  become: yes
  become_method: runas
  vars:
    ansible_become_user: '{{ ansible_user }}'
    ansible_become_pass: '{{ ansible_password }}'
</code></pre></div></div>

<p>The first task will use create a Windows Credential for the network host <code class="language-plaintext highlighter-rouge">server</code> under the become user’s credential vault and the second task will use those credentials when saving the mapped drive. Any future interactive logon sessions for that user will be able to see that drive and it will automatically use the credentials that were created in the first task.</p>

<p>The magic behind all this is using Ansible’s <code class="language-plaintext highlighter-rouge">become</code> process to change the logon type from <code class="language-plaintext highlighter-rouge">network</code> to <code class="language-plaintext highlighter-rouge">interactive</code> so that it can access the user’s credentials. Historically using become with <code class="language-plaintext highlighter-rouge">win_mapped_drive</code> would only work if the account did not have a split access token but the recent refactor is able to handle this scenario by impersonating the limited token when managing the network resources.</p>

<p>Say you wish to create a mapped drive without saving the credentials you can run the following</p>

<div class="language-plaintext highlighter-rouge"><div class="highlight"><pre class="highlight"><code>- name: create a mapped drive with temporary credentials
  win_mapped_drive:
    letter: Z
    path: \\server\share
    state: present
    username: username
    password: password
</code></pre></div></div>

<p>This will use <code class="language-plaintext highlighter-rouge">username</code> and <code class="language-plaintext highlighter-rouge">password</code> for the initial connection test but unlike <code class="language-plaintext highlighter-rouge">net use</code>, it will not save the <code class="language-plaintext highlighter-rouge">username</code> in the registry. We can see that become is not required in this case as we don’t need access to the Credential Manager for authentication. The mapped drive will be available to any future interactive logons it will just require manual authentication by the user.</p>

<p>The last scenario would be creating a globally scoped mapped drive. If you wish to create a global mapped drive that will exist until the next reboot you can run this task</p>

<div class="language-plaintext highlighter-rouge"><div class="highlight"><pre class="highlight"><code>- name: create a global mapped drive without persistence
  win_mapped_drive:
    letter: Z
    path: \\server\share
    state: present
    # While this isn't always required, it may need explicit
    # credentials for the initial authentication
    username: username
    password: password
  become: yes
  become_method: runas
  become_user: SYSTEM
</code></pre></div></div>

<p>If you wish to create a global mapped drive that persists on a reboot you can edit the registry key like so</p>

<div class="language-plaintext highlighter-rouge"><div class="highlight"><pre class="highlight"><code>- name: create a global mapped drive with persistence
  win_regedit:
    path: HKLM:\SYSTEM\CurrentControlSet\Control\Session Manager\DOS Devices
    name: 'Z:'
    data: '\Device\LanmanRedirector\;Z:00000000000003e7\server\share'
    type: string
    state: present
</code></pre></div></div>

<p>The first example runs the code under the <code class="language-plaintext highlighter-rouge">SYSTEM</code> account which is the same as running <code class="language-plaintext highlighter-rouge">net use</code> under the <code class="language-plaintext highlighter-rouge">SYSTEM</code> account but as we’ve gone across it before this will not persist on a reboot. You don’t have to map the drive using the <code class="language-plaintext highlighter-rouge">SYSTEM</code> account before creating the registry entry, the first task is only necessary if you want it available immediately.</p>

<h1 id="tldr">TLDR;</h1>

<p>I’ve talked about some pretty low level Windows concepts in this post and thought it best to try and sum it all up for anyone just wanting a quick overview.</p>

<ul>
  <li>mapped drives are created per logon session, the only exception is a mapped drive created by the SYSTEM account which is global</li>
  <li>a global mapped drive can be created by running the mapping process as the <code class="language-plaintext highlighter-rouge">SYSTEM</code> account</li>
  <li>a global mapped drive will only exist until the host is rebooted</li>
  <li>you can define global mapped drives that are mapped when Windows starts up by editing the registry</li>
  <li>a typical administrator has 2 logon sessions and only the limited session will be able to add/enumerate/remove a mapped drive</li>
  <li>you can use the <code class="language-plaintext highlighter-rouge">EnableLinkedConnections</code> policy to control whether the admin token will see the same drives as the limited token</li>
  <li>a WinRM process, will never see a persisted mapped drive as the automatic mapping only occurs with certain logon types</li>
  <li>when using credentials, use the Credential Manager to save the credential for the remote host</li>
  <li>when using the <code class="language-plaintext highlighter-rouge">/user:</code> parameter of <code class="language-plaintext highlighter-rouge">net use</code>, the drive will fail to map on the next logon, use the Credential Manager instead</li>
  <li>and lastly, use the <code class="language-plaintext highlighter-rouge">win_mapped_drive</code> and <code class="language-plaintext highlighter-rouge">win_credential</code> modules with Ansible to easily manage these resources 🙂</li>
</ul>]]></content><author><name>Jordan Borean</name></author><category term="ansible" /><category term="windows" /><summary type="html"><![CDATA[Mapped drives have always been a curiosity for me, I’ve used them before in the past but usually come across an issue that forces me to abandon them. Alongside my curiosity, there has also been some demand in Ansible to be able to manage mapped drives and in my naivety I created a very basic …]]></summary></entry><entry><title type="html">Windows host through SSH bastion on Ansible</title><link href="https://bloggingforlogging.com/2018/10/14/windows-host-through-ssh-bastion-on-ansible/" rel="alternate" type="text/html" title="Windows host through SSH bastion on Ansible" /><published>2018-10-14T22:09:00+00:00</published><updated>2018-10-14T22:09:00+00:00</updated><id>https://bloggingforlogging.com/2018/10/14/windows-host-through-ssh-bastion-on-ansible</id><content type="html" xml:base="https://bloggingforlogging.com/2018/10/14/windows-host-through-ssh-bastion-on-ansible/"><![CDATA[<p>A use case I’ve been asked about a few times is to be able to connect to a Windows host through another bastion host. In the context of this post, a bastion host is “a server that is placed on the boundary of an internal network and provides access to this network from another external network”.</p>

<p><a href="/assets/images/2018/10/AWS_Bastion.png"><img src="/assets/images/2018/10/AWS_Bastion.png" alt="" /></a></p>

<p><em>Typical AWS Bastion Setup – <a href="https://aws.amazon.com/blogs/security/how-to-record-ssh-sessions-established-through-a-bastion-host">source</a></em></p>

<p>Because a bastion host provides access to an internal network, great care must be taken to harden this host from malicious actors. The scope of this post is to not cover the hardening of this host but rather how to configure Ansible to use Windows hosts within an environment like this.</p>

<h1 id="protocols">Protocols</h1>

<p>The main two protocols that are used for this scenario are SOCKS and SSH which are fairly well known and understood so I’ll briefly talk about them.</p>

<h2 id="socks">SOCKS</h2>

<p>When we talk about proxies, typically a standard HTTP proxy comes in mind that can forward HTTP requests from a client to another server that the proxy can reach. As WinRM is a HTTP protocol we can still use a HTTP proxy to route to our Windows host but this guide is about using SSH through a bastion host so it will ignore HTTP proxies. SOCKS stands for SOCKet Secure and the latest standard is SOCKS5 which will be used in this guide.</p>

<p>SOCKS is a proxy that routes traffic back and forth between a client and a server and acts as a middle man between the two. It tries to be as transparent as possible and transfers the packet to the client and server unmodified. This is unlike a HTTP proxy which forwards the the HTTP request and can include more in depth analysis of the HTTP request itself and act accordingly.</p>

<p>The SOCKS protocol does not encrypt or change your data during transit but utilising it with other protocols, like SSH, we can ensure any traffic on a public interface is encrypted.</p>

<h2 id="ssh">SSH</h2>

<p>The special sauce in this mix is Secure SHel (SSH) that is used as the channel to transfer the SOCKS data from the Ansible host to the bastion host. SSH is fairly ubiquitous in today’s IT environment so I won’t bore you with the details of what is actually happening during this connection. Channeling the data over SSH gives us a few benefits, such as;</p>

<ul>
  <li>Encryption of data as it goes through the public channel</li>
  <li>Use SSH keys for authentication, this does not negate the need for WinRM authentication but is used to protect the bastion host</li>
  <li>Server host verification</li>
  <li>Compression of data when running over a high latency network</li>
</ul>

<p>A very basic outline of what this can looks like is;</p>

<p><a href="/assets/images/2018/10/bastion-socks-diagram.png"><img src="/assets/images/2018/10/bastion-socks-diagram.png" alt="" /></a></p>

<p><em>Excuse my crude diagramming</em></p>

<p>Unlike a simple Ansible to Windows host over WinRM connection, this scenario has multiple network boundaries that we need to be aware of. These boundaries include;</p>

<ul>
  <li>Ansible to the SOCKS listener
    <ul>
      <li>The port this runs on is dependent on whatever port the listener was configured with, <code class="language-plaintext highlighter-rouge">-D &lt;port&gt;</code></li>
      <li>This data contains the WinRM payload encapsulated in a SOCKS packet, encryption is dependent on the WinRM/HTTP protocol</li>
      <li>In this demo, this all runs on the loopback interface but the SOCKS/SSH client could also be on another host if needed</li>
    </ul>
  </li>
  <li>SOCKS listener to the SSH client
    <ul>
      <li>An internal channel that is controlled by the SSH service</li>
    </ul>
  </li>
  <li>SSH Channel
    <ul>
      <li>SSH traffic sent over an unsecured connection like the internet</li>
      <li>All data is encrypted using the SSH protocol and is seen as normal SSH traffic</li>
      <li>Typically this is done over port 22 but can be whatever is specified by the user</li>
      <li>In this demo, this is the data sent over port <code class="language-plaintext highlighter-rouge">2222</code> on the loopback interface (VBox NAT port forwarding)</li>
    </ul>
  </li>
  <li>SSH Server to the WinRM listener
    <ul>
      <li>The Bastion host acts as the Ansible controller and sends the WinRM traffic to the Windows host</li>
      <li>For WinRM, this would be done over port <code class="language-plaintext highlighter-rouge">5985</code> (http) or <code class="language-plaintext highlighter-rouge">5986</code> (https)</li>
      <li>The WinRM service sees the bation host as the source and has no idea of the SSH/SOCKS implementation behind it</li>
    </ul>
  </li>
</ul>

<p>Any responses from the Windows host are sent back through the same channel and everything should be transparent to the Ansible controller.</p>

<h2 id="psrpwinrm">PSRP/WinRM</h2>

<p>I’ve spoken about WinRM and PSRP at lengths in <a href="/2018/01/24/demystifying-winrm/">Demystifying WinRM</a> and <a href="/2018/08/14/powershell-remoting-on-python/">PowerShell emoting on Python</a> so I won’t go into too much detail here. Basically WinRM is a HTTP protocol and uses a SOAP based API for communication between the client and the server. While encryption can and should be used with either HTTPS or Kerberos with AES256 encryption, it is not as simple to setup and use in comparison to SSH. Windows does offer a <a href="https://github.com/PowerShell/Win32-OpenSSH">Win32 port</a> of OpenSSH that you can use today but it’s still fairly buggy and not currently compatible in Ansible.</p>

<p>As time goes on I expect to see WinRM decline in use but for the immediate and short term future it is here to stay.</p>

<h1 id="in-action">In Action</h1>

<p>Now that we’ve gone over a high level overview of what is involved, let’s demonstrate this in action.</p>

<h2 id="requirements">Requirements</h2>

<p>Here are the following applications that need to be installed for the demo;</p>

<ul>
  <li><a href="https://www.ansible.com/">Ansible v2.7+</a></li>
  <li><a href="https://github.com/jborean93/pypsrp">pypsrp</a></li>
  <li><a href="https://www.vagrantup.com/">Vagrant</a></li>
  <li><a href="https://www.virtualbox.org/">VirtualBox</a></li>
</ul>

<p>If you wish to just read the blog then this isn’t necessary but actually doing each step helped me to understand what is actually going on and I highly recommend it.</p>

<p>Once Vagrant and VirtualBox have been installed, pip can be used to install the Python dependencies;</p>

<div class="language-plaintext highlighter-rouge"><div class="highlight"><pre class="highlight"><code># recommend you use a Virtual Environment for your testing
pip install virtualenv
virtualenv ansible-bastion
source ansible-bastion/bin/activate

# install the required Python packages
pip install ansible pypsrp requests[socks]
</code></pre></div></div>

<p>This installs Ansible, pypsrp, and a library for requests to support SOCKS proxies.</p>

<h2 id="setting-up-the-hosts">Setting up the hosts</h2>

<p>Once the pre-requisite applications have been installed, the next step is to setup the test environment. Create a file called <code class="language-plaintext highlighter-rouge">'Vagrantfile'</code> with the following content:</p>

<div class="language-plaintext highlighter-rouge"><div class="highlight"><pre class="highlight"><code># -*- mode: ruby -*-
# vi: set ft=ruby :

Vagrant.configure("2") do |config|
  config.vm.define "bastion" do |bastion|
    ssh_pub_key = File.readlines("#{Dir.home}/.ssh/id_rsa.pub").first.strip
    bastion.vm.box = "centos/7"
    bastion.vm.network "private_network", ip: "192.168.50.10",
      virtualbox__intnet: true
    bastion.vm.network "forwarded_port", guest: 22, host: 2222, id: "ssh"
    bastion.vm.provision "shell",
      inline: "echo '192.168.50.11 windows-server' &gt;&gt; /etc/hosts"
    bastion.vm.provision "shell", privileged: false,
      inline: "echo #{ssh_pub_key} &gt;&gt; $HOME/.ssh/authorized_keys"
  end
  config.vm.define "windows" do |windows|
    windows.vm.box = "jborean93/WindowsServer2016"
    windows.vm.network "private_network", ip: "192.168.50.11",
      virtualbox__intnet: true
  end
end
</code></pre></div></div>

<p>This Vagrantfile will create two VMs with the following configurations;</p>

<ul>
  <li>A Centos 7 host that acts as our bastion host
    <ul>
      <li>Has a NAT adapter with a forwarded SSH port bound to <code class="language-plaintext highlighter-rouge">2222</code> for external access</li>
      <li>A VirtualBox internal network adapter set to an IP of <code class="language-plaintext highlighter-rouge">192.168.50.10</code>, any IP will do here</li>
      <li>A manual entry in the hosts file that points to our Windows host IP</li>
      <li>Our current user’s public key set as an authorized key for SSH logon, this isn’t strictly needed but it saves us from managing SSH password authentication</li>
    </ul>
  </li>
  <li>A Windows Server 2016 host that is our intended target
    <ul>
      <li>Has a NAT adapter for Vagrant to configure but will not be used as part of the demo</li>
      <li>A VirtualBox internal network adapter set to an IP of <code class="language-plaintext highlighter-rouge">192.168.50.11</code>, any IP will do as long as it matches the host entry on our bastion host</li>
    </ul>
  </li>
</ul>

<p>This scenario is not limited to a Centos 7 or Windows Server 2016 host, the main requirement is that the bastion host can resolve our Windows host and that bastion can then be accessed through SSH from our Ansible controller host. Once the file been created, start the Vagrant process with the command <code class="language-plaintext highlighter-rouge">'vagrant up'</code>.</p>

<p><a href="/assets/images/2018/10/vagrant-up-bastion.png"><img src="/assets/images/2018/10/vagrant-up-bastion.png" alt="" /></a></p>

<p><em>Get a cup of coffee this could take awhile</em></p>

<p>This step can take some time to complete as it will download the Vagrant boxes required and then setup the VirtualBox VMs. Once the hosts are setup, you should be able to connect to the bastion host over SSH with the command <code class="language-plaintext highlighter-rouge">'ssh -p 2222 vagrant@127.0.0.1'</code>. Otherwise to log on manually, open the VirtualBox console for the VM and logon with the username <code class="language-plaintext highlighter-rouge">vagrant</code> and password <code class="language-plaintext highlighter-rouge">vagrant</code>. To remove the VMs or to start again, run <code class="language-plaintext highlighter-rouge">'vagrant destroy'</code>.</p>

<p>The SSH connection is targeted towards <code class="language-plaintext highlighter-rouge">127.0.0.1:2222</code> due to how the VirtualBox NAT network adapter works. What happens is that it sets up a listener on the localhost and listens on the port configured (<code class="language-plaintext highlighter-rouge">2222</code>). Any requests to this port are then forwarded to the port on the VM (<code class="language-plaintext highlighter-rouge">22</code>). While our new Windows host also has a NAT adapter for Vagrant to use in its initial configuration, we will be ignoring that and pretend only the internal network adapter exists for this demo. This effectively means we cannot access that Windows host on our Ansible controller host but our bastion host can through the internal network that they are both connected to.</p>

<h2 id="configuring-the-ssh-proxy">Configuring the SSH Proxy</h2>

<p>The next step is to setup the SSH proxy that exposes a SOCKS5 proxy to channel the WinRM requests through the bastion host. This can be as simple as running <code class="language-plaintext highlighter-rouge">'ssh -C -D 1234 -p 2222 vagrant@127.0.0.1'</code> in another session and keeping that running for the tests. To have something that runs in the background you can use SSH Multiplexing with ControlMaster. To setup the background connection run;</p>

<div class="language-plaintext highlighter-rouge"><div class="highlight"><pre class="highlight"><code># any folder will do, as long as it is the same in ControlPath
mkdir ~/.ssh/cp
ssh -o "ControlMaster=auto" -o "ControlPersist=no" -o "ControlPath=~/.ssh/cp/ssh-%r@%h:%p" -CfNq -D 127.0.0.1:1234 -p 2222 vagrant@127.0.0.1
</code></pre></div></div>

<p>Let’s break this down a bit more;</p>

<ul>
  <li><code class="language-plaintext highlighter-rouge">-o "ControlMaster=auto"</code>: Allow multiplexing when possible</li>
  <li><code class="language-plaintext highlighter-rouge">-o "ControlPersist=no"</code>: The master connection will be closed when the initial connection is also closed</li>
  <li><code class="language-plaintext highlighter-rouge">-o "ControlPath=..."</code>: The path to the control socket, uses some substituted values to derive the filename but is configurable</li>
  <li><code class="language-plaintext highlighter-rouge">-C</code>: Compress the data that goes over this channel, good for high latency networks</li>
  <li><code class="language-plaintext highlighter-rouge">-f</code>: Run SSH in the background after the connection is setup</li>
  <li><code class="language-plaintext highlighter-rouge">-N</code>: Do not execute a remote command</li>
  <li><code class="language-plaintext highlighter-rouge">-q</code>: Quiet mode</li>
  <li><code class="language-plaintext highlighter-rouge">-D 127.0.0.1:1234</code>: The bind address and port for the SOCKS proxy, the host address can be omitted which indicates the port should be available from all interfaces</li>
  <li><code class="language-plaintext highlighter-rouge">-p 2222</code>: The remote port of our bastion host</li>
  <li><code class="language-plaintext highlighter-rouge">vagrant@127.0.0.1</code>: The username and hostname of our bastion host</li>
</ul>

<p>Once you have finished the connection and wish to close it, simply run <code class="language-plaintext highlighter-rouge">'ssh -o "ControlPath=~/.ssh/cp/ssh-%r@%h:%p" -O stop -p 2222 vagrant@127.0.0.1'</code>. This closes the background connection that’s stored at the <code class="language-plaintext highlighter-rouge">ControlPath</code> option based on the host we specified (our bastion host). You can substitute <code class="language-plaintext highlighter-rouge">'-O stop'</code> with <code class="language-plaintext highlighter-rouge">'-O check'</code> to check the status of a connection as well.</p>

<p>Creating a SOCKS proxy is not limited to OpenSSH, there are various applications out there that can also achieve this goal. OpenSSH was chosen in this guide as it is fairly universal when it comes to using Ansible.</p>

<h2 id="connecting-with-ansible">Connecting with Ansible</h2>

<p>Once the proxy has been setup, the last step is to create an Ansible inventory that will use the SSH proxy to talk to the Windows host. The inventory would be set like Ansible is connecting directly to the Windows host but with the addition of the <code class="language-plaintext highlighter-rouge">ansible_psrp_proxy</code> variable that points to our SSH proxy server.</p>

<p>For this demo, create a file called <code class="language-plaintext highlighter-rouge">inventory.ini</code> with the following content:</p>

<div class="language-plaintext highlighter-rouge"><div class="highlight"><pre class="highlight"><code>[windows]
windows-server

[windows:vars]
ansible_user=vagrant
ansible_password=vagrant
ansible_connection=psrp
ansible_psrp_protocol=http
ansible_psrp_proxy=socks5h://localhost:1234
</code></pre></div></div>

<p>Instead of using the typical winrm connection plugin, we will try out the new <a href="https://docs.ansible.com/ansible/latest/plugins/connection/psrp.html">psrp</a> plugin which exposes a variable that can define a proxy for Ansible to use. This can also be done with the winrm connection plugin but requires global environment variables to be set which is a lot more messy if you have different proxy requirements per host. Breaking down the proxy variable we can see that it’s split into 3 parts <code class="language-plaintext highlighter-rouge">&lt;scheme&gt;://&lt;hostname&gt;:&lt;port&gt;</code>;</p>

<ul>
  <li><code class="language-plaintext highlighter-rouge">scheme</code>: Set to either <code class="language-plaintext highlighter-rouge">socks5</code> or <code class="language-plaintext highlighter-rouge">socks5h</code>, the former means DNS resolution is done on the client while the latter means resolution happens on the bastion host</li>
  <li><code class="language-plaintext highlighter-rouge">hostname</code>: The hostname of the SSH proxy, in this demo this is the same host as the Ansible controller</li>
  <li><code class="language-plaintext highlighter-rouge">port</code>: The port the SSH proxy is listening on, corresponds to the <code class="language-plaintext highlighter-rouge">-D</code> argument when starting the proxy</li>
</ul>

<p>I haven’t been able to test it, but if your SOCKS proxy server requires user authentication then the credentials would be specified like <code class="language-plaintext highlighter-rouge">socks5://user:pass@host:port</code>.</p>

<p>As the bastion host contains the hosts entry to resolve the Windows host, we use the <code class="language-plaintext highlighter-rouge">socks5h</code> schema, this should be typical of most scenarios. Once the inventory has been created, simply run <code class="language-plaintext highlighter-rouge">ansible -i inventory.ini windows -m win_ping</code> and watch it connect.</p>

<p><a href="/assets/images/2018/10/bastion-ansible.png"><img src="/assets/images/2018/10/bastion-ansible.png" alt="" /></a></p>

<p><em>Successful connection</em></p>

<p>Now that we can successfully connect Ansible to our Windows host through the bastion host, you can easily see that Ansible runs as normal with the exception of the proxy variable being set. I would love to have the actual SOCKS/SSH proxy set up as part of Ansible to get rid of that manual step but that’s a nice to have feature and not a must have.</p>]]></content><author><name>Jordan Borean</name></author><category term="ansible" /><category term="ssh" /><category term="windows" /><summary type="html"><![CDATA[A use case I’ve been asked about a few times is to be able to connect to a Windows host through another bastion host. In the context of this post, a bastion host is “a server that is placed on the boundary of an internal network and provides access to this network from another external …]]></summary></entry><entry><title type="html">PowerShell Remoting on Python</title><link href="https://bloggingforlogging.com/2018/08/14/powershell-remoting-on-python/" rel="alternate" type="text/html" title="PowerShell Remoting on Python" /><published>2018-08-14T05:34:03+00:00</published><updated>2018-08-14T05:34:03+00:00</updated><id>https://bloggingforlogging.com/2018/08/14/powershell-remoting-on-python</id><content type="html" xml:base="https://bloggingforlogging.com/2018/08/14/powershell-remoting-on-python/"><![CDATA[<p>One thing I am looking into everyday as part of my job is how to make the remote management of Windows servers easier. Currently the best way is through WinRM but as I’ve <a href="/2018/01/24/demystifying-winrm/">written about before</a>, WinRM can be such a vague term. It can mean refer to different technologies and the answer to what is WinRM depends on who you ask and in what context. When talking about third party implementations, like Ansible/pywinrm; it refers to the raw Windows Remote Shell (WinRS) over the WSMan transport protocol. Whereas, a Windows admin, would probably be talking about the PowerShell remoting protocol through things like the <code class="language-plaintext highlighter-rouge">Invoke-Command</code>, <code class="language-plaintext highlighter-rouge">Enter-PSSession</code> PowerShell cmdlets.</p>

<p>While they both share the same transport mechanism over WSMan, they are really not the same thing. WinRS is a very basic remote shell protocol to run commands while the PowerShell Remoting Protocol (PSRP) is like WinRS but on steroids. This can lead to some confusion when trying to explain some of the differences between WinRS and PSRP, but in short these are the benefits I see with using PSRP over WinRS;</p>

<ul>
  <li>PSRP is faster when executing PowerShell commands as it does not need to start a new PowerShell process on each invocation</li>
  <li>PSRP can connect to custom endpoints/configurations, enabling things like <a href="https://docs.microsoft.com/en-us/powershell/jea/overview">Just Enough Administration (JEA)</a></li>
  <li>PSRP deals with PowerShell objects directly, e.g. strings, ints, dicts, lists, and other objects can be serialised/deserialised as it transfers between each host</li>
  <li>PSRP has a mechanism for securely sharing secrets through the <a href="https://msdn.microsoft.com/en-us/library/system.security.securestring.aspx">SecureString</a> type</li>
</ul>

<p>Before I continue on to talk about this a bit more, I wanted to give a shout out to Matt Wrock who wrote some posts about PSRP <a href="http://www.hurryupandwait.io/blog/released-winrm-gem-20-first-cross-platform-open-sourced-psrp-client-implementation?rq=PSRP">here</a> and <a href="http://www.hurryupandwait.io/blog/a-look-under-the-hood-at-powershell-remoting-through-a-ruby-cross-plaform-lens?rq=PSRP">here</a>. While I think some of the points raised in these blogs are not 100% correct, they are what inspired me to work down this path and are really helpful for anyone interested in this topic. I highly recommend you read through them when you have a chance as they are really great articles on PSRP and how it has been implemented in the <a href="https://github.com/WinRb/WinRM">Ruby WinRM</a> library</p>

<h1 id="what-is-psrp-and-pypsrp">What is PSRP and PyPSRP</h1>

<p>So what is PSRP, PSRP is an acronym for PowerShell Remoting Protocol. As I mentioned above it is a protocol that sits on top of the WSMan/WinRM protocol that was designed for interacting with a PowerShell instance remotely. In recent years it has been expanded to also run on other transports mechanisms like SSH but this has only been a recent addition with the PowerShell Core (6.0+) releases. I’m still not fully sold on PowerShell Core and it’s benefits today so I will mostly be focusing on PowerShell 2 – 5.x which only allows the WSMan transport.</p>

<p>PyPSRP is a Python library I’ve written that is designed to operate on the PSRP layer rather than just the WinRS component most other third party libraries offer. The only other third party library that I know works with PSRP is the <a href="https://github.com/WinRb/WinRM">Ruby WinRM</a> library, but its implementation has mostly been around adapting the PSRP components to an stdio based process rather than taking full advantage of PSRP and what it offers. When I first started to look into this protocol, I went a similar route to the Ruby WinRM library and just bolted on PSRP into the pywinrm library. I was young and naive and expected excellent performance from the implementation I jammed into the library at the time. This did not pan out at all and I kept it on the backburner for a few months and focused on other projects.</p>

<p>Over time I kept on coming across really weird, incorrect, buggy behaviour in pywinrm and I didn’t have the maintainer rights to the repo so I decided to cut my losses and start again in a branch new project. From the ashes of my failure, <a href="https://github.com/jborean93/pypsrp">pypsrp</a> was born.</p>

<p>What I set out to achieve when creating pypsrp was;</p>

<ul>
  <li>Include all the same features from pywinrm but in a nicer and less confusing interface</li>
  <li>The ability to run commands over both the WinRS layer and PSRP layer</li>
  <li>Support all authentication types like <code class="language-plaintext highlighter-rouge">Basic</code>, <code class="language-plaintext highlighter-rouge">Certificate</code>, <code class="language-plaintext highlighter-rouge">Negotiate</code>, <code class="language-plaintext highlighter-rouge">Kerberos</code>, and <code class="language-plaintext highlighter-rouge">CredSSP</code></li>
  <li>Support message encryption when running over HTTP with <code class="language-plaintext highlighter-rouge">Negotiate</code>, <code class="language-plaintext highlighter-rouge">Kerberos</code>, and <code class="language-plaintext highlighter-rouge">CredSSP</code> authentication</li>
  <li>Deal directly with the PowerShell objects rather than just strings</li>
  <li>Serialise secure strings so it can securely transmit secrets not in plaintext</li>
  <li>Create an interface that closely resembles the .NET <a href="https://docs.microsoft.com/en-us/dotnet/api/system.management.automation?view=powershellsdk-1.1.0">System.Management.Automation</a> namespace</li>
  <li>Create a higher level interface for people to run commands on either protocol as well as copy and fetch files</li>
</ul>

<p>In the end, I believe I’ve been able to achieve these goals, and some more, with pypsrp.</p>

<p>Before I go into how to use pypsrp, I want to go through the core concepts of PSRP and how it all works.</p>

<h2 id="key-concepts">Key Concepts</h2>

<p>There are a few key concepts used in PSRP that I thought it best to mention and explain a bit more.</p>

<h3 id="runspace-pool-and-runspaces">Runspace Pool and Runspaces</h3>

<p>Runspaces are quite simply a new thread on an existing PowerShell process that can run a single “Pipeline” at one point in time. A Runspace Pool is a collection/pool of Runspaces that can handle the execution of multiple Runspaces in an efficient manner for you. Runspaces is mostly a developer focused topic so you usually don’t need to understand this layer. In reality, a lot of the Microsoft cmdlets that run over WinRM, like the <code class="language-plaintext highlighter-rouge">*-PSSession</code> and <code class="language-plaintext highlighter-rouge">*-Job</code> cmdlets, use Runspaces in their implementation.</p>

<h3 id="pipelines">Pipelines</h3>

<p>In PSRP, a pipeline is an ordered collection of “Statements” to execute on the “Runspace”. There is a 1 to 1 mapping of Runspaces and Pipelines which means that a Runspace can execute one and only one pipeline. This does get confusing as a Pipeline can then create what is called a nested pipeline within itself but fundamentally, a Runspace can only have one root Pipeline. A nested pipeline is special because it interrupts the thread of the running pipeline and can be used to check things like the state of a variable or running command. Once the nested pipeline is finished executing, the parent pipeline will resume from where it was blocked.</p>

<h3 id="statements">Statements</h3>

<p>A statement is an ordered collection of “Commands” or scripts to run on a “Pipeline”. A statement can easily be seen as a unit of work, and is most commonly represented as a line in Powershell, e.g.</p>

<div class="language-plaintext highlighter-rouge"><div class="highlight"><pre class="highlight"><code># 2 statements
$service = Get-Service -Name winrm
$service.Status

# same 2 statements in the 1 line
$service = Get-Service -Name winrm; $service.Status
</code></pre></div></div>

<h3 id="commands">Commands</h3>

<p>A command is an ordered collection of cmdlets or scripts that are piped together. A script is simply like a PowerShell codeblock which can contain multiple lines of code as well as functions and other properties. When there are multiple cmdlets or scripts in a command, the output of the first cmdlet/script is piped into the input of the second cmdlet/script, e.g. <code class="language-plaintext highlighter-rouge">Get-Service -Name winrm | Stop-Service</code> will pipe the result of <code class="language-plaintext highlighter-rouge">Get-Service</code> into <code class="language-plaintext highlighter-rouge">Stop-Service</code>. Each cmdlet/script can have none or multiple parameters/arguments when running.</p>

<h3 id="streams">Streams</h3>

<p>If you aren’t new to PowerShell then you are probably already aware of the concept of streams in PowerShell. Unlike typical processes which use the stdio concept of an input, output and error stream of bytes, PowerShell contains 6 (5 pre v 5.0) streams;</p>

<p><a href="/assets/images/2018/08/3482.7.png"><img src="/assets/images/2018/08/3482.7.png" alt="" /></a></p>

<p><em>Source: https://blogs.technet.microsoft.com/heyscriptingguy/2015/07/04/weekend-scripter-welcome-to-the-powershell-information-stream/</em></p>

<p>I recommend reading <a href="https://blogs.technet.microsoft.com/heyscriptingguy/2014/03/30/understanding-streams-redirection-and-write-host-in-powershell/">Understanding Streams, Redirect, and Write-Host in PowerShell</a> and it’s follow up article <a href="https://blogs.technet.microsoft.com/heyscriptingguy/2015/07/04/weekend-scripter-welcome-to-the-powershell-information-stream/">Welcome to the PowerShell Information Stream</a> which go in further detail of what streams are and how to use them.</p>

<h3 id="objects">Objects</h3>

<p>As well as having more streams, PowerShell differs from stdio where it streams objects rather than bytes. While technically at a deeper level they are represented as bytes, this is not exposed in PowerShell layer. For example, if a C program runs <code class="language-plaintext highlighter-rouge">printf("Hello World")</code>, it will send the bytes <code class="language-plaintext highlighter-rouge">48 65 6c 6c 6f 20 57 6f 72 6c 64</code> to the stdout stream. Compare that to PowerShell where <code class="language-plaintext highlighter-rouge">Write-Output "Hello World"</code> will instead send a string as a .NET object on the first stream. A problem with this approach is how to represent these objects over remote transport protocol like WSMan as these objects are not native to this layer. Microsoft decided to use CLIXML to work around this and I’ll go into more details for this further in this post (hint it’s not pretty).</p>

<h2 id="process-flow">Process Flow</h2>

<p>So now we have a basic understanding of some of the components used in PSRP, let’s walk through the steps required to run a pipeline of commands on a remote host. In this example I’ll explain in more details, what pypsrp does when executing the following script;</p>

<div class="language-plaintext highlighter-rouge"><div class="highlight"><pre class="highlight"><code>from pypsrp.powershell import PowerShell, RunspacePool
from pypsrp.wsman import WSMan

wsman = WSMan("server2016.domain.local", username="vagrant",
              password="vagrant",
              cert_validation=False)

with RunspacePool(wsman) as pool:
    ps = PowerShell(pool)
    ps.add_cmdlet("Get-PSDrive").add_parameter("Name", "C")
    ps.invoke()
    # we will print the first object returned back to us
    print(ps.output[0])
</code></pre></div></div>

<p>This script effectively runs the cmdlet <code class="language-plaintext highlighter-rouge">Get-PSDrive -Name C</code> on the host <code class="language-plaintext highlighter-rouge">server2016.domain.local</code>. Here is a basic process flow of messages exchanged when executing this code;</p>

<p><a href="/assets/images/2018/08/PSRP-Process-Flow.png"><img src="/assets/images/2018/08/PSRP-Process-Flow.png" alt="" /></a></p>

<p><em>What you are not seeing, lots and lots of XML</em></p>

<p>While the messages used above are the most common types used in the PSRP protocol, there are are currently 31 distinct PSRP message types in the base protocol.</p>

<h2 id="message-structure">Message Structure</h2>

<p>While this article is about PSRP, this section will also break down the WSMan component to help you get a better understanding of the data sent over the wire. The following sections will break down the following message which is the first message sent in a standard PSRP exchange;</p>

<div class="language-plaintext highlighter-rouge"><div class="highlight"><pre class="highlight"><code>&lt;s:Envelope xmlns:rsp="http://schemas.microsoft.com/wbem/wsman/1/windows/shell" xmlns:s="http://www.w3.org/2003/05/soap-envelope" xmlns:wsa="http://schemas.xmlsoap.org/ws/2004/08/addressing" xmlns:wsman="http://schemas.dmtf.org/wbem/wsman/1/wsman.xsd" xmlns:wsmv="http://schemas.microsoft.com/wbem/wsman/1/wsman.xsd"&gt;
    &lt;s:Header&gt;
        &lt;wsa:Action s:mustUnderstand="true"&gt;http://schemas.xmlsoap.org/ws/2004/09/transfer/Create&lt;/wsa:Action&gt;
        &lt;wsmv:DataLocale s:mustUnderstand="false" xml:lang="en-US"/&gt;
        &lt;wsman:Locale s:mustUnderstand="false" xml:lang="en-US"/&gt;
        &lt;wsman:MaxEnvelopeSize s:mustUnderstand="true"&gt;153600&lt;/wsman:MaxEnvelopeSize&gt;
        &lt;wsa:MessageID&gt;uuid:1C74E6AE-8C7A-4C03-99D1-C4AD3DABFD6D&lt;/wsa:MessageID&gt;
        &lt;wsman:OperationTimeout&gt;PT20S&lt;/wsman:OperationTimeout&gt;
        &lt;wsa:ReplyTo&gt;
            &lt;wsa:Address s:mustUnderstand="true"&gt;http://schemas.xmlsoap.org/ws/2004/08/addressing/role/anonymous&lt;/wsa:Address&gt;
        &lt;/wsa:ReplyTo&gt;
        &lt;wsman:ResourceURI s:mustUnderstand="true"&gt;http://schemas.microsoft.com/powershell/Microsoft.PowerShell&lt;/wsman:ResourceURI&gt;
        &lt;wsmv:SessionId s:mustUnderstand="false"&gt;uuid:C6602DD7-6096-4983-A956-82B048821F4D&lt;/wsmv:SessionId&gt;
        &lt;wsa:To&gt;http://server2016.domain.local:5985/wsman&lt;/wsa:To&gt;
        &lt;wsman:OptionSet s:mustUnderstand="true"&gt;
            &lt;wsman:Option MustComply="true" Name="protocolversion"&gt;2.3&lt;/wsman:Option&gt;
        &lt;/wsman:OptionSet&gt;
    &lt;/s:Header&gt;
    &lt;s:Body&gt;
        &lt;rsp:Shell ShellId="5A416EA5-FB2A-4AAA-91BF-77BF51043386"&gt;
            &lt;rsp:InputStreams&gt;stdin pr&lt;/rsp:InputStreams&gt;
            &lt;rsp:OutputStreams&gt;stdout&lt;/rsp:OutputStreams&gt;
            &lt;creationXml xmlns="http://schemas.microsoft.com/powershell"&gt;AAAAAAAAAAEAAAAAAAAAAAMAAADHAgAAAAIAAQBaQW6l+ypKqpG/d79RBDOGAAAAAAAAAAAAAAAAAAAAADxPYmogUmVmSWQ9IjAiPjxNUz48VmVyc2lvbiBOPSJwcm90b2NvbHZlcnNpb24iPjIuMzwvVmVyc2lvbj48VmVyc2lvbiBOPSJQU1ZlcnNpb24iPjIuMDwvVmVyc2lvbj48VmVyc2lvbiBOPSJTZXJpYWxpemF0aW9uVmVyc2lvbiI+MS4xLjAuMTwvVmVyc2lvbj48L01TPjwvT2JqPgAAAAAAAAACAAAAAAAAAAADAAAC/QIAAAAEAAEAWkFupfsqSqqRv3e/UQQzhgAAAAAAAAAAAAAAAAAAAAA8T2JqIFJlZklkPSIwIj48TVM+PEkzMiBOPSJNaW5SdW5zcGFjZXMiPjE8L0kzMj48STMyIE49Ik1heFJ1bnNwYWNlcyI+MTwvSTMyPjxPYmogTj0iUFNUaHJlYWRPcHRpb25zIiBSZWZJZD0iMSI+PFROIFJlZklkPSIwIj48VD5TeXN0ZW0uTWFuYWdlbWVudC5BdXRvbWF0aW9uLlJ1bnNwYWNlcy5QU1RocmVhZE9wdGlvbnM8L1Q+PFQ+U3lzdGVtLkVudW08L1Q+PFQ+U3lzdGVtLlZhbHVlVHlwZTwvVD48VD5TeXN0ZW0uT2JqZWN0PC9UPjwvVE4+PFRvU3RyaW5nPkRlZmF1bHQ8L1RvU3RyaW5nPjxJMzI+MDwvSTMyPjwvT2JqPjxPYmogTj0iQXBhcnRtZW50U3RhdGUiIFJlZklkPSIyIj48VE4gUmVmSWQ9IjEiPjxUPlN5c3RlbS5NYW5hZ2VtZW50LkF1dG9tYXRpb24uUnVuc3BhY2VzLkFwYXJ0bWVudFN0YXRlPC9UPjxUPlN5c3RlbS5FbnVtPC9UPjxUPlN5c3RlbS5WYWx1ZVR5cGU8L1Q+PFQ+U3lzdGVtLk9iamVjdDwvVD48L1ROPjxUb1N0cmluZz5VTktOT1dOPC9Ub1N0cmluZz48STMyPjI8L0kzMj48L09iaj48T2JqIE49Ikhvc3RJbmZvIiBSZWZJZD0iMyI+PE1TPjxCIE49Il9pc0hvc3ROdWxsIj50cnVlPC9CPjxCIE49Il9pc0hvc3RVSU51bGwiPnRydWU8L0I+PEIgTj0iX2lzSG9zdFJhd1VJTnVsbCI+dHJ1ZTwvQj48QiBOPSJfdXNlUnVuc3BhY2VIb3N0Ij50cnVlPC9CPjwvTVM+PC9PYmo+PE5pbCBOPSJBcHBsaWNhdGlvbkFyZ3VtZW50cyIgLz48L01TPjwvT2JqPg==&lt;/creationXml&gt;
        &lt;/rsp:Shell&gt;
    &lt;/s:Body&gt;
&lt;/s:Envelope&gt;
</code></pre></div></div>

<h3 id="wsman">WSMan</h3>

<p>WSMan is a SOAP based protocol that is sent over HTTP which means it’s time to get down and dirty with the first XML layer used in PSRP. Each WSMan message contains a root element <code class="language-plaintext highlighter-rouge">&lt;{http://www.w3.org/2003/05/soap-envelope}Envelope&gt;</code> which in turn contains 2 elements;</p>

<ul>
  <li><code class="language-plaintext highlighter-rouge">&lt;{http://www.w3.org/2003/05/soap-envelope}Header&gt;</code>: Contains metadata around the message such as the action, the resource/configuration endpoint, and Runspace Pool/Shell selector each the message relates to.</li>
  <li><code class="language-plaintext highlighter-rouge">&lt;{http://www.w3.org/2003/05/soap-envelope}Body&gt;</code>: Depending on the type/action can be empty or in a specific format, this is where the PSRP message are usually contained.</li>
</ul>

<p>While it isn’t guaranteed, most implementations I’ve seen use <code class="language-plaintext highlighter-rouge">s</code> as the namespace prefix for <code class="language-plaintext highlighter-rouge">http://www.w3.org/2003/05/soap-envelope</code>, so usually these elements are represented as <code class="language-plaintext highlighter-rouge">&lt;s:Envelope&gt;</code>, <code class="language-plaintext highlighter-rouge">&lt;s:Header&gt;</code>, and <code class="language-plaintext highlighter-rouge">&lt;s:Body&gt;</code>. When in doubt you can always look at the prefix defined in the xmlns attribute definitions for each message.</p>

<p>One of the key fields in the header block is the <code class="language-plaintext highlighter-rouge">&lt;{http://schemas.xmlsoap.org/ws/2004/08/addressing}:Action&gt;</code> element. This element is used by the client and server to determine the format the body element will be in. There are many different action types in the WSMan protocol but the following are key in PSRP;</p>

<ul>
  <li><code class="language-plaintext highlighter-rouge">Create</code>: Used to create the RunspacePool, only the <code class="language-plaintext highlighter-rouge">SESSION_CAPABILITY</code> and <code class="language-plaintext highlighter-rouge">INIT_RUNSPACEPOOL</code> objects are sent with a create message</li>
  <li><code class="language-plaintext highlighter-rouge">Command</code>: Used to create the Pipeline, only the INIT_PIPELINE` object is sent with a command message</li>
  <li><code class="language-plaintext highlighter-rouge">Connect</code>: Connect to a disconnected RunspacePool (created by another client) that is in a disconnected state</li>
  <li><code class="language-plaintext highlighter-rouge">Delete</code>: Used to close the RunspacePool, no PSRP objects are sent with this message</li>
  <li><code class="language-plaintext highlighter-rouge">Disconnect</code>: Disconnect from an opened RunspacePool</li>
  <li><code class="language-plaintext highlighter-rouge">Enumerate</code>: Used to get a list of RunspacePools and Pipelines on a remote host</li>
  <li><code class="language-plaintext highlighter-rouge">Fault</code>: Used to display error information if something went wrong in the request</li>
  <li><code class="language-plaintext highlighter-rouge">Receive</code>: Used to get the output of a RunspacePool or Pipeline based on the ID specified, no PSRP objects are sent with this message</li>
  <li><code class="language-plaintext highlighter-rouge">Reconnect</code>: Reconnect to a disconnected RunspacePool (created by the same client) that is in a disconnected state</li>
  <li><code class="language-plaintext highlighter-rouge">Send</code>: Used to send the majority of the PSRP objects to the server</li>
  <li><code class="language-plaintext highlighter-rouge">Signal</code>: Forcibly stop a running Pipeline</li>
</ul>

<p>Looking at our example message we can see the following headers are defined;</p>

<ul>
  <li><code class="language-plaintext highlighter-rouge">Action</code>: This is set to <code class="language-plaintext highlighter-rouge">http://schemas.xmlsoap.org/ws/2004/09/transfer/Create</code> which tells the server the body should contain a resource object that needs to be created, in this case a Shell/Runspace Pool</li>
  <li><code class="language-plaintext highlighter-rouge">DataLocale</code>: The format of the numerical data sent by the client. This is largely inconsequential to the end user and is just an implementation detail</li>
  <li><code class="language-plaintext highlighter-rouge">Locale</code>: Similar to DataLocale but it specifies the language of the text in the message</li>
  <li><code class="language-plaintext highlighter-rouge">MaxEnvelopeSize</code>: The maximum size of the whole WSMan message that the client can expect in a response</li>
  <li><code class="language-plaintext highlighter-rouge">MessageID</code>: A unique ID for this message, used to identify responses with the request sent from the client</li>
  <li><code class="language-plaintext highlighter-rouge">OperationTimeout</code>: The maximum time that the server can spend processing the request, if it exceeds this limit than it will send a timeout fault</li>
  <li><code class="language-plaintext highlighter-rouge">ReplyTo</code>: Always constant as defined by the rules in <a href="https://msdn.microsoft.com/en-us/library/cc251604.aspx">MS-WSMV</a></li>
  <li><code class="language-plaintext highlighter-rouge">ResourceURI</code>: The resource URI to connect to, by default it is set to connect to the <code class="language-plaintext highlighter-rouge">Microsoft.PowerShell</code> configuration endpoint on the server but can be changed depending on the user setup</li>
  <li><code class="language-plaintext highlighter-rouge">SessionId</code>: A unique ID for the current user session, spans multiple requests and is required if the user wants to disconnect a Runspace Pool</li>
  <li><code class="language-plaintext highlighter-rouge">To</code>: The endpoint this message is for, this isn’t mandatory but makes it easier when debugging messages to see who it is for</li>
  <li><code class="language-plaintext highlighter-rouge">OptionSet</code>: Used to define various options in by the PSRP protocol, currently only <code class="language-plaintext highlighter-rouge">protocolversion</code> is defined as an OptionSet here</li>
  <li><code class="language-plaintext highlighter-rouge">SelectorSet</code>: Not used in the create message but contains the Runspace Pool ID in subsequent messages</li>
</ul>

<p>When looking at the body of the message we can see it contains the following elements;</p>

<ul>
  <li><code class="language-plaintext highlighter-rouge">Shell</code>: The root element with a <code class="language-plaintext highlighter-rouge">ShellId</code> attribute defined by the client. If the <code class="language-plaintext highlighter-rouge">ShellId</code> is not defined here then the server will generate a unique one
    <ul>
      <li><code class="language-plaintext highlighter-rouge">InputStreams</code>: For PSRP, this must be set to <code class="language-plaintext highlighter-rouge">stdin pr</code>, it basically says it can expect input through the stdin pipe as well as a “prompt response” input pipe</li>
      <li><code class="language-plaintext highlighter-rouge">OutputStreams</code>: For PSRP, this must be set to <code class="language-plaintext highlighter-rouge">stdout</code>, <code class="language-plaintext highlighter-rouge">stdout</code> is used as the stream name when sending the <code class="language-plaintext highlighter-rouge">Receive</code> messages</li>
      <li><code class="language-plaintext highlighter-rouge">creationXml</code>: Contains the the base64 encoding <code class="language-plaintext highlighter-rouge">SESSION_CAPABILITY</code> and <code class="language-plaintext highlighter-rouge">INIT_RUNSPACEPOOL</code> PSRP message fragments</li>
    </ul>
  </li>
</ul>

<p><em>Technically the <code class="language-plaintext highlighter-rouge">creationXml</code> may not contain the full <code class="language-plaintext highlighter-rouge">INIT_RUNSPACEPOOL</code> PSRP message if it exceeds the <code class="language-plaintext highlighter-rouge">MaxEnvelopeSize</code> set on the server config. I have been unable to replicate this scenario on a real Windows client and it would be quite rare for that message to exceed the max size.</em></p>

<p>If successful, I should get a <code class="language-plaintext highlighter-rouge">CreateResponse</code> message back from the server, here is an example of one of these responses;</p>

<div class="language-plaintext highlighter-rouge"><div class="highlight"><pre class="highlight"><code>&lt;s:Envelope xmlns:s="http://www.w3.org/2003/05/soap-envelope" xmlns:a="http://schemas.xmlsoap.org/ws/2004/08/addressing" xmlns:x="http://schemas.xmlsoap.org/ws/2004/09/transfer" xmlns:w="http://schemas.dmtf.org/wbem/wsman/1/wsman.xsd" xmlns:rsp="http://schemas.microsoft.com/wbem/wsman/1/windows/shell" xmlns:p="http://schemas.microsoft.com/wbem/wsman/1/wsman.xsd" xml:lang="en-US"&gt;
    &lt;s:Header&gt;
        &lt;a:Action&gt;http://schemas.xmlsoap.org/ws/2004/09/transfer/CreateResponse&lt;/a:Action&gt;
        &lt;a:MessageID&gt;uuid:0880F6CA-19EA-4CE3-8309-E0512677BABD&lt;/a:MessageID&gt;
        &lt;a:To&gt;http://schemas.xmlsoap.org/ws/2004/08/addressing/role/anonymous&lt;/a:To&gt;
        &lt;a:RelatesTo&gt;uuid:1C74E6AE-8C7A-4C03-99D1-C4AD3DABFD6D&lt;/a:RelatesTo&gt;
    &lt;/s:Header&gt;
    &lt;s:Body&gt;
        &lt;x:ResourceCreated&gt;
            &lt;a:Address&gt;http://server2016.domain.local:5985/wsman&lt;/a:Address&gt;
            &lt;a:ReferenceParameters&gt;
                &lt;w:ResourceURI&gt;http://schemas.microsoft.com/powershell/Microsoft.PowerShell&lt;/w:ResourceURI&gt;
                &lt;w:SelectorSet&gt;
                    &lt;w:Selector Name="ShellId"&gt;5A416EA5-FB2A-4AAA-91BF-77BF51043386&lt;/w:Selector&gt;
                &lt;/w:SelectorSet&gt;
            &lt;/a:ReferenceParameters&gt;
        &lt;/x:ResourceCreated&gt;
        &lt;rsp:Shell xmlns:rsp="http://schemas.microsoft.com/wbem/wsman/1/windows/shell"&gt;
            &lt;rsp:ShellId&gt;5A416EA5-FB2A-4AAA-91BF-77BF51043386&lt;/rsp:ShellId&gt;
            &lt;rsp:ResourceUri&gt;http://schemas.microsoft.com/powershell/Microsoft.PowerShell&lt;/rsp:ResourceUri&gt;
            &lt;rsp:Owner&gt;SERVER2016\vagrant&lt;/rsp:Owner&gt;
            &lt;rsp:ClientIP&gt;192.168.56.1&lt;/rsp:ClientIP&gt;
            &lt;rsp:ProcessId&gt;2812&lt;/rsp:ProcessId&gt;
            &lt;rsp:IdleTimeOut&gt;PT7200.000S&lt;/rsp:IdleTimeOut&gt;
            &lt;rsp:InputStreams&gt;stdin pr&lt;/rsp:InputStreams&gt;
            &lt;rsp:OutputStreams&gt;stdout&lt;/rsp:OutputStreams&gt;
            &lt;rsp:MaxIdleTimeOut&gt;PT2147483.647S&lt;/rsp:MaxIdleTimeOut&gt;
            &lt;rsp:Locale&gt;en-US&lt;/rsp:Locale&gt;
            &lt;rsp:DataLocale&gt;en-US&lt;/rsp:DataLocale&gt;
            &lt;rsp:CompressionMode&gt;NoCompression&lt;/rsp:CompressionMode&gt;
            &lt;rsp:ProfileLoaded&gt;Yes&lt;/rsp:ProfileLoaded&gt;
            &lt;rsp:Encoding&gt;UTF8&lt;/rsp:Encoding&gt;
            &lt;rsp:BufferMode&gt;Block&lt;/rsp:BufferMode&gt;
            &lt;rsp:State&gt;Connected&lt;/rsp:State&gt;
            &lt;rsp:ShellRunTime&gt;P0DT0H0M0S&lt;/rsp:ShellRunTime&gt;
            &lt;rsp:ShellInactivity&gt;P0DT0H0M0S&lt;/rsp:ShellInactivity&gt;
        &lt;/rsp:Shell&gt;
    &lt;/s:Body&gt;
&lt;/s:Envelope&gt;
</code></pre></div></div>

<p>We can see it returned a few bits and pieces about the created Runspace but the one we are interested in is the <code class="language-plaintext highlighter-rouge">SelectorSet</code> returned. This is added to the WSMan Header elements for each subsequent message sent for this Runspace Pool.</p>

<h3 id="psrp-fragment">PSRP Fragment</h3>

<p>So now that you’ve seen the WSMan message side, the remaining layers are all defined in PSRP. I said, in the example above, that the <code class="language-plaintext highlighter-rouge">creationXml</code> contained a base64 encoded value of the <code class="language-plaintext highlighter-rouge">SESSION_CAPABILITY</code> and <code class="language-plaintext highlighter-rouge">INIT_RUNSPACEPOOL</code> message but that’s not 100% accurate. Each WSMan message has a maximum size that the client can send to the server which can be problematic when dealing with objects larger than this limit (the default limit since PSv3 is 500 KiB). To overcome this hurdle, PSRP always fragments messages before adding it to the WSMan payload, even if it is smaller than the max size. The structure of a PSRP fragment is as follows</p>

<p><a href="/assets/images/2018/08/PSRP-Fragment-Structure.png"><img src="/assets/images/2018/08/PSRP-Fragment-Structure.png" alt="" /></a></p>

<p>Lets break down each of the fields;</p>

<ul>
  <li><code class="language-plaintext highlighter-rouge">ObjectId</code>: An 8 byte unsigned integer for the global fragment ID counter starting at 1, no 2 fragments in the same session should have the same ID</li>
  <li><code class="language-plaintext highlighter-rouge">FragmentId</code>: An 8 byte unsigned integer for the sequence number that identifies where this fragment belongs in the whole message, this starts at 0</li>
  <li><code class="language-plaintext highlighter-rouge">Reserved</code>: 6 bits that are set to 0, not used right now</li>
  <li><code class="language-plaintext highlighter-rouge">E</code>: 1 bit that specifies if this is the last fragment from the message</li>
  <li><code class="language-plaintext highlighter-rouge">S</code>: 1 bit that specifies if this is the first fragment from the message</li>
  <li><code class="language-plaintext highlighter-rouge">BlobLength</code>: A 4 byte unsigned integer that is the size of the <code class="language-plaintext highlighter-rouge">Blob</code> field</li>
  <li><code class="language-plaintext highlighter-rouge">Blob</code>: Either the entire PSRP message if it fits into the <code class="language-plaintext highlighter-rouge">MaxEnvelopeSize</code> or part of a fragmented PSRP message</li>
</ul>

<p>If we were to take the value of <code class="language-plaintext highlighter-rouge">creationXml</code>, base64 decode it, we get a total of <code class="language-plaintext highlighter-rouge">1006</code> bytes. Each fragment header is a fixed size of 21 bytes so let’s get the first 21 bytes in our output and parse our fragment header;</p>

<div class="language-plaintext highlighter-rouge"><div class="highlight"><pre class="highlight"><code>00 00 00 00 00 00 00 01
00 00 00 00 00 00 00 00
03
00 00 00 c7
</code></pre></div></div>

<ul>
  <li><code class="language-plaintext highlighter-rouge">ObjectId</code>: 1</li>
  <li><code class="language-plaintext highlighter-rouge">FragmentId</code>: 0</li>
  <li><code class="language-plaintext highlighter-rouge">Reserved + E + S</code>: In binary this is <code class="language-plaintext highlighter-rouge">0000 0011</code> which means both the E and S bit are set (the blob is the whole message)</li>
  <li><code class="language-plaintext highlighter-rouge">BlogLength</code>: 199</li>
</ul>

<p>With these values we know this fragment contains the full PSRP message which is <code class="language-plaintext highlighter-rouge">199</code> bytes long, this still leaves <code class="language-plaintext highlighter-rouge">786</code> bytes left (1006 – (21 + 199)) in our payload which means there’s another fragment for us to parse. If we get bytes 220 – 240 we can parse the next fragment header;</p>

<div class="language-plaintext highlighter-rouge"><div class="highlight"><pre class="highlight"><code>00 00 00 00 00 00 00 02
00 00 00 00 00 00 00 00
03
00 00 02 fd
</code></pre></div></div>

<p>We can see the <code class="language-plaintext highlighter-rouge">ObjectId</code> for this second fragment has been incremented to 2 and the <code class="language-plaintext highlighter-rouge">FragmentId</code> has been reset back to 0. This fragment also has the <code class="language-plaintext highlighter-rouge">E</code> and <code class="language-plaintext highlighter-rouge">S</code> bits set so we know it also contains the full PSRP message which is <code class="language-plaintext highlighter-rouge">765</code> bytes long. This brings us to the full <code class="language-plaintext highlighter-rouge">1006</code> bytes in our payload so there’s no more fragments to parse.</p>

<h3 id="psrp-message">PSRP Message</h3>

<p>We’ve parsed the payload and found two fragments, one at <code class="language-plaintext highlighter-rouge">199</code> bytes long and another at <code class="language-plaintext highlighter-rouge">765</code> bytes and are now ready to look at the message structure itself. Each message is structured like the following;</p>

<p><a href="/assets/images/2018/08/PSRP-Message-Structure.png"><img src="/assets/images/2018/08/PSRP-Message-Structure.png" alt="" /></a></p>

<p>Lets break down each of the fields;</p>

<ul>
  <li><code class="language-plaintext highlighter-rouge">Destination</code>: A 4 byte field that tells us whether the message is targeted towards the client <code class="language-plaintext highlighter-rouge">01 00 00 00</code> or the server <code class="language-plaintext highlighter-rouge">02 00 00 00</code></li>
  <li><code class="language-plaintext highlighter-rouge">MessageType</code>: A 4 byte field that defines the type of message contained in the data field</li>
  <li><code class="language-plaintext highlighter-rouge">RPID</code>: A 16 byte field of the Runspace Pool/Shell ID returned by the server in the <code class="language-plaintext highlighter-rouge">CreateResponse</code> message</li>
  <li><code class="language-plaintext highlighter-rouge">PID</code>: A 16 byte field of the Pipeline ID of the Pipeline the message is targeted to, this is no set if it isn’t targeted to a pipeline</li>
  <li><code class="language-plaintext highlighter-rouge">Data</code>: The actual PSRP data of the PSRP message defined by <code class="language-plaintext highlighter-rouge">MessageType</code></li>
</ul>

<p>We looking at the first fragment we get;</p>

<div class="language-plaintext highlighter-rouge"><div class="highlight"><pre class="highlight"><code>02 00 00 00
02 00 01 00
5a 41 6e a5 fb 2a 4a aa 91 bf 77 bf 51 04 33 86
00 00 00 00 00 00 00 00 00 00 00 00 00 00 00 00

# I have conveniently converted these bytes to the utf-8 form
&lt;Obj RefId="0"&gt;
    &lt;MS&gt;
        &lt;Version N="protocolversion"&gt;2.3&lt;/Version&gt;
        &lt;Version N="PSVersion"&gt;2.0&lt;/Version&gt;
        &lt;Version N="SerializationVersion"&gt;1.1.0.1&lt;/Version&gt;
    &lt;/MS&gt;
&lt;/Obj&gt;
</code></pre></div></div>

<ul>
  <li><code class="language-plaintext highlighter-rouge">Destination</code>: This is targeted towards the server</li>
  <li><code class="language-plaintext highlighter-rouge">MessageType</code>: This type is <code class="language-plaintext highlighter-rouge">SESSION_CAPABILITY</code></li>
  <li><code class="language-plaintext highlighter-rouge">RPID</code>: The Runspace Pool/Shell ID is actually a GUID, this value is the bytes representation of <code class="language-plaintext highlighter-rouge">5A416EA5-FB2A-4AAA-91BF-77BF51043386</code></li>
  <li><code class="language-plaintext highlighter-rouge">PID</code>: This is not set as this message isn’t targeted towards a Pipeline</li>
  <li><code class="language-plaintext highlighter-rouge">Data</code>: The remaining bytes in the fragment is the data, as you can see, we have another XML string in CLIXML format</li>
</ul>

<p>Now lets have a look at the second fragment in our payload</p>

<div class="language-plaintext highlighter-rouge"><div class="highlight"><pre class="highlight"><code>02 00 00 00
04 00 01 00
5a 41 6e a5 fb 2a 4a aa 91 bf 77 bf 51 04 33 86
00 00 00 00 00 00 00 00 00 00 00 00 00 00 00 00 

&lt;Obj RefId="0"&gt;
    &lt;MS&gt;
        &lt;I32 N="MinRunspaces"&gt;1&lt;/I32&gt;
        &lt;I32 N="MaxRunspaces"&gt;1&lt;/I32&gt;
        &lt;Obj N="PSThreadOptions" RefId="1"&gt;
            &lt;TN RefId="0"&gt;
                &lt;T&gt;System.Management.Automation.Runspaces.PSThreadOptions&lt;/T&gt;
                &lt;T&gt;System.Enum&lt;/T&gt;
                &lt;T&gt;System.ValueType&lt;/T&gt;
                &lt;T&gt;System.Object&lt;/T&gt;
            &lt;/TN&gt;
            &lt;ToString&gt;Default&lt;/ToString&gt;
            &lt;I32&gt;0&lt;/I32&gt;
        &lt;/Obj&gt;
        &lt;Obj N="ApartmentState" RefId="2"&gt;
            &lt;TN RefId="1"&gt;
                &lt;T&gt;System.Management.Automation.Runspaces.ApartmentState&lt;/T&gt;
                &lt;T&gt;System.Enum&lt;/T&gt;
                &lt;T&gt;System.ValueType&lt;/T&gt;
                &lt;T&gt;System.Object&lt;/T&gt;
            &lt;/TN&gt;
            &lt;ToString&gt;UNKNOWN&lt;/ToString&gt;
            &lt;I32&gt;2&lt;/I32&gt;
        &lt;/Obj&gt;
        &lt;Obj N="HostInfo" RefId="3"&gt;
            &lt;MS&gt;
                &lt;B N="_isHostNull"&gt;true&lt;/B&gt;
                &lt;B N="_isHostUINull"&gt;true&lt;/B&gt;
                &lt;B N="_isHostRawUINull"&gt;true&lt;/B&gt;
                &lt;B N="_useRunspaceHost"&gt;true&lt;/B&gt;
            &lt;/MS&gt;
        &lt;/Obj&gt;
        &lt;Nil N="ApplicationArguments"/&gt;
    &lt;/MS&gt;
&lt;/Obj&gt;
</code></pre></div></div>

<p>The only difference in this message is the <code class="language-plaintext highlighter-rouge">MessageType</code> field which is each to <code class="language-plaintext highlighter-rouge">INIT_RUNSPACEPOOL</code> and the <code class="language-plaintext highlighter-rouge">Data</code> field. Once again I’ve conveniently converted the byte values of <code class="language-plaintext highlighter-rouge">Data</code> to the clixml value of the message.</p>

<h3 id="clixml">CLIXML</h3>

<p>We’ve seen the XML data in the WSMan messages but to make matters even worse, there’s another layer of XML hiding behind the base64 encoded text, enter CLIXML. I personally think this is the most complex component of PSRP and I’m not 100% happy with how I’ve implemented it in pypsrp. I may revisit the implementation at some point in the future but for now it is workable. Ultimately, CLIXML is a way of serialising objects like strings, lists, .NET classes, and more into a format that can be sent over another channel. There are two types of objects in CLIXML;</p>

<ul>
  <li><code class="language-plaintext highlighter-rouge">Primitive</code>: the somewhat easy stuff like strings, integers, see <a href="https://msdn.microsoft.com/en-us/library/dd305931.aspx">here</a> for a full list</li>
  <li><code class="language-plaintext highlighter-rouge">Complex</code>: the hard/ugly stuff like lists, dictionaries, pretty much the rest of the .NET objects. Objects used by PSRP are found <a href="https://msdn.microsoft.com/en-us/library/dd342768.aspx">here</a> but this does not include all the objects returned in the PowerShell output which can be anything</li>
</ul>

<p>Starting with a string, primitive object, if I was to serialise</p>

<p><code class="language-plaintext highlighter-rouge">Hello World\nXML is ? when dealing with things like _x000A_\n</code></p>

<p>to CLIXML, it would become</p>

<p><code class="language-plaintext highlighter-rouge">&lt;S&gt;Hello World_x000A_XML is _xD83D__xDCA9_ when dealing with things like _x005F_x000A__x000A_&lt;/S&gt;</code></p>

<p>Normal unicode values are fine but when dealing with control codes, surrogate chars and escaping string that match the regex <code class="language-plaintext highlighter-rouge">_x([a-fA-F0-9]{4})_</code> it becomes a massive mess. We can see control codes are escaped in the format <code class="language-plaintext highlighter-rouge">_x{utf-16-be hex value}_</code> and values that are already like this pattern have the leading <code class="language-plaintext highlighter-rouge">_</code> replaced with <code class="language-plaintext highlighter-rouge">_x005F_</code>. Surrogate chars are a bit more complex but the same fundamental rules apply, for example <a href="https://www.fileformat.info/info/unicode/char/1f4a9/index.htm">Pile of Poo Emoji</a> has a UTF-16 hex representation of <code class="language-plaintext highlighter-rouge">D8 3D DC A9</code> and this will be serialised like 2 code points in clixml <code class="language-plaintext highlighter-rouge">_xD83D__xDCA9_</code>.</p>

<p>Complex objects are a whole other ball game, it makes escaping strings look like child’s play. You can see that each PSRP message has its own object structure and using the <code class="language-plaintext highlighter-rouge">SESSION_CAPABILITY</code> we send we can see it is formatted like this;</p>

<div class="language-plaintext highlighter-rouge"><div class="highlight"><pre class="highlight"><code>&lt;Obj RefId="0"&gt;
    &lt;MS&gt;
        &lt;Version N="protocolversion"&gt;2.3&lt;/Version&gt;
        &lt;Version N="PSVersion"&gt;2.0&lt;/Version&gt;
        &lt;Version N="SerializationVersion"&gt;1.1.0.1&lt;/Version&gt;
    &lt;/MS&gt;
&lt;/Obj&gt;
</code></pre></div></div>

<p>We can see this is a relatively simple “complex object” with three extended properties; <code class="language-plaintext highlighter-rouge">protocolversion</code>, <code class="language-plaintext highlighter-rouge">PSVersion</code>, and <code class="language-plaintext highlighter-rouge">SerializationVersion</code> all of the primitive <code class="language-plaintext highlighter-rouge">Version</code> type. If we look at the <code class="language-plaintext highlighter-rouge">INIT_RUNSPACEPOOL</code> it starts to be a bit more daunting</p>

<div class="language-plaintext highlighter-rouge"><div class="highlight"><pre class="highlight"><code>&lt;Obj RefId="0"&gt;
    &lt;MS&gt;
        &lt;I32 N="MinRunspaces"&gt;1&lt;/I32&gt;
        &lt;I32 N="MaxRunspaces"&gt;1&lt;/I32&gt;
        &lt;Obj N="PSThreadOptions" RefId="1"&gt;
            &lt;TN RefId="0"&gt;
                &lt;T&gt;System.Management.Automation.Runspaces.PSThreadOptions&lt;/T&gt;
                &lt;T&gt;System.Enum&lt;/T&gt;
                &lt;T&gt;System.ValueType&lt;/T&gt;
                &lt;T&gt;System.Object&lt;/T&gt;
            &lt;/TN&gt;
            &lt;ToString&gt;Default&lt;/ToString&gt;
            &lt;I32&gt;0&lt;/I32&gt;
        &lt;/Obj&gt;
        &lt;Obj N="ApartmentState" RefId="2"&gt;
            &lt;TN RefId="1"&gt;
                &lt;T&gt;System.Management.Automation.Runspaces.ApartmentState&lt;/T&gt;
                &lt;T&gt;System.Enum&lt;/T&gt;
                &lt;T&gt;System.ValueType&lt;/T&gt;
                &lt;T&gt;System.Object&lt;/T&gt;
            &lt;/TN&gt;
            &lt;ToString&gt;UNKNOWN&lt;/ToString&gt;
            &lt;I32&gt;2&lt;/I32&gt;
        &lt;/Obj&gt;
        &lt;Obj N="HostInfo" RefId="3"&gt;
            &lt;MS&gt;
                &lt;B N="_isHostNull"&gt;true&lt;/B&gt;
                &lt;B N="_isHostUINull"&gt;true&lt;/B&gt;
                &lt;B N="_isHostRawUINull"&gt;true&lt;/B&gt;
                &lt;B N="_useRunspaceHost"&gt;true&lt;/B&gt;
            &lt;/MS&gt;
        &lt;/Obj&gt;
        &lt;Nil N="ApplicationArguments"/&gt;
    &lt;/MS&gt;
&lt;/Obj&gt;
</code></pre></div></div>

<p>Here we still have a few extended properties; <code class="language-plaintext highlighter-rouge">MinRunspaces</code>, <code class="language-plaintext highlighter-rouge">MaxRunspaces</code>, <code class="language-plaintext highlighter-rouge">PSThreadOptions</code>, <code class="language-plaintext highlighter-rouge">ApartmentState</code>, <code class="language-plaintext highlighter-rouge">HostInfo</code>, and <code class="language-plaintext highlighter-rouge">ApplicationArguments</code>. The values for each of these properties are different types with some being another complex object. Once again, this is not too bad and somewhat simple to parse. It becomes highly complex when dealing with lists/dicts of complex objects with nested complex objects. Just have a look at <a href="https://msdn.microsoft.com/en-us/library/dd342423.aspx">ERROR_RECORD</a> example in the MS-PSRP documentation.</p>

<p>Finally if we were to look at the output from our example pipeline <code class="language-plaintext highlighter-rouge">Get-PSDrive -Name C</code>, we would get the following returned back to us as a <code class="language-plaintext highlighter-rouge">PIPELINE_OUTPUT</code> message;</p>

<div class="language-plaintext highlighter-rouge"><div class="highlight"><pre class="highlight"><code>&lt;Obj RefId="0"&gt;
    &lt;TN RefId="0"&gt;
        &lt;T&gt;System.Management.Automation.PSDriveInfo&lt;/T&gt;
        &lt;T&gt;System.Object&lt;/T&gt;
    &lt;/TN&gt;
    &lt;ToString&gt;C&lt;/ToString&gt;
    &lt;Props&gt;
        &lt;S N="CurrentLocation"&gt;Users\vagrant\Documents&lt;/S&gt;
        &lt;S N="Name"&gt;C&lt;/S&gt;
        &lt;S N="Provider"&gt;Microsoft.PowerShell.Core\FileSystem&lt;/S&gt;
        &lt;S N="Root"&gt;C:\&lt;/S&gt;
        &lt;S N="Description"&gt;Windows 2016&lt;/S&gt;
        &lt;Nil N="MaximumSize"/&gt;
        &lt;Obj N="Credential" RefId="1"&gt;
            &lt;TN RefId="1"&gt;
                &lt;T&gt;System.Management.Automation.PSCredential&lt;/T&gt;
                &lt;T&gt;System.Object&lt;/T&gt;
            &lt;/TN&gt;
            &lt;ToString&gt;System.Management.Automation.PSCredential&lt;/ToString&gt;
            &lt;Props&gt;
                &lt;Nil N="UserName"/&gt;
                &lt;Nil N="Password"/&gt;
            &lt;/Props&gt;
        &lt;/Obj&gt;
        &lt;Nil N="DisplayRoot"/&gt;
    &lt;/Props&gt;
    &lt;MS&gt;
        &lt;U64 N="Used"&gt;29512912896&lt;/U64&gt;
        &lt;U64 N="Free"&gt;12061024256&lt;/U64&gt;
    &lt;/MS&gt;
&lt;/Obj&gt;
</code></pre></div></div>

<p>If we were running on a .NET language, the tools to deserialise this back into a <code class="language-plaintext highlighter-rouge">PSDriveInfo</code> object would be builtin but with pypsrp I had to try and implement this myself. What I ended up doing was having a predefined “known types” list which mapped known types to an existing Python object defined <a href="https://github.com/jborean93/pypsrp/blob/master/pypsrp/complex_objects.py">here</a>. These known types are mostly types used within PSRP itself such as <code class="language-plaintext highlighter-rouge">PSThreadOptions</code>, <code class="language-plaintext highlighter-rouge">ErrorRecord</code>, <code class="language-plaintext highlighter-rouge">PSCredential</code> and more. For types that are not pre-defined, like <code class="language-plaintext highlighter-rouge">PSDriveInfo</code>, it would be encapsulated into a <code class="language-plaintext highlighter-rouge">GenericComplexObject</code>. This object is able to convert the raw CLIXML string into the following Python object properties;</p>

<ul>
  <li><code class="language-plaintext highlighter-rouge">types</code>: A list of types as defined by the <code class="language-plaintext highlighter-rouge">TN</code> element</li>
  <li><code class="language-plaintext highlighter-rouge">to_string</code>: If the object contains a <code class="language-plaintext highlighter-rouge">ToString</code> element, this stores that value, using str(obj) would also return that value</li>
  <li><code class="language-plaintext highlighter-rouge">adapted_properties</code> Any properties contained in the <code class="language-plaintext highlighter-rouge">Props</code> element are stored here, this is dict where the <code class="language-plaintext highlighter-rouge">N</code> element attribute value is the key</li>
  <li><code class="language-plaintext highlighter-rouge">extended_properties</code>: Any properties contained in the <code class="language-plaintext highlighter-rouge">MS</code> element are stored here, the key is also the value of the <code class="language-plaintext highlighter-rouge">N</code> element attribute</li>
  <li><code class="language-plaintext highlighter-rouge">property_sets</code>: Any other elements that are not in the <code class="language-plaintext highlighter-rouge">Props</code> or <code class="language-plaintext highlighter-rouge">MS</code> elements</li>
</ul>

<p>If for any reason this failed, then the raw CLIXML string is returned instead.</p>

<p>When looking at the <code class="language-plaintext highlighter-rouge">PSDriveInfo</code> example, here is some ways of accessing each of the objects returned in Python;</p>

<div class="language-plaintext highlighter-rouge"><div class="highlight"><pre class="highlight"><code>assert output.types == ["System.Management.Automation.PSDriveInfo", "System.Object"]

# get the string representation &lt;ToString&gt;
assert str(output) == "C"

assert output.adapted_properties['CurrentLocation'] == r"Users\vagrant\Documents"

# PSCredentials is a known type so we can access the props based on the object definition
assert output.adapted_properties['Credential'].username is None

assert output.extended_properties['Used'] == 29512912896
</code></pre></div></div>

<p>I’m hoping the current implementation makes it somewhat easier to deal with objects but I can see there’s always room for improvement. If worst comes to worst and you want to go back to a more stdio way of working and pipe the output as a string so PowerShell does all the heavy lifting for you. The best way of doing this is to run your whole command/script under <code class="language-plaintext highlighter-rouge">Invoke-Expression -Command "..." | Out-String Stream</code> like so.</p>

<div class="language-plaintext highlighter-rouge"><div class="highlight"><pre class="highlight"><code>from pypsrp.powershell import PowerShell, RunspacePool
from pypsrp.wsman import WSMan

wsman = WSMan("server2016.domain.local", username="vagrant", password="vagrant",
              cert_validation=False)

with RunspacePool(wsman) as pool:
    ps = PowerShell(pool)
    ps.add_cmdlet("Invoke-Expression").add_parameter("Command", "Get-PSDrive -Name C")
    ps.add_cmdlet("Out-String").add_parameter("Stream")
    ps.invoke()
    print("\n".join(ps.output))
</code></pre></div></div>

<p>This will produce the following output</p>

<div class="language-plaintext highlighter-rouge"><div class="highlight"><pre class="highlight"><code>Name           Used (GB)     Free (GB) Provider      Root                                                CurrentLocation
----           ---------     --------- --------      ----                                                ---------------
C                  27.49         11.23 FileSystem    C:\                                         Users\vagrant\Documents
</code></pre></div></div>

<p>So in the end it is up to your how you want to handle objects, you can get PowerShell on the remote host to create the output string or you can manually parse the objects yourself and create the output in whatever format you desire.</p>

<h1 id="using-pypsrp">Using PyPSRP</h1>

<p>I’ve spoken a lot about PSRP and hope you have a better understanding of what goes on in the background. I’ve put in a lot of hours to get it all working and I hope some people find a use for it.</p>

<h2 id="how-to-install">How to install</h2>

<p>The first step to get this all working is actually installing pypsrp, the simplest way to do this is by running <code class="language-plaintext highlighter-rouge">pip install pypsrp</code>. This will download all the dependencies and get the package setup and ready to do. Out of the box you can do pretty much anything but authenticate with Kerberos or CredSSP authentication. If you wanted to add support for that, just run;</p>

<div class="language-plaintext highlighter-rouge"><div class="highlight"><pre class="highlight"><code># Ubuntu Python 2
apt-get install gcc python-dev libkrb5-dev

# Ubuntu Python 3
apt-get install gcc python3-dev libkrb5-dev

# RHEL/Centos
yum install gcc python-devel krb5-devel

# Fedora
dnf install gcc python-devel krb5-devel

pip install pypsrp[kerberos,credssp]
</code></pre></div></div>

<h3 id="psrp-examples">PSRP Examples</h3>

<p>I’ll first give you an example of how to run some code through the PSRP layer. The high level API is designed to wrap a lot of the work that goes on behind the scenes with Runspaces and Pipelines into a simple function that runs a script and returns the output. Here is a very simple example of how you can run a cmdlet like <code class="language-plaintext highlighter-rouge">New-Item</code> through this interface;</p>

<div class="language-plaintext highlighter-rouge"><div class="highlight"><pre class="highlight"><code>from pypsrp.client import Client

client = Client("server", username="user",
                password="password", ssl=False)

script = r"New-Item -Path C:\temp\folder -ItemType Directory -Verbose"
output, streams, had_errors = client.execute_ps(script)

print("HAD ERRORS: %s" % had_errors)
print("OUTPUT:\n%s" % output)
print("ERROR:\n%s" % "\n".join([str(s) for s in streams.error]))
print("DEBUG:\n%s" % "\n".join([str(s) for s in streams.debug]))
print("VERBOSE:\n%s" % "\n".join([str(s) for s in streams.verbose]))
</code></pre></div></div>

<p>We see instead of the standard <code class="language-plaintext highlighter-rouge">stdout</code>, <code class="language-plaintext highlighter-rouge">stderr</code>, and <code class="language-plaintext highlighter-rouge">rc</code> outputs, we get the following;</p>

<ul>
  <li><code class="language-plaintext highlighter-rouge">output</code>: A string that contains all the output records from the execution</li>
  <li><code class="language-plaintext highlighter-rouge">streams</code>: A object that contains each of the streams (<code class="language-plaintext highlighter-rouge">error</code>, <code class="language-plaintext highlighter-rouge">verbose</code>, <code class="language-plaintext highlighter-rouge">debug</code>, <code class="language-plaintext highlighter-rouge">warning</code>, <code class="language-plaintext highlighter-rouge">information</code>) which has a list of each stream object created by the script</li>
  <li><code class="language-plaintext highlighter-rouge">had_errors</code>: A boolean that indicates whether a terminating error was thrown, <em>note: this is different from a normal error</em></li>
</ul>

<p>The output of the above command is</p>

<p><a href="/assets/images/2018/08/PyPSRP-PSRP-Good.png"><img src="/assets/images/2018/08/PyPSRP-PSRP-Good.png" alt="" /></a></p>

<p>If we were to run it one more time we would get</p>

<p><a href="/assets/images/2018/08/PyPSRP-PSRP-Bad.png"><img src="/assets/images/2018/08/PyPSRP-PSRP-Bad.png" alt="" /></a></p>

<p>We can see that there is an error entry but <code class="language-plaintext highlighter-rouge">had_errors</code> is still <code class="language-plaintext highlighter-rouge">False</code>. This is because of the way <code class="language-plaintext highlighter-rouge">execute_ps</code> runs the script, only terminating errors, e.g. <code class="language-plaintext highlighter-rouge">throw</code> will set this to <code class="language-plaintext highlighter-rouge">True</code>.</p>

<p>Converting this to the low level API would look like</p>

<div class="language-plaintext highlighter-rouge"><div class="highlight"><pre class="highlight"><code>from pypsrp.powershell import PowerShell, RunspacePool
from pypsrp.wsman import WSMan

wsman = WSMan("server", username="user",
              password="password", ssl=False)

with RunspacePool(wsman) as pool:
    ps = PowerShell(pool)
    ps.add_script("New-Item -Path C:\\temp\\folder -ItemType Directory -Verbose")
    output = ps.invoke()

print("HAD ERRORS: %s" % ps.had_errors)
print("OUTPUT:\n%s" % "\n".join([str(s) for s in output]))
print("ERROR:\n%s" % "\n".join([str(s) for s in ps.streams.error]))
print("DEBUG:\n%s" % "\n".join([str(s) for s in ps.streams.debug]))
print("VERBOSE:\n%s" % "\n".join([str(s) for s in ps.streams.verbose]))`
</code></pre></div></div>

<p><a href="/assets/images/2018/08/PyPSRP-PSRP-Low-Level.png"><img src="/assets/images/2018/08/PyPSRP-PSRP-Low-Level.png" alt="" /></a></p>

<p>We can see that output is now a list of stream objects rather than a single string. You can always do what the example does and just cast each entry to to a string but the output will look a bit different to what you are used to on a native PowerShell console. Some of the extra features you can play with when using this lower level interface are;</p>

<ul>
  <li>You can specify the PSRP configuration name to connect to instead of using the default <code class="language-plaintext highlighter-rouge">Microsoft.PowerShell</code></li>
  <li>You can run multiple Runspaces/Pipelines at the same time compared to just the one</li>
  <li>You can define a pseudo Host to handle host methods like WriteLine, Prompt, ReadLine and so on</li>
  <li>You can run the PowerShell script in the background without blocking, use the <code class="language-plaintext highlighter-rouge">begin_invoke()</code>, <code class="language-plaintext highlighter-rouge">poll_invoke()</code>, and <code class="language-plaintext highlighter-rouge">end_invoke()</code> methods for this</li>
  <li>Lots and lots more, this only scratches the surface.</li>
</ul>

<p>The low level interface is designed to replicate the .NET API for dealing with Runspace Pools and Pipelines. See the <a href="https://docs.microsoft.com/en-us/dotnet/api/system.management.automation.runspaces.runspacepool?view=powershellsdk-1.1.0">RunspacePool Class</a> and <a href="https://docs.microsoft.com/en-us/dotnet/api/system.management.automation.powershell?view=powershellsdk-1.1.0">PowerShell Class</a> for details on the methods.</p>

<h3 id="winrs-examples">WinRS Examples</h3>

<p>I spoke at the start I wanted to make sure I implemented all the features currently present in pywinrm and that includes being able to run a command through WinRS. Like with the PSRP side, there is a high level implementation to make it easy for someone new to the library as well as a lower level interface if you need some of the more advanced features. Let’s show an example of both.</p>

<div class="language-plaintext highlighter-rouge"><div class="highlight"><pre class="highlight"><code>from pypsrp.client import Client

client = Client("server", username="user",
                password="password", ssl=False)

stdout, stderr, rc = client.execute_cmd("whoami.exe /all")
print("RC: %d" % rc)
print("STDOUT:\n%s" % stdout)
print("STDERR:\n%s" % stderr)
</code></pre></div></div>

<p><a href="/assets/images/2018/08/PyPSRP-WinRS.png"><img src="/assets/images/2018/08/PyPSRP-WinRS.png" alt="" /></a></p>

<p>Now comparing it to the lower level API;</p>

<div class="language-plaintext highlighter-rouge"><div class="highlight"><pre class="highlight"><code>from pypsrp.shell import Process, SignalCode, WinRS
from pypsrp.wsman import WSMan

wsman = WSMan("server", username="user", password="password",
              ssl=False)

with WinRS(wsman) as shell:
    process = Process(shell, "whoami.exe", ["/all"])
    process.invoke()
    process.signal(SignalCode.CTRL_C)

print("RC: %d" % process.rc)

# the stdout and stderr streams come back as bytes, this decodes them with the 437 codepage (default on my Windows host)
print("STDOUT:\n%s" % process.stdout.decode('437'))
print("STDERR:\n%s" % process.stderr.decode('437'))
</code></pre></div></div>

<p>You can see we are manually creating the <code class="language-plaintext highlighter-rouge">Process</code> object with the executable and a list of argument(s), invoking that and sending the stop signal once finished. This is a lot more verbose than the other code but some of the things you can do with the low level interface are;</p>

<ul>
  <li>You can run multiple commands in the same WinRS shell which saves some time</li>
  <li>The process object has a <code class="language-plaintext highlighter-rouge">begin_invoke()</code>, <code class="language-plaintext highlighter-rouge">poll_invoke()</code> and <code class="language-plaintext highlighter-rouge">end_invoke()</code> to effectively run the command in the background and not block Python until it is finished</li>
  <li>The <code class="language-plaintext highlighter-rouge">Process</code> object has a <code class="language-plaintext highlighter-rouge">send()</code> method to send bytes to the stdin pipe of the remote process</li>
  <li>Lots more configuration options around the WinRS shell and Process object, like environment, working directory, codepage, etc</li>
</ul>

<h1 id="interop-with-secure-strings">Interop with Secure Strings</h1>

<p>This is one feature I thought was important enough to talk about a bit more and was probably one of the more complex ones to implement in Python. When creating a SecureString in PowerShell the string is encrypted using a key baked by DPAPI based on the current user’s credentials. This effectively means only the user on the host that created the string can decrypt and get the plaintext of that value. When using plain WinRM, you loose the ability to create a secure string and send it over the wire to the remote host, any attempt to do so would involve manually encrypting and decrypting the string with some out of band mechanism.</p>

<p>PSRP offers an in built mechanism to serialise a string as a SecureString object and send that across the wire using AES256 encryption.</p>

<h2 id="how-it-works">How it Works</h2>

<p>Unlike WinRM message encryption which is dependent on either TLS to encrypt the entire transport payload or using the authentication context wrapping methods to encrypt the WSMan payload, PSRP uses another layer of encryption when dealing with SecureStrings. In the current protocols each key is unique per WSMan session and is based on the AES256 algorithm in CBC mode. Here is a basic process flow of what happens when the client starts the key exchange process;</p>

<p><a href="/assets/images/2018/08/PSRP-Key-Exchange.png"><img src="/assets/images/2018/08/PSRP-Key-Exchange.png" alt="" /></a></p>

<p>Some things to note;</p>

<ul>
  <li>The RSA key pair generated by the client, MUST never be reused</li>
  <li>PyPSRP will generate the key pair with a public exponent value of <code class="language-plaintext highlighter-rouge">65537</code> and a key size of <code class="language-plaintext highlighter-rouge">2048</code> bits</li>
  <li>The PUBLIC_KEY message contains a pre set header as defined at <a href="https://msdn.microsoft.com/en-us/library/dd644859.aspx">MS-PSRP 2.2.2.3 PUBLIC_KEY Message</a></li>
  <li>The server will generate the session key using <a href="https://docs.microsoft.com/en-us/windows/desktop/api/wincrypt/nf-wincrypt-cryptgenkey">CryptGenKey</a> with;
    <ul>
      <li><code class="language-plaintext highlighter-rouge">Algid</code>: <a href="https://docs.microsoft.com/en-us/windows/desktop/SecCrypto/alg-id">CALG_AES_256</a></li>
      <li><code class="language-plaintext highlighter-rouge">dwFlags</code>: <code class="language-plaintext highlighter-rouge">0x0100000</code> (256 bit length) | <code class="language-plaintext highlighter-rouge">CRYPT_EXPORTABLE</code> | <code class="language-plaintext highlighter-rouge">CRYPT_CREATE_SALT</code></li>
    </ul>
  </li>
  <li>The generated key is exported with <a href="https://docs.microsoft.com/en-us/windows/desktop/api/wincrypt/nf-wincrypt-cryptexportkey">CryptExportKey</a> with <code class="language-plaintext highlighter-rouge">hExpKey</code> set to the handle of the RSA public key sent by the client</li>
  <li>The encrypted session key is padded based on the RSAES-PKCS-v1_5 algorithm before sending to the client</li>
  <li>Due to the asymmetric nature of the RSA algorithm, only the host that generated the key (the server) and the holder of the RSA private key (the client) now know what the session key is</li>
  <li>When generating the AES256 CBC cipher, Windows defaults to having an IV of 16 bytes of <code class="language-plaintext highlighter-rouge">\x00</code></li>
</ul>

<p>Finally when it comes to serialising a string as a SecureString, we need to get the <code class="language-plaintext highlighter-rouge">UTF-16-LE</code> encoded bytes of the string, pad it iwth the PKCS7 algorithm and then encrypt that with the session key from the server.</p>

<p>This process may change sometime in the future, especially if PowerShell Core adds support for it, but for now this works on PowerShell 2.0 to 5.x.</p>

<h2 id="issues-with-python-interop">Issues with Python Interop</h2>

<p>The documentation around how this all works is pretty minimal so I found implementing this in Python was quite difficult. The issues I came across were;</p>

<ul>
  <li>Getting the public key modulus in the format expected was difficult, cryptography’s <a href="https://cryptography.io/en/latest/hazmat/primitives/asymmetric/rsa/#cryptography.hazmat.primitives.asymmetric.rsa.RSAPublicNumbers">RSAPublicNumbers</a> object contains the modulus as an int but we needed it as bytes. Being a really large number meant I couldn’t use struct to do this for me</li>
  <li>The encrypted session key returned by the server had to have it’s bytes reversed for it to work with Python cryptography, never really found out why but it needed to be done</li>
  <li>The docs do state that <code class="language-plaintext highlighter-rouge">RSAES-PKCS-v1_5</code> padding is used on the session key, but finding out how to implement that in Python cryptography to work with the Windows crypto libraries took a lot of trial and error</li>
  <li>The process to encrypt the secure strings MUST be done on the UTF-16-LE encoded bytes of the string, this is fine for Python 3 which defaults to unicode strings but Python 2’s default text is already a byte string which can be problematic as people usually have UTF-8/ASCII bytes in their Python 2 strings</li>
  <li>PSRP would not reply with helpful error messages if the message format was incorrect, leading to lots of different trial and error attempts</li>
</ul>

<h2 id="using-securestrings-in-pypsrp">Using SecureStrings in PyPSRP</h2>

<p>Let’s show an example of this in action.</p>

<div class="language-plaintext highlighter-rouge"><div class="highlight"><pre class="highlight"><code>from pypsrp.complex_objects import ObjectMeta, PSCredential
from pypsrp.powershell import PowerShell, RunspacePool
from pypsrp.wsman import WSMan

wsman = WSMan("server2016.domain.local", username="vagrant",
              password="vagrant", cert_validation=False)

with RunspacePool(wsman) as pool:
    pool.exchange_keys()

    secure_string = pool.serialize(u"My secret", ObjectMeta("SS"))
    ps_credential = PSCredential(username="Username", password="Password")

    ps = PowerShell(pool)
    # send the Python objects across and store as a variable in our Pipeline
    ps.add_cmdlet("Set-Variable").add_parameters({"Name": "secure_string", "Value": secure_string})
    ps.add_statement()
    ps.add_cmdlet("Set-Variable").add_parameters({"Name": "ps_credential", "Value": ps_credential})

    # assert it was serialized as a secure string and we can decrypt/return it back to us
    ps.add_statement().add_script('''
$sec_ptr = [Runtime.InteropServices.Marshal]::SecureStringToBSTR($secure_string)
[Runtime.InteropServices.Marshal]::PtrToStringAuto($sec_ptr)

$sec_ptr = [Runtime.InteropServices.Marshal]::SecureStringToBSTR($ps_credential.Password)
[Runtime.InteropServices.Marshal]::PtrToStringAuto($sec_ptr)
''')
    ps.invoke()

    assert ps.output[0] == u"My secret"
    assert ps.output[1] == u"Password"
</code></pre></div></div>

<p>In the script above we added the extra step to setup the encryption keys with <code class="language-plaintext highlighter-rouge">.exchange_keys()</code>. This is done after the RunspacePool is opened and before we go to serialise any SecureString objects. Once that’s done, we can serialise any unicode string with the <code class="language-plaintext highlighter-rouge">pool.serialize()</code> method or any known complex object that uses SecureStrings like `PSCredential. Having a look at the actual PSRP objects sent in this exchange we can see the serialised form of both these variables;</p>

<div class="language-plaintext highlighter-rouge"><div class="highlight"><pre class="highlight"><code>&lt;SS N="V"&gt;Zs+jIsTFR1jsAoq68slZIO3SFaKmOuFinKWOq89mXwk=&lt;/SS&gt;

&lt;Obj N="V" RefId="26"&gt;
    &lt;TN RefId="4"&gt;
        &lt;T&gt;System.Management.Automation.PSCredential&lt;/T&gt;
        &lt;T&gt;System.Object&lt;/T&gt;
    &lt;/TN&gt;
    &lt;ToString&gt;System.Management.Automation.PSCredential&lt;/ToString&gt;
    &lt;Props&gt;
        &lt;S N="UserName"&gt;Username&lt;/S&gt;
        &lt;SS N="Password"&gt;oqIE37i0OiC6Qg8TO9a931DlrqoEFaRxYWUQ/eja+5I=&lt;/SS&gt;
    &lt;/Props&gt;
&lt;/Obj&gt;
</code></pre></div></div>

<p>Awesome, so anyone who manages to snoop over the wire will only see the encrypted value.</p>

<h1 id="whats-next">What’s Next</h1>

<p>So far I’ve created an Ansible connection plugin that uses pypsrp to speed up the execution a bit more. The gains are nothing dramatic but I found it saved around 45 seconds off a 5 minute playbook which is better than nothing :). If you wish to test it out, either wait until Ansible 2.7 is released or add the changes <a href="https://github.com/ansible/ansible/pull/41729">here</a> to your install of Ansible. I want to look into setting it up as a persisted connection within Ansible to get even more of a performance gain but came across some problems with the current persisted connection framework within Ansible that needed to be solved first before moving ahead.</p>

<p>As for pypsrp itself, I am hoping to get the following working at some point in the future;</p>

<ul>
  <li>Support for SSH as a transport mechanism</li>
  <li>Create an interactive console so you can connect to a host and run commands interactively</li>
  <li>Create a readthedocs site to help people use the library</li>
</ul>

<p>SSH is probably the biggest feature I would like to implement but the only documentation I can find around this is the code itself in the PowerShell repo on GitHub. It’s not impossible to get working but without some reference docs to explain some of the complex steps in the code it will take a bit more time than normal.</p>

<h1 id="what-ive-learnt">What I’ve Learnt</h1>

<p>This project has been quite an illuminating one for me. I’ve always been interested in getting PSRP working with Python ever since I read Matt Wrock’s article about it. The allure of a faster API than what WinRS offered was definitely a big reason for this but ultimately I found the performance gains a bit disappointing. I found that yes it was faster than WinRS, due less overhead in creating each PowerShell process, but some of the other benefits like file transfer speeds weren’t actually realised.</p>

<p>I think that the complexities involved with PSRP, like serialisation of objects, probably outweigh the advantages for someone wanting to just run a PowerShell command which is why not many third party libraries have embraced PSRP over vanilla WinRM. In saying that there are definitely some advantages of using PSRP that make this library a good option for some. These features would be things like;</p>

<ul>
  <li>Connecting to a custom configuration endpoint, used in tools like Just Enough Administration or things like Office 365 management consoles</li>
  <li>You want to deal with PowerShell objects directly instead of parsing text</li>
  <li>You want to utilise SecureString remotely to add extra confidentiality to the data being sent</li>
  <li>You want finer control over executing PowerShell commands and really enjoy the .NET Runspace interface</li>
</ul>

<p>At the end of the day, I learnt a hell of a lot about the PowerShell/WinRM ecosystem that I didn’t know before which is what I call a success. If a by product of this work means other people can benefit from it, then that’s just icing on the cake.</p>]]></content><author><name>Jordan Borean</name></author><category term="powershell" /><category term="windows" /><category term="winrm" /><summary type="html"><![CDATA[One thing I am looking into everyday as part of my job is how to make the remote management of Windows servers easier. Currently the best way is through WinRM but as I’ve written about before, WinRM can be such a vague term. It can mean refer to different technologies and the answer to what …]]></summary></entry><entry><title type="html">Decrypting the secrets of Ansible Vault in PowerShell</title><link href="https://bloggingforlogging.com/2018/05/20/decrypting-the-secrets-of-ansible-vault-in-powershell/" rel="alternate" type="text/html" title="Decrypting the secrets of Ansible Vault in PowerShell" /><published>2018-05-20T05:49:40+00:00</published><updated>2018-05-20T05:49:40+00:00</updated><id>https://bloggingforlogging.com/2018/05/20/decrypting-the-secrets-of-ansible-vault-in-powershell</id><content type="html" xml:base="https://bloggingforlogging.com/2018/05/20/decrypting-the-secrets-of-ansible-vault-in-powershell/"><![CDATA[<p>Ansible Vault is a pretty nifty tool that allows people to easily encrypt secrets for use in Ansible. It’s a builtin tool that can be use to encrypt secrets and make them easily usable for Ansible.</p>

<p>When calling Ansible, you must supply the password by either manually entering it or use a password file. From there, Ansible will automatically decrypt the contents when it is required, simple stuff.</p>

<p>As an example I can turn something like this</p>

<div class="language-plaintext highlighter-rouge"><div class="highlight"><pre class="highlight"><code>host_password: supersecretpass123!
</code></pre></div></div>

<p>into this</p>

<div class="language-plaintext highlighter-rouge"><div class="highlight"><pre class="highlight"><code>$ANSIBLE_VAULT;1.1;AES256
33343835306666636239373663396363643766613363343837646633343933376633323964663030
3134616235646661306436643134383333633730376233650a663466323032343633383061336461
36393261363338616337613039363435313631343437323164386661326633313339396238396236
3462393338636632650a653036663266373533343232393838343161396564333963643632653932
30386135636131656130346537356637396139323134386162306431376564346537633566666532
6331323061373237336639356165393563613765663864366231
</code></pre></div></div>

<p>As a dev on the Ansible project, this was an area that I didn’t really understand and I wanted to fix that by understanding how the vault works. At the same time I also wanted to have another way for people working on Windows to encrypt and decrypt vault files, reducing the barrier for using Ansible for those users. Currently Ansible, and by extension <code class="language-plaintext highlighter-rouge">ansible-vault</code>, is unable to run natively on Windows. There are ways around this such as using WSL or Cygwin to run the Ansible scripts but either this won’t work for all users (WSL) or is quite complex to setup (Cygwin).</p>

<p>I decided to try and kill 2 birds with 1 stone, which was to re implement the functionality of <code class="language-plaintext highlighter-rouge">ansible-vault</code> in another language. In doing so I gain an understanding of how <code class="language-plaintext highlighter-rouge">ansible-vault</code> works as well as giving Windows users a native solution for managing vault files.</p>

<p>Before I started to write this new tool, I had a few goals in mind which were;</p>

<ul>
  <li>Runs natively on Windows with no extra software dependencies</li>
  <li>Also works on older Windows hosts like Windows 7, 8, and 8.1</li>
  <li>Simple and easy to setup/use</li>
  <li>Easy to maintain the software going forward</li>
</ul>

<p>I could have just ported the Python code to a script that works on Windows and be done with it but, in my mind, that would be cheating and doesn’t really fulfill all my goals. Specifically it would require Python to be installed (not a hard ask I know but still extra software) and I wouldn’t be learning too much if I just reused code from the Ansible codebase.</p>

<p>The result is a PowerShell module that includes cmdlets to encrypt and decrypt vault files but before I go into the PowerShell side I want to explain how Ansible Vault works based on what I learnt.</p>

<h1 id="analysing-ansible-vault">Analysing Ansible Vault</h1>

<p>The code behind Ansible Vault is all open source and can <a href="https://github.com/ansible/ansible/blob/devel/lib/ansible/parsing/vault/__init__.py">viewed in the Ansible GitHub Repo</a> by anyone. At the time of writing this blog post, AES256 at the 1.1/1.2 implementation was the latest and that is what this section will break down. Each vault is split into 2 main parts;</p>

<ul>
  <li>Header – On the first line of the vault file and defines the structure of the vault</li>
  <li>Cipher text – Contains the salt, hmac hash, and the encrypted bytes as a hex string with a newline at every 80 chars</li>
</ul>

<h2 id="header">Header</h2>

<p>The header of the vault is comprised of a few keys fields, each separated by <code class="language-plaintext highlighter-rouge">;</code>, which are;</p>

<ul>
  <li>The file format ID, currently only <code class="language-plaintext highlighter-rouge">$ANSIBLE_VAULT</code> is used</li>
  <li>The vault version that indicates how it was encrypted</li>
  <li>The cipher used for encryption</li>
  <li>An optional ID field</li>
</ul>

<h3 id="versions">Versions</h3>

<p>There are 3 versions of the Ansible Vault that exist;</p>

<ul>
  <li><code class="language-plaintext highlighter-rouge">1.0</code> – Introduced in Ansible 1.5, this is the original vault format and no longer in use</li>
  <li><code class="language-plaintext highlighter-rouge">1.1</code> – Introduced in Ansible 1.5.1, fixed issues with the original format and is still in use today</li>
  <li><code class="language-plaintext highlighter-rouge">1.2</code> – Introduced in Ansible 2.4, is the same as <code class="language-plaintext highlighter-rouge">1.1</code> but includes the <code class="language-plaintext highlighter-rouge">ID</code> field in the header</li>
</ul>

<p>Currently <code class="language-plaintext highlighter-rouge">1.1</code> is used when no ID is set to the vault and <code class="language-plaintext highlighter-rouge">1.2</code> is used when an ID set. The cipher contents and encryption process are the same between the two, the only difference is the extra field in the header. Because the <code class="language-plaintext highlighter-rouge">1.0</code> format was quickly removed in a single minor release, I did not implement support for decrypting that format. If you still have a vault file in that format, change it immediately!</p>

<h3 id="ciphers">Ciphers</h3>

<p>The next field in the header is the cipher that is used, currently it can be either of the following;</p>

<ul>
  <li><code class="language-plaintext highlighter-rouge">AES</code> – Used in the <code class="language-plaintext highlighter-rouge">1.0</code> version and no longer in use</li>
  <li><code class="language-plaintext highlighter-rouge">AES256</code> – Used in both <code class="language-plaintext highlighter-rouge">1.1</code> and <code class="language-plaintext highlighter-rouge">1.2</code>, is based on the AES cipher with a 256 bit key in CTR mode</li>
</ul>

<p>This made thing relatively simple as there is only cipher I needed to add support for.</p>

<h3 id="vault-id">Vault ID</h3>

<p>The vault ID was added in the <code class="language-plaintext highlighter-rouge">1.2</code> version and it is used by Ansible to map a password to a particular vault file. For example, a user can create a vault file for each environment, say <code class="language-plaintext highlighter-rouge">dev</code>, <code class="language-plaintext highlighter-rouge">uat</code>, <code class="language-plaintext highlighter-rouge">prod</code>, and create a vault file for each environment with different passwords per ID/environment. When a vault file contains an ID, the header would look like the following;</p>

<div class="language-plaintext highlighter-rouge"><div class="highlight"><pre class="highlight"><code>$ANSIBLE_VAULT;1.2;AES256;prod
</code></pre></div></div>

<h2 id="cipher-text">Cipher Text</h2>

<p>Before breaking down the cipher text, I will briefly cover the various cryptography tools used as part of the vault process. Currently these functions/protocls are being used;</p>

<ul>
  <li>AES block cipher with a 32-byte (256 bit) key in CTR mode to encrypt/decrypt</li>
  <li>PBKDF2 using HMAC SHA256 to derive the various keys, this takes in a 32-byte salt, runs for 10000 iterations</li>
  <li>HMAC using SHA256 to verify the KDF output against the encrypted bytes</li>
  <li>PKCS7 padding on the encrypted bytes</li>
</ul>

<p>When bringing this all together we need the following bits of information;</p>

<ul>
  <li>A password used as the secret input into the PBKDF2 function</li>
  <li>A 32-byte salt to use with the password in the PBKDF2 function</li>
  <li>A 32-byte key to use as part of the HMAC function</li>
  <li>A 32-byte key used to initialise the AES cipher</li>
  <li>A 16-byte key used as the base counter/nonce of the AES CTR mode</li>
</ul>

<p>We already know the password and the salt is stored in the cipher text, from there we can get the rest of the keys as they are the output of the PBKDF2 function. To get the salt, lets first break down the cipher text (excluding the header). Here is a sample cipher text that I posted in the beginning of this blog;</p>

<div class="language-plaintext highlighter-rouge"><div class="highlight"><pre class="highlight"><code>33343835306666636239373663396363643766613363343837646633343933376633323964663030
3134616235646661306436643134383333633730376233650a663466323032343633383061336461
36393261363338616337613039363435313631343437323164386661326633313339396238396236
3462393338636632650a653036663266373533343232393838343161396564333963643632653932
30386135636131656130346537356637396139323134386162306431376564346537633566666532
6331323061373237336639356165393563613765663864366231
</code></pre></div></div>

<p>This is a hex encoded string that contains the salt, the SHA256 based HMAC output of the encrypted bytes, and finally the encrypted bytes. Each entry is split by a newline which in hex form is <code class="language-plaintext highlighter-rouge">0a</code>, applying this split this is what we get;</p>

<div class="language-plaintext highlighter-rouge"><div class="highlight"><pre class="highlight"><code># Salt
33343835306666636239373663396363
64376661336334383764663334393337
66333239646630303134616235646661
30643664313438333363373037623365

# HAMC
66346632303234363338306133646136
39326136333861633761303936343531
36313434373231643866613266333133
39396238396236346239333863663265

# Encrypted Bytes
65303666326637353334323239383834
31613965643339636436326539323038
61356361316561303465373566373961
39323134386162306431376564346537
63356666653263313230613732373366
39356165393563613765663864366231
</code></pre></div></div>

<p>Each entry is actually a hex string of a hex string, I’m not sure why this has been hex encoded twice but that’s just how it is. When “un-hexified” we get the following hex values for each entry;</p>

<div class="language-plaintext highlighter-rouge"><div class="highlight"><pre class="highlight"><code># Salt (32 bytes)
34850ffcb976c9ccd7fa3c487df34937
f329df0014ab5dfa0d6d14833c707b3e

# HMAC (32 bytes)
f4f20246380a3da692a638ac7a096451
6144721d8fa2f31399b89b64b938cf2e

# Encrypted Bytes (48 bytes)
e06f2f75342298841a9ed39cd62e9208
a5ca1ea04e75f79a92148ab0d17ed4e7
c5ffe2c120a7273f95ae95ca7ef8d6b1
</code></pre></div></div>

<p>Bingo, we know have the salt and password and can use that in conjunction with the PBKDF2 function to produce the remaining keys. PBKDF2 is a key derivation function that applies a pseudorandom function to a secret input, such as a password, along with a salt to produce a derived key. Part of this function is the ability to specify the number of iterations that repeats the process to make the computational cost of calculating the key more expensive. As shown on <a href="https://en.wikipedia.org/wiki/PBKDF2">Wikipedia</a>, PBKDF2 has five input parameters</p>

<div class="language-plaintext highlighter-rouge"><div class="highlight"><pre class="highlight"><code>DK = PBKDF2(PRF, Password, Salt, c, dkLen)
</code></pre></div></div>

<p>where:</p>

<ul>
  <li><code class="language-plaintext highlighter-rouge">PRF</code>: is a pseudorandom function like a HMAC, for Ansible Vault this uses the SHA256 algorithm</li>
  <li><code class="language-plaintext highlighter-rouge">Password</code>: the password/secret that is known to the user</li>
  <li><code class="language-plaintext highlighter-rouge">Salt</code>: the salt, this is randomly generated when creating the vault but stored as part of the cipher text of an existing vault as we saw above</li>
  <li><code class="language-plaintext highlighter-rouge">c</code>: the number of iterations desired, Ansible Vault is set to 10000</li>
  <li><code class="language-plaintext highlighter-rouge">dkLen</code>: the length of output key, for Ansible Vault we want 80 as (80 == (32 + 32 + 16) == (AES Key + HMAC Key + CTR Counter/Nonce))</li>
</ul>

<p>Putting this into practice, you can use this handy Python script to generate the derived key. Note: for this to work you need the <a href="https://pypi.org/project/cryptography/#description">cryptography</a> package installed;</p>

<div class="language-plaintext highlighter-rouge"><div class="highlight"><pre class="highlight"><code>import binascii

from cryptography.hazmat.backends import default_backend
from cryptography.hazmat.primitives import hashes
from cryptography.hazmat.primitives.kdf.pbkdf2 import PBKDF2HMAC

password = b"password"  # this is the password I used to create the example vault
kdf = PBKDF2HMAC(
    algorithm=hashes.SHA256(),
    length=80,
    salt=binascii.unhexlify("34850ffcb976c9ccd7fa3c487df34937f329df0014ab5dfa0d6d14833c707b3e"),
    iterations=10000,
    backend=default_backend())
derived_key = kdf.derive(password)
print(binascii.hexlify(derived_key))
</code></pre></div></div>

<p>The output of this script is the following hex string;</p>

<div class="language-plaintext highlighter-rouge"><div class="highlight"><pre class="highlight"><code># KDF (80 bytes)
fc4a21fb71bfaad6a0bbb078f0704721
ccad80519fc349c3ff14268fced14203
9bfb1a43effdfb8f8d7119387fccec54
8859c7fccc26589a65a2ee856e05763f
394f9f4a44152b33234cba44c930921b
</code></pre></div></div>

<p>Ansible Vault, splits this output at 32 and 64 bytes into 3 parts like so;</p>

<div class="language-plaintext highlighter-rouge"><div class="highlight"><pre class="highlight"><code># AES Key (32 bytes)
fc4a21fb71bfaad6a0bbb078f0704721
ccad80519fc349c3ff14268fced14203

# HMAC Key (32 bytes)
9bfb1a43effdfb8f8d7119387fccec54
8859c7fccc26589a65a2ee856e05763f

# AES CTR Counter/Nonce (16 bytes)
394f9f4a44152b33234cba44c930921b
</code></pre></div></div>

<p>Now we know all the keys that are required to decrypt/encrypt the bytes but before we do that, we want to verify the HMAC output against what is expected. If the HMAC value does not match the expectation, we know the password/secret was incorrect and can report that back to the user. Using a simple Python script we can get the HMAC value of the encrypted bytes</p>

<div class="language-plaintext highlighter-rouge"><div class="highlight"><pre class="highlight"><code>import binascii
import hashlib
import hmac

key = binascii.unhexlify("9bfb1a43effdfb8f8d7119387fccec548859c7fccc26589a65a2ee856e05763f")
encrypted_bytes = binascii.unhexlify("e06f2f75342298841a9ed39cd62e9208a5ca1ea04e75f79a92148ab0d17ed4e7c5ffe2c120a7273f95ae95ca7ef8d6b1")

hmac_digest = hmac.new(key, encrypted_bytes, digestmod=hashlib.sha256).digest()
print(binascii.hexlify(hmac_digest))
</code></pre></div></div>

<p>This produces the result <code class="language-plaintext highlighter-rouge">f4f20246380a3da692a638ac7a0964516144721d8fa2f31399b89b64b938cf2e</code> which matches the HMAC value stored in the vault. We know the secret was correct and we can move onto decrypting the bytes themselves.</p>

<p>To decrypt the bytes, we need to use AES in CTR mode, here is some Python code to decrypt the data;</p>

<div class="language-plaintext highlighter-rouge"><div class="highlight"><pre class="highlight"><code>import binascii
from cryptography.hazmat.backends import default_backend
from cryptography.hazmat.primitives.ciphers import Cipher, algorithms, modes

key = binascii.unhexlify("fc4a21fb71bfaad6a0bbb078f0704721ccad80519fc349c3ff14268fced14203")
nonce = binascii.unhexlify("394f9f4a44152b33234cba44c930921b")
encrypted_bytes = binascii.unhexlify("e06f2f75342298841a9ed39cd62e9208a5ca1ea04e75f79a92148ab0d17ed4e7c5ffe2c120a7273f95ae95ca7ef8d6b1")

aes_cipher = Cipher(algorithms.AES(key), modes.CTR(nonce), default_backend())
decryptor = aes_cipher.decryptor()
plaintext = decryptor.update(encrypted_bytes) + decryptor.finalize()
print(plaintext)
</code></pre></div></div>

<p>This produces the following UTF-8 string;</p>

<div class="language-plaintext highlighter-rouge"><div class="highlight"><pre class="highlight"><code>host_password: supersecretpass123!\n\r\r\r\r\r\r\r\r\r\r\r\r\r
</code></pre></div></div>

<p>So close to the plaintext but now we have <code class="language-plaintext highlighter-rouge">\r</code> padded onto the end of the string. This is just simple PKCS7 padding to make sure the input to the AES cipher is a multiple of the AES block size (16 bytes). This padding is the same byte where the decimal value of that byte is the number of bytes needed. In the case above, the length of the plaintext value (including the last newline) is 35 while the nearest full block is 48. To reach the full block size of 48, the byte with a decimal value of 13 (<code class="language-plaintext highlighter-rouge">\r</code>) needs to be appended. After removing the padding we get the original plaintext which Ansible loads as required.</p>

<p>To encrypt a string, it’s pretty much the same process in reverse order. For example this is what Ansible does when it goes to encrypt a string;</p>

<ol>
  <li>Pad the text using the PKCS7 mechanism to the block size of 16 (AES block size / 8)</li>
  <li>Generate a secure random 32-byte salt to use in the PBKDF2 function</li>
  <li>Generate the AES, HMAC, and AES CTR counter/nonce bytes using the PBKDF2 function with the salt and password specified</li>
  <li>Encrypt the padded text text using AES in CTR mode with the keys produced in step 3</li>
  <li>Generate the HMAC SHA256 hash of the encrypted bytes based on the HMAC key from step 3</li>
  <li>Create a hex string of the salt, HMAC hash, and encrypted bytes</li>
  <li>Join the three hex string’s with a newline</li>
  <li>Create another hex string of the value from step 7</li>
  <li>Create the vault header and append the value from step 8</li>
</ol>

<p>From there you have an Ansible Vault that is securely protected by a password of your choosing.</p>

<h1 id="working-with-windows">Working with Windows</h1>

<p>So now we know how the vault works and how Ansible encrypts/decrypts the data, it should be fairly trivial to reimplement it in PowerShell, or so I thought.</p>

<h2 id="problems-on-windows">Problems on Windows</h2>

<p>The biggest issue I had with Windows was finding a way to interop with the functions that are being used in the Ansible Vault process. More specifically I needed a way to;</p>

<ul>
  <li>Use PBKDF2 with the SHA256 algorithm</li>
  <li>Use AES in CTR mode</li>
  <li>Pad and unpad the decrypted bytes with the PKCS7 spec</li>
</ul>

<p>Each one of the above is either not possible in the standard .NET framework that PowerShell uses, or requires a newer version of the framework. Let’s break down each part and how I ultimately implemented it in PowerShell.</p>

<h3 id="pbkdf2-with-sha256">PBKDF2 with SHA256</h3>

<p>The first step in implementing Ansible Vault on Windows is to derive the keys used in the downstream process. A quick Google search on how this can be done leads me to the <a href="https://msdn.microsoft.com/en-us/library/system.security.cryptography.rfc2898derivebytes.aspx">Rfc2898DeriveBytes</a> class. The description for this class is</p>

<blockquote>
  <p>Implements password-based key derivation functionality, PBKDF2, by using a pseudo-random number generator based on HMACSHA1.</p>
</blockquote>

<p>Unfortunately we need to the use SHA256 hash in our generator so the default of SHA1 won’t produce the right key that we need. There’s some constructors that have a <a href="https://msdn.microsoft.com/en-us/library/system.security.cryptography.hashalgorithmname.aspx">HashAlgorithmName</a> parameter so that looks like what we need.</p>

<p><a href="/assets/images/2018/05/Rfc2898DeriveBytesHashAlgorithmName.png"><img src="/assets/images/2018/05/Rfc2898DeriveBytesHashAlgorithmName.png" alt="" /></a></p>

<p><em>What the, the docs says there is!</em></p>

<p>So that didn’t work, when reading the docs around that constructor I found this gem</p>

<blockquote>
  <p>Version Information<br />
.NET Framework<br />
Available since 4.7.2</p>
</blockquote>

<p>So I either need to set a dependency on .NET 4.7.2 to run the cmdlets or find some other way around this limitation, because my goal was to support older hosts I pretty much had to find another way. The fact that a newer version of the .NET framework exposes the parameter that I needed usually means Windows can do it with the native Win32 APIs. After some searching I came across <a href="https://blogs.msdn.microsoft.com/dsnotes/2017/09/20/pbkdf2-net-api-does-not-exists-with-sha256-implementation-here-pbkdf2-stands-for-password-based-key-derivation-function-2/">this</a> blog post from Microsoft which used the <a href="https://msdn.microsoft.com/en-us/library/windows/desktop/hh448506.aspx">BCryptKeyDerivation</a> Win32 API. This is close to what I am looking for but unfortunately <code class="language-plaintext highlighter-rouge">BCryptKeyDerivation</code> was only added in Windows 8/Server 2012 and I was hoping for something I can use in Windows 7/Server 2008 R2. Finally I came across the <a href="https://msdn.microsoft.com/en-us/library/windows/desktop/dd433795.aspx">BCryptDeriveKeyPBKDF2</a> which was added in Windows 7/Server 2008 R2.</p>

<p>So now we have an API available on Windows that can give us the key required but we need a way to call this within PowerShell. There’s no inbuilt way in PowerShell to do this, but you can use C# code with P/Invoke to call these platform functions and PowerShell can compile/run C# code. This is done through the <a href="https://docs.microsoft.com/en-us/powershell/module/microsoft.powershell.utility/add-type?view=powershell-6">Add-Type</a> cmdlet which calls <code class="language-plaintext highlighter-rouge">csc.exe</code> to compile the C# code and load it into the current PowerShell scope. For example here is a simple way to add the functions we need in PowerShell;</p>

<div class="language-plaintext highlighter-rouge"><div class="highlight"><pre class="highlight"><code>Add-Type -Namespace Win32 -Name NativeFunctions -MemberDefinition @'
[DllImport("Bcrypt.dll")]
public static extern uint BCryptOpenAlgorithmProvider(
    out IntPtr phAlgorithm,
    [MarshalAs(UnmanagedType.LPWStr)] string pszAlgId,
    [MarshalAs(UnmanagedType.LPWStr)] string pszImplementation,
    UInt32 dwFlags);

[DllImport("Bcrypt.dll")]
public static extern uint BCryptDeriveKeyPBKDF2(
    IntPtr hPrf,
    [MarshalAs(UnmanagedType.LPWStr)] string pbPassword,
    UInt32 cbPassword,
    byte[] pbSalt,
    UInt32 cbSalt,
    UInt64 cIterations,
    byte[] pbDerivedKey,
    UInt32 cbDerivedKey,
    UInt32 dwFlags);

[DllImport("Bcrypt.dll")]
public static extern uint BCryptCloseAlgorithmProvider(
    IntPtr hAlgorithm,
    UInt32 dwFlags);
'@

$algo = [IntPtr]::Zero
$res = [Win32.NativeFunctions]::BCryptOpenAlgorithmProvider([Ref]$algo, "SHA256", $null, 0x00000008)
if ($res -ne 0) {
    throw "Failed to open algo provider"
}

$key = New-Object -TypeName byte[] -ArgumentList 80
$salt = New-Object -TypeName byte[] -ArgumentList 32
$pass = "password"
$res = [Win32.NativeFunctions]::BCryptDeriveKeyPBKDF2($algo, $pass, $pass.Length, $salt, $salt.Length, 10000, $key, $key.Length, 0)
if ($res -ne 0) {
    throw "Failed to derive key"
}

[Win32.NativeFunctions]::BCryptCloseAlgorithmProvider($algo, 0)
</code></pre></div></div>

<p>Using Add-Type does have some downsides, it creates a temporary DLL file on disk and it takes more time to compile. None of these are really issues for this scenario but it has been something I wanted to work around for some time. I decided to take the opportunity to find another way around Add-Type and ultimately came across a way of calling these native functions with .NET Reflection. There are some blog posts which I have referenced at the bottom of this post, that helped me to understand how to use reflection. This resulted in the following cmdlet <a href="https://github.com/jborean93/PowerShell-AnsibleVault/blob/master/AnsibleVault/Private/Invoke-Win32Api.ps1">Invoke-Win32Api</a> which can be used to call any Win32 APIs. If you are interested in learning more about this I recommend you look at the code and references to see how it works.</p>

<p>In the end, <a href="https://github.com/jborean93/PowerShell-AnsibleVault/blob/master/AnsibleVault/Private/New-PBKDF2Key.ps1">New-PBKDF2Key</a> is what I ended up with. It calls the native Win32 APIs to produce the key required in a way that works on Windows 7/Server 2008 R2 and newer. In the future, I may add a conditional check to use Rfc2898DeriveBytes if the HashAlgorithmName constructor is available so this works on .NET Core but that wasn’t part of my original goals.</p>

<h3 id="aes-in-ctr-mode">AES in CTR mode</h3>

<p>Now that we have solved the PBKDF2 issue we move onto the next one, getting the <a href="https://msdn.microsoft.com/en-us/library/system.security.cryptography.aescryptoserviceprovider.aspx">AesCryptoServiceProvider</a> to work in CTR mode. When looking at the <a href="https://msdn.microsoft.com/en-us/library/system.security.cryptography.ciphermode.aspx">CipherMode</a> enumeration values, there is no option to run in CTR mode which is going to be a problem for us.</p>

<p>Looking at the underlying Win32 functions I was hoping this would be a similar situation as the PBKDF2 with SHA256 but unfortunately that didn’t seem to be the case, I had to implement this mode myself. I was loath to do this and was prepared to scrap this whole idea but luckily CTR mode isn’t that complex to do. From my understanding (please don’t reference me for this), it works like this;</p>

<ol>
  <li>A counter is initialised from a randomly unique nonce value, this nonce is derived as part of the key from the PBKDF2 function (last 16 bytes)</li>
  <li>The counter is then encrypted with the AES cipher in ECB mode, this AES cipher is based on the 32-byte key from the PBKDF2 function (first 32 bytes)</li>
  <li>The counter is incremented by 1</li>
  <li>The result from step 2 is the XOR’d with the plaintext or ciphertext byte by byte until there are no more bytes left in the output</li>
  <li>Steps 2-4 is repeated until all bytes in the plaintext or cipher text have been XOR’d</li>
</ol>

<p>Taking this into practice, let’s decrypt the first 32 bytes of our example cipher text, here are the inputs from the example;</p>

<div class="language-plaintext highlighter-rouge"><div class="highlight"><pre class="highlight"><code># First 16 bytes of our encrypted bytes
e06f2f75342298841a9ed39cd62e9208

# Next 16 bytes of our encrypted bytes
a5ca1ea04e75f79a92148ab0d17ed4e7

# The starting 16-byte counter/nonce (from the PBKDF2 function)
394f9f4a44152b33234cba44c930921b

# The 32-byte AES key used in counter transformations
fc4a21fb71bfaad6a0bbb078f0704721ccad80519fc349c3ff14268fced14203
</code></pre></div></div>

<p>When using a site like <a href="http://www.cryptogrium.com/aes-encryption-online-ecb.html">this online AES ECB cipher</a> we can encrypt the current counter value with the AES 256 key to get the input to the XOR function.</p>

<p><a href="/assets/images/2018/05/AES-ECB-Cycle-1.png"><img src="/assets/images/2018/05/AES-ECB-Cycle-1.png" alt="" /></a></p>

<p>When xoring the output <code class="language-plaintext highlighter-rouge">88005c016b52f9f769e9bceeb214b27b</code> with the next 16 bytes in the encrypted bytes array <code class="language-plaintext highlighter-rouge">e06f2f75342298841a9ed39cd62e9208</code> we get <code class="language-plaintext highlighter-rouge">686f73745f70617373776f72643a2073</code> which is <code class="language-plaintext highlighter-rouge">host_password: s</code> in UTF-8. Now we have exhausted the XOR input, we need to increment the counter and repeat the process again.</p>

<div class="language-plaintext highlighter-rouge"><div class="highlight"><pre class="highlight"><code># Previous counter
394f9f4a44152b33234cba44c930921b

# Next counter
394f9f4a44152b33234cba44c930921c

# AES ECB encryption output of this counter
d0ba7bd23d1094e8f760fad1a20de5d5

# Next 16 bytes of our encrypted bytes to XOR
a5ca1ea04e75f79a92148ab0d17ed4e7

# XOR result
75706572736563726574706173733132

# UTF-8 string of the XOR hex string
upersecretpass12
</code></pre></div></div>

<p>Putting the outputs together we currently have <code class="language-plaintext highlighter-rouge">host_password: supersecretpass12</code>. there are still some encrypted bytes left but the process is still the same; increment the counter, encrypt counter, XOR encrypted result with the next encrypted block. Putting this into PowerShell was relatively simple and the end result is <a href="https://github.com/jborean93/PowerShell-AnsibleVault/blob/master/AnsibleVault/Private/Invoke-AESCTRCycle.ps1">Invoke-AESCTRCycle</a>. Because of the nature of XOR, the encryption and decryption process is exactly the same in CTR mode.</p>

<h3 id="pkcs7-padding">PKCS7 padding</h3>

<p>So we have solved the hurdle of PBKDF2 with SHA256 and adding support for AES in CTR mode, the last remaining hurdle is adding a function to pad and unpad our bytes based on the PKCS7 algorithm. Usually padding is used to “pad” the input bytes so it fits the block size in a cipher, e.g. AES uses a block size of 16 so each input to the transformation process must also be 16-bytes. AES in CTR mode is actually a stream cipher so the input block does not need to be the same size, but in Ansible Vault, the data is still padded.</p>

<p>Usually this padding is done as part of the <code class="language-plaintext highlighter-rouge">AesCryptoServiceProvider</code> but because we implemented our own method and CTR mode is not a block cipher we need to manually pad or unpad the data. Luckily PKCS7 is a relatively simple algorithm and easily implement, it appends the same byte that is equal to the number of bytes to add for a complete block until the block is complete. The exception to this is if the input data is currently the size of the block, PKCS7 will still add another block with the value being the number of bytes added.</p>

<p>Here are some examples of padding in action for an 8-byte block size;</p>

<div class="language-plaintext highlighter-rouge"><div class="highlight"><pre class="highlight"><code># 8 - 1 = 7, the byte with the value 07, is added 7 times
01 == 01 07 07 07 07 07 07 07

# 8 - 3 = 5, the byte with the value 05 is added 5 times
01 02 03 == 01 02 03 05 05 05 05 05

# When the input is the same as the block size, an extra block is added
01 02 03 04 05 06 07 08 == 01 02 03 04 05 06 07 08 08 08 08 08 08 08 08 08
</code></pre></div></div>

<p>I ended up with 2 cmdlets to achieve this <a href="https://github.com/jborean93/PowerShell-AnsibleVault/blob/master/AnsibleVault/Private/Add-Pkcs7Padding.ps1">Add-Pkcs7Padding</a>, and <a href="https://github.com/jborean93/PowerShell-AnsibleVault/blob/master/AnsibleVault/Private/Remove-Pkcs7Padding.ps1">Remove-Pkcs7Padding</a>.</p>

<h2 id="ansiblevault-module">AnsibleVault module</h2>

<p>Putting this all together, I present <a href="https://github.com/jborean93/PowerShell-AnsibleVault">AnsibleVault</a>, a PowerShell module that can encrypt and decrypt Ansible vaults on Windows. Earlier I stated that one of my goals was to have a way to easily maintain the script and just creating a module does not fully fit this. I wanted a way to automatically;</p>

<ul>
  <li>Run sanity checks on the code</li>
  <li>Run unit and integration tests</li>
  <li>Automatically deploy the changes to the PowerShell Gallery</li>
</ul>

<p>To achieve this, I used a combination of the following PowerShell modules;</p>

<ul>
  <li><a href="https://github.com/PowerShell/PSScriptAnalyzer">PsScriptAnalyzer</a> – static code checker</li>
  <li><a href="https://github.com/pester/Pester">Pester</a> – testing and code coverage tool</li>
  <li><a href="https://github.com/RamblingCookieMonster/PSDeploy">PSDeploy</a> – tool used for simplifying the module deployment to PowerShell Gallery</li>
  <li><a href="https://github.com/psake/psake">Psake</a> – build automation tool</li>
  <li><a href="https://github.com/RamblingCookieMonster/BuildHelpers/">BuildHelpers</a> – helper tool for running a build in a CI environment like Appveyor</li>
</ul>

<p>If you interested in how I put all of this together I highly recommend you read through <a href="ramblingcookiemonster.github.io/PSDeploy-Inception/">this</a> blog post who is the author of some of those modules. I implemented most of the work that the blog talked through but added a few extra things like the PsScriptAnalyzer and code coverage steps which are two metrics I am interested in.</p>

<p>Ultimately I can test out changes to AnsibleVault and have a system that will reliably run tests and other checks on the changes automatically. My only wish would be a way to test against older PowerShell versions and not just one but that’s probably a project for another time. The other great thing about this workflow is that to deploy a new release to the PowerShell Gallery, all I need to do is create a new tag in GitHub. This will kick off a run in Appveyor which will publish the changes to the gallery.</p>

<h2 id="how-to-get-it">How to get it</h2>

<p>Now that the module is part of the <a href="https://www.powershellgallery.com/packages/AnsibleVault">PowerShell Gallery</a> it is quite simple to install, just run the <a href="https://docs.microsoft.com/en-us/powershell/module/powershellget/Install-Module?view=powershell-6">Install-Module</a> module.</p>

<p><em>Note: this will only work if you are running PowerShell v5 or have <a href="https://github.com/powershell/powershellget">PowerShellGet</a> installed for older versions.</em></p>

<p><a href="/assets/images/2018/05/Installing-with-PSGet.png"><img src="/assets/images/2018/05/Installing-with-PSGet.png" alt="" /></a></p>

<p><em>You can set -Force to automatically accept prompt</em></p>

<p>If you don’t want to install the module system wide (or you don’t have admin rights), you can install it just for the current user by setting <code class="language-plaintext highlighter-rouge">-Scope CurrentUser</code> on the install cmdlet. PowerShellGet makes managing modules such a simple thing to do and I highly recommend people <a href="https://docs.microsoft.com/en-us/powershell/gallery/installing-psget">install it through the MSI</a> if they can’t upgrade PowerShell to version 5. If you wish to uninstall the module, the cmdlet <code class="language-plaintext highlighter-rouge">Uninstall-Module -Name AnsibleVault</code> can be used to remove it from the system.</p>

<p>If you don’t want to install PowerShellGet you can manually install it on the system by doing the following;</p>

<ol>
  <li>Download the latest zip from GitHub <a href="https://github.com/jborean93/PowerShell-AnsibleVault/releases/latest">here</a></li>
  <li>Extract the zip</li>
  <li>Copy the folder <code class="language-plaintext highlighter-rouge">AnsibleVault</code> inside the zip to a path that is set in <code class="language-plaintext highlighter-rouge">$env:PSModulePath</code>, e.g. <code class="language-plaintext highlighter-rouge">C:\Program Files\WindowsPowerShell\Modules</code> or <code class="language-plaintext highlighter-rouge">C:\Users\&lt;user&gt;\Documents\WindowsPowerShell\Modules</code></li>
  <li>Trust the downloaded files with <code class="language-plaintext highlighter-rouge">$path = (Get-Module -Name AnsibleVault -ListAvailable).ModuleBase; Unblock-File -Path $path\*.psd1; Unblock-File -Path $path\Public\*.ps1; Unblock-File -Path $path\Private\*.ps1</code></li>
  <li>Restart PowerShell so the unblock policy is applied to the module</li>
</ol>

<p><em>Note: You are not limited to those paths, you can add a new entry to the environment variable <code class="language-plaintext highlighter-rouge">PSModulePath</code> if you want to use another path.</em></p>

<p><a href="/assets/images/2018/05/AnsibleVault-Manual-Install.png"><img src="/assets/images/2018/05/AnsibleVault-Manual-Install.png" alt="" /></a></p>

<p><em>Here I have installed it under the user’s profile</em></p>

<h2 id="using-the-ansiblevault-module">Using the AnsibleVault module</h2>

<p>Now that the module is installed, the cmdlets <code class="language-plaintext highlighter-rouge">Get-DecryptedAnsibleVault</code> and <code class="language-plaintext highlighter-rouge">Get-EncryptedAnsibleVault</code> can be used like any other cmdlet. Here is the basic syntax for each module;</p>

<div class="language-plaintext highlighter-rouge"><div class="highlight"><pre class="highlight"><code>Get-DecryptedAnsibleVault `
    [-Value] &lt;String&gt; `
    [-Password] &lt;SecureString&gt; `
    [-Encoding &lt;Encoding&gt;] `
    [&lt;CommonParameters&gt;]

Get-DecryptedAnsibleVault `
    [-Path] &lt;String&gt; `
    [-Password] &lt;SecureString&gt; `
    [-Encoding &lt;Encoding&gt;] `
    [&lt;CommonParameters&gt;]

Get-EncryptedAnsibleVault `
    [-Value] &lt;String&gt; `
    [-Password] &lt;SecureString&gt; `
    [-Id &lt;String&gt;] `
    [&lt;CommonParameters&gt;]

Get-EncryptedAnsibleVault `
    [-Path] &lt;String&gt; `
    [-Password] &lt;SecureString&gt; `
    [-Id &lt;String&gt;] `
    [&lt;CommonParameters&gt;]
</code></pre></div></div>

<p>Here are what each parameter does;</p>

<ul>
  <li><code class="language-plaintext highlighter-rouge">Value</code>: A string value to encrypt/decrypt, this can also be sent as a pipeline input</li>
  <li><code class="language-plaintext highlighter-rouge">Path</code>: The path to a file whose contents will be encrypted/decrypted</li>
  <li><code class="language-plaintext highlighter-rouge">Password</code>: A secure string that is the password for the vault</li>
  <li><code class="language-plaintext highlighter-rouge">Encoding</code>: When decrypting a vault, this is the final output string encoding of the vault (default if UTF-8). You shouldn’t have to touch this parameter but if the source vault file was not UTF-8 than this can control the final decrypted output</li>
  <li><code class="language-plaintext highlighter-rouge">Id</code>: An optional parameter that specifies the ID to assign to the new vault string</li>
</ul>

<p>You can use a combination of these cmdlets and pipelining to achieve similar results to some common <code class="language-plaintext highlighter-rouge">ansible-vault</code> commands, here are some common examples to replace existing <code class="language-plaintext highlighter-rouge">ansible-vault</code> functionality;</p>

<div class="language-plaintext highlighter-rouge"><div class="highlight"><pre class="highlight"><code># ansible-vault encrypt C:\temp\vault.yml --ask-vault-pass
Get-EncryptedAnsibleVault -Path C:\temp\vault.yml | Set-Content -Path C:\temp\vault.yml

# ansible-vault encrypt C:\temp\vault.yml --vault-id dev@prompt
Get-EncryptedAnsibleVault -Path C:\temp\vault.yml -Id dev | Set-Content -Path C:\temp\vault.yml

# ansible-vault rekey C:\temp\vault.yml --ask-vault-pass
Get-DecryptedAnsibleVault -Path C:\temp\vault.yml | Get-EncryptedAnsibleVault | Set-Content -Path C:\temp\vault.yml

# ansible-vault view C:\temp\vault.yml --ask-vault-pass
Get-DecryptedAnsibleVault -Path C:\temp\vault.yml

# ansible-vault decrypt C:\temp\vault.yml --ask-vault-pass
Get-DecryptedAnsibleVault -Path C:\temp\vault.yml | Set-Content -Path C:\temp\vault.yml

# ansible-vault encrypt_string --stdin-name 'vault_variable'
$vault_text = Read-Host -Prompt "Enter string to encrypt" | Get-EncryptedAnsibleVault
Write-Output -InputObject "vault_variable: !vault |`n    $($vault_text.Replace("`n", "`n    "))"

# add a new variable to an existing vault file
$vault_pass = Read-Host -Prompt "Enter vault password" -AsSecureString
$vault_text = Get-DecryptedAnsibleVault -Path C:\temp\vault.yml -Password $vault_pass
$vault_text += "`nanother_host_secret: you'll never guess this"
Get-EncryptedAnsibleVault -Value $vault_text -Password $vault_pass | Set-Content -Path C:\temp\vault.yml
</code></pre></div></div>

<p><a href="/assets/images/2018/05/AnsibleVault-Example.png"><img src="/assets/images/2018/05/AnsibleVault-Example.png" alt="" /></a></p>

<p><em>AnsibleVault in Action, the sky is the limit with what you can do</em></p>

<h1 id="references">References</h1>

<p>I would like to point out a few different blogs/sites that helped me along the way</p>

<ul>
  <li><a href="https://blogs.msdn.microsoft.com/dsnotes/2017/09/20/pbkdf2-net-api-does-not-exists-with-sha256-implementation-here-pbkdf2-stands-for-password-based-key-derivation-function-2/">PBKDF2 SHA256 C# Implementation</a></li>
  <li><a href="http://www.leeholmes.com/blog/2007/10/02/managing-ini-files-with-powershell/">Lee Holmes and P/Invoke through .NET Reflection</a></li>
  <li><a href="https://blogs.technet.microsoft.com/heyscriptingguy/2013/06/27/use-powershell-to-interact-with-the-windows-api-part-3/">The Scripting Guys – Another P/Invoke through .NET Reflection</a></li>
  <li><a href="https://gist.github.com/hanswolff/8809275">Hans Wolff and his AES CTR implementation</a></li>
  <li><a href="http://ramblingcookiemonster.github.io/PSDeploy-Inception/">Rambling Cookie Monster and his PSake reference</a></li>
</ul>]]></content><author><name>Jordan Borean</name></author><category term="ansible" /><category term="powershell" /><category term="windows" /><summary type="html"><![CDATA[Ansible Vault is a pretty nifty tool that allows people to easily encrypt secrets for use in Ansible. It’s a builtin tool that can be use to encrypt secrets and make them easily usable for Ansible. When calling Ansible, you must supply the password by either manually entering it or use a password file. From …]]></summary></entry><entry><title type="html">Introducing PsExec for Python</title><link href="https://bloggingforlogging.com/2018/03/12/introducing-psexec-for-python/" rel="alternate" type="text/html" title="Introducing PsExec for Python" /><published>2018-03-12T01:17:28+00:00</published><updated>2018-03-12T01:17:28+00:00</updated><id>https://bloggingforlogging.com/2018/03/12/introducing-psexec-for-python</id><content type="html" xml:base="https://bloggingforlogging.com/2018/03/12/introducing-psexec-for-python/"><![CDATA[<p>Over the past few months I’ve been trying to find a way that gives people more options around running commands on a Windows host remotely. Currently you have a few options available to you that enable this;</p>

<ul>
  <li>Configure WinRM</li>
  <li>Bake in commands to the startup process, like a Windows answer file or AWS user data</li>
  <li>Use a tool like PsExec from another Windows host</li>
</ul>

<p>The last point is where I am going to focus this blog post on, in particular I will talk about a new Python package called <a href="https://github.com/jborean93/pypsexec">pypsexec</a>.</p>

<h1 id="why-psexec">Why PsExec</h1>

<p>Before I go into the what, I need to explain why I am trying to run commands like PsExec and not just use something like WinRM. Ultimately PsExec has a few advantages over these protocols/tools like;</p>

<ul>
  <li>No custom service or agent is required on the host</li>
  <li>It is only reliant on Server Message Block (SMB) which is setup and enabled on all Windows hosts</li>
  <li>Due to the minimal dependencies, it is really simple to allow PsExec to connect remotely compared to WinRM</li>
  <li>It is not platform dependent, can run on local hosts or hosts in AWS or some other cloud provider</li>
  <li>Allows you to easily escape WinRM hell or run as the SYSTEM account (more info around WinRM limitation can be found <a href="/2018/01/24/demystifying-winrm/">on this blog post</a>)</li>
</ul>

<p>In saying that, the PsExec model does have a few disadvantages such as;</p>

<ul>
  <li>On Windows versions older than Server 2012 or Windows 8, there is no data encryption available</li>
  <li>Can only authenticated with an account that is a member of the local Administrators group</li>
  <li>May require some relaxing of Windows’s UAC settings if not in a domain environment</li>
  <li>The overhead required to run a command means it is slow to start compared to WinRM</li>
</ul>

<p>Ultimately I wanted to have an open source PsExec alternative that I can use in situations where WinRM is not available. This means I can</p>

<ul>
  <li>Use it to run bootstrapping scripts or adhoc commands on Windows host without requiring WinRM to be setup</li>
  <li>Use this library to setup WinRM on newly installed hosts without the requirement of another Windows host</li>
  <li>Reduce the time it takes to copy files, WinRM is really slow with file transfers while SMB is designed for this process</li>
  <li>Satisfy my general curiosity around how PsExec works and get a better understanding of the SMB protocol</li>
</ul>

<h1 id="what-is-it">What is it</h1>

<p>While PsExec is the most common name or term given to this process, it is actually a set of processes that is uses builtin protocols in Windows to work. The most common one is called <a href="https://docs.microsoft.com/en-us/sysinternals/downloads/psexec">PsExec</a> and written by Mark Russinovich as part of the <a href="https://docs.microsoft.com/en-us/sysinternals/">Sysinternals</a> package. I’ll go into more details on how the protocol works further down but ultimately it leverages SMB and RPC to start a service on a Windows host and use that to execute the desired process.</p>

<p>While PsExec is probably the most popular tool that works with this model, there are a few other tools out there which offer similar capabilities. These tools are;</p>

<ul>
  <li><a href="https://www.poweradmin.com/paexec/">PAExec</a> a free and open source replacement of PsExec and is used by <code class="language-plaintext highlighter-rouge">pypsexec</code> on the remote side</li>
  <li><a href="https://github.com/kavika13/RemCom">RemCom</a> another free and open source project but hasn’t been updated since 2012 and has quite a few limitations</li>
  <li><a href="https://github.com/CoreSecurity/impacket">Impacket</a> a Python implementation of multiple Windows protocols including the PsExec model but leverages <code class="language-plaintext highlighter-rouge">RemCom</code> on the remote side</li>
</ul>

<p>There are some others out there but these are the only ones I know that work today. Unfortunately none of these tools really fit what I am looking for, the closest is Impacket but it has a few issues from my perspective. Ultimately I needed a way to run commands using the PsExec model that fit the following requirements;</p>

<ul>
  <li>Not reliant on Windows, this rules out PsExec, PAExec, and RemCom as they use Win32 APIs to talk to the remote Windows host</li>
  <li>Works on the current supported versions of Windows, Impacket is ruled out as it uses RemCom which in turn doesn’t support 64-bit architectures</li>
  <li>Can easily integrate into Ansible, Impacket is close but doesn’t support Python 3 and would make this step difficult</li>
</ul>

<p>In the end I decided that I needed to write some code (turned out to be a lot) in Python to fit my requirements and ultimately that ended up with 2 Python libraries, <a href="https://github.com/jborean93/smbprotocol">smbprotocol</a> and <a href="https://github.com/jborean93/pypsexec">pypsexec</a>.</p>

<h1 id="host-requirements">Host requirements</h1>

<p>One of the reasons I looked into using the PsExec model is because it didn’t require a lot of steps to setup on a Windows host. These are the only things that need to be done on the Windows host for this library to work;</p>

<ul>
  <li>Enable incoming traffic through port 445 – <code class="language-plaintext highlighter-rouge">netsh advfirewall firewall set rule name="File and Printer Sharing (SMB-In)" dir=in new enable=Yes</code></li>
  <li>The <code class="language-plaintext highlighter-rouge">ADMIN$</code> share is enabled – this is enabled by default</li>
  <li>Use a account that is a member of the local Administrators group</li>
  <li>The connection user to have a full elevated (administrative) token on a remote logon</li>
</ul>

<p>The first 3 requirements are quite simple to set up and can either be done using sysprep images or through things like an Windows answer file during the setup. The last requirement is probably the biggest stumbling block when it comes to using this tool. To understand this restriction you first need to understand logon tokens and how they work from Windows Vista and onwards. A logon token contains the rights and groups of the account during the initial logon and since Windows Vista, the token only contains the rights of a limited user account regardless if they are an administrator. You can still run processes with the full administrative rights that is granted to the user but it must go through UAC to elevate the token (Right click -&gt; Run as Administrator).</p>

<p>When running things remotely, there is no GUI to right click and say <code class="language-plaintext highlighter-rouge">Run as Administrator</code> or any UAC prompt when the process asked for admin rights so it will fail. We need admin rights to be able to open SCMR and manage the service that will run our process. Ultimately for this to work we need the Windows host to not filter a remote logon token and this can be done through multiple ways;</p>

<ul>
  <li>In a domain environment, use any domain account that is a member of the local Administrators group</li>
  <li>Any local Administrator will work if <a href="https://support.microsoft.com/en-us/help/951016/description-of-user-account-control-and-remote-restrictions-in-windows">LocalAccountTokenFilterPolicy</a> is set to <code class="language-plaintext highlighter-rouge">1</code> which disables the filtering</li>
  <li>Use the builtin Administrator account (SID S-1-5-21-*-500), this account is typically disabled on desktop variants and this only works if <a href="https://docs.microsoft.com/en-us/previous-versions/windows/it-pro/windows-server-2008-R2-and-2008/dd835564(v=ws.10)#BKMK_BuiltInAdmin">AdminApprovalMode</a> is not Enabled – this is not Enabled by default</li>
  <li>For local accounts, any local Administrator will work if <a href="https://docs.microsoft.com/en-us/previous-versions/windows/it-pro/windows-server-2008-R2-and-2008/dd835564(v=ws.10)#BKMK_BuiltInAdmin">EnableLUA</a> is not Enabled – this is Enabled by default</li>
  <li>Disable UAC entirely (please don’t do this)</li>
</ul>

<p>As you can see, a domain environment makes this simple as Windows will automatically use the full elevated token on a remote logon which satisfies our requirements. If using a local account, either the initial builtin Administrator account (without AdminApprovalMode) being enabled or another local admin account with <code class="language-plaintext highlighter-rouge">LocalAccountTokenFilterPolicy</code> being set to 1 will work. Disabling the <code class="language-plaintext highlighter-rouge">EnableLUA</code> option will also work but it also affects local processes and runs them under the full token by default, effectively bypassing UAC in those scenarios.</p>

<p>To disable the <code class="language-plaintext highlighter-rouge">LocalAccountTokenFilterPolicy</code>, you can run the following PowerShell script;</p>

<div class="language-plaintext highlighter-rouge"><div class="highlight"><pre class="highlight"><code>$reg_path = "HKLM:\SOFTWARE\Microsoft\Windows\CurrentVersion\Policies\System"
$reg_prop_name = "LocalAccountTokenFilterPolicy"

$reg_key = Get-Item -Path $reg_path
$reg_prop = $reg_key.GetValue($reg_prop_name)
if ($null -ne $reg_prop) {
    Remove-ItemProperty -Path $reg_path -Name $reg_prop_name
}

New-ItemProperty -Path $reg_path -Name $reg_prop_name -Value 1 -PropertyType DWord
</code></pre></div></div>

<p>I will have to warn you, this can have some security implications for your Windows host so make sure you are aware of the risks and don’t follow the instructions blindly.</p>

<h1 id="using-pypsexec">Using pypsexec</h1>

<p>Now onto the fun part, getting it to run a command. The first step is to have a working Python install, you can run this on Python 2.6, 2.7, 3.4 and newer. To install the pypsexec library, simply run <code class="language-plaintext highlighter-rouge">pip install pypsexec</code> and it will be installed for you.</p>

<p><a href="/assets/images/2018/03/Install-pypsexec.png"><img src="/assets/images/2018/03/Install-pypsexec.png" alt="" /></a></p>

<p><em>One simple command and it’s done</em></p>

<p>Once installed we need to create a simple Python script to call the library and tell it what commands to run. This is a very basic template you can use which runs the command <code class="language-plaintext highlighter-rouge">whoami.exe /all</code> under a specific account.</p>

<div class="language-python highlighter-rouge"><div class="highlight"><pre class="highlight"><code><span class="kn">from</span> <span class="nn">pypsexec.client</span> <span class="kn">import</span> <span class="n">Client</span>

<span class="n">server</span> <span class="o">=</span> <span class="s">"server2016.domain.local"</span>
<span class="n">username</span> <span class="o">=</span> <span class="s">"vagrant-domain@DOMAIN.LOCAL"</span>
<span class="n">password</span> <span class="o">=</span> <span class="s">"VagrantPass1"</span>
<span class="n">executable</span> <span class="o">=</span> <span class="s">"whoami.exe"</span>
<span class="n">arguments</span> <span class="o">=</span> <span class="s">"/all"</span>

<span class="n">c</span> <span class="o">=</span> <span class="n">Client</span><span class="p">(</span><span class="n">server</span><span class="p">,</span> <span class="n">username</span><span class="o">=</span><span class="n">username</span><span class="p">,</span> <span class="n">password</span><span class="o">=</span><span class="n">password</span><span class="p">,</span>
           <span class="n">encrypt</span><span class="o">=</span><span class="bp">True</span><span class="p">)</span>

<span class="n">c</span><span class="p">.</span><span class="n">connect</span><span class="p">()</span>
<span class="k">try</span><span class="p">:</span>
    <span class="n">c</span><span class="p">.</span><span class="n">create_service</span><span class="p">()</span>
    <span class="n">result</span> <span class="o">=</span> <span class="n">c</span><span class="p">.</span><span class="n">run_executable</span><span class="p">(</span><span class="n">executable</span><span class="p">,</span> <span class="n">arguments</span><span class="o">=</span><span class="n">arguments</span><span class="p">)</span>
<span class="k">finally</span><span class="p">:</span>
    <span class="n">c</span><span class="p">.</span><span class="n">remove_service</span><span class="p">()</span>
    <span class="n">c</span><span class="p">.</span><span class="n">disconnect</span><span class="p">()</span>

<span class="k">print</span><span class="p">(</span><span class="s">"STDOUT:</span><span class="se">\n</span><span class="s">%s"</span> <span class="o">%</span> <span class="n">result</span><span class="p">[</span><span class="mi">0</span><span class="p">].</span><span class="n">decode</span><span class="p">(</span><span class="s">'utf-8'</span><span class="p">)</span> <span class="k">if</span> <span class="n">result</span><span class="p">[</span><span class="mi">0</span><span class="p">]</span> <span class="k">else</span> <span class="s">""</span><span class="p">)</span>
<span class="k">print</span><span class="p">(</span><span class="s">"STDERR:</span><span class="se">\n</span><span class="s">%s"</span> <span class="o">%</span> <span class="n">result</span><span class="p">[</span><span class="mi">1</span><span class="p">].</span><span class="n">decode</span><span class="p">(</span><span class="s">'utf-8'</span><span class="p">)</span> <span class="k">if</span> <span class="n">result</span><span class="p">[</span><span class="mi">1</span><span class="p">]</span> <span class="k">else</span> <span class="s">""</span><span class="p">)</span>
<span class="k">print</span><span class="p">(</span><span class="s">"RC: %d"</span> <span class="o">%</span> <span class="n">result</span><span class="p">[</span><span class="mi">2</span><span class="p">])</span>
</code></pre></div></div>

<p>From there I can simply run the Python script with just <code class="language-plaintext highlighter-rouge">python psexec.py</code> and here is the result from one of my servers</p>

<p><a href="/assets/images/2018/03/pypsexec-output.png"><img src="/assets/images/2018/03/pypsexec-output.png" alt="" /></a></p>

<p><em>Output is just like it is locally</em></p>

<p>This is a basic example of running a process but pypsexec gives you control over multiple options like;</p>

<ul>
  <li>The number of processors it can run on</li>
  <li>Whether to run the command asynchronously and not wait for a response, it will continue to run in the background</li>
  <li>Whether to run it as an interactive process and what session to show that process on (the application will run on that session’s desktop)</li>
  <li>Running as a different account than what was used in the connection process</li>
  <li>Running as the local SYSTEM account to get godlike privileges on the process</li>
  <li>Change the working directory</li>
  <li>Set the priority of the process</li>
  <li>Send bytes through the stdin pipe in case the remote process requires input</li>
  <li>Set a timeout on the remote process</li>
</ul>

<p>All these options and more can be found on the <a href="https://github.com/jborean93/pypsexec">pypsexec Github page</a>.</p>

<p>One extra feature that is not included by default is the ability to use Kerberos to authenticate and run a process as that user. This requires some Kerberos bindings to be installed on the host as well as the Python Kerberos packages. The system Kerberos bindings are dependent on the distro that is being used and once installed, needs to be configured. The Python packages can be installed by running <code class="language-plaintext highlighter-rouge">pip install smbprotocol[kerberos]</code>. This means that in the SMB authentication process, it will automatically attempt to authenticate with Kerberos if possible and continue on from there.</p>

<p>As I mentioned earlier, one of the reasons why I wanted to do this work was to add in a new way to run commands on a Windows host through Ansible. While, as of writing this blog post, it hasn’t been merged into the Ansible repository I have created a PR that you can start using today and try it out. This PR can be found <a href="https://github.com/ansible/ansible/pull/36723">here</a> and any tests or feedback is greatly appreciated. To use this module in your own Ansible setup you will have to;</p>

<ul>
  <li>Install <code class="language-plaintext highlighter-rouge">pypsexec</code> and optional Kerberos dependencies as per usual on the host the module will run on</li>
  <li>Copy down the <code class="language-plaintext highlighter-rouge">psexec.py</code> file from that PR into a folder called <code class="language-plaintext highlighter-rouge">library</code> that is adjacent to your playbook or in a role directory</li>
</ul>

<p>There are multiple examples in that PR on how you can use it but I will show you a simple example like the one above;</p>

<div class="language-plaintext highlighter-rouge"><div class="highlight"><pre class="highlight"><code>- name: run a simple command over the psexec module
  hosts: localhost
  gather_facts: no
  tasks:
  - name: run whoami /all on a Windows host
    psexec:
      hostname: server2016.domain.local
      connection_username: vagrant-domain@DOMAIN.LOCAL
      connection_password: VagrantPass1
      executable: whoami.exe
      arguments: /all
    register: whoami_output
    failed_when: whoami_output.rc not in [0, 1]

  - name: output stdout from psexec process
    debug:
      var: whoami_output.stdout_lines
</code></pre></div></div>

<p>Here is what it looks like when run;</p>

<p><a href="/assets/images/2018/03/Ansible-psexec-output.png"><img src="/assets/images/2018/03/Ansible-psexec-output.png" alt="" /></a></p>

<p>One of the benefits I spoke about of using this module is that you can provision a Windows host and use <code class="language-plaintext highlighter-rouge">pypsexec</code> to provision the WinRM listeners so Ansible can communicate with it normally. With this module you can easily do this by adding in the following task</p>

<div class="language-plaintext highlighter-rouge"><div class="highlight"><pre class="highlight"><code>- name: Download and run ConfigureRemotingForAnsible.ps1 to setup WinRM
  psexec:
    hostname: windows-pc
    connection_username: Administrator
    connection_password: Password01
    executable: powershell.exe
    arguments: '-'
    stdin: |
      $ErrorActionPreference = "Stop"
      $sec_protocols = [Net.ServicePointManager]::SecurityProtocol -bor [Net.SecurityProtocolType]::SystemDefault
      $sec_protocols = $sec_protocols -bor [Net.SecurityProtocolType]::Tls12
      [Net.ServicePointManager]::SecurityProtocol = $sec_protocols
      $url = "https://github.com/ansible/ansible/raw/devel/examples/scripts/ConfigureRemotingForAnsible.ps1"
      Invoke-Expression ((New-Object Net.WebClient).DownloadString($url))
      exit
</code></pre></div></div>

<p>This will run a PowerShell that we pass in through the <code class="language-plaintext highlighter-rouge">stdin</code> option that downloads Ansible’s <a href="https://github.com/ansible/ansible/blob/devel/examples/scripts/ConfigureRemotingForAnsible.ps1">ConfigureRemotingForAnsible.ps1</a> and runs it on that Windows host. Once complete, your Ansible playbook can switch over to using the standard WinRM listener and continue as usual.</p>

<p>The next steps from here would be to look into turning this into a connection plugin within Ansible so that you aren’t limited to running commands but you can do things like copy and fetch files to the host as well as use all the Ansible PowerShell modules. This isn’t the be all to end all as the overhead required to run the process would make this quite slow and impractical to use over WinRM.</p>

<h1 id="how-it-works">How it works</h1>

<p>Now we know how to install and run this, it’s time to get down into some protocol details and how it all stacks together. Here is a basic process flow of how this all fits together.</p>

<p><a href="/assets/images/2018/03/PsExec-Flow.png"><img src="/assets/images/2018/03/PsExec-Flow.png" alt="" /></a></p>

<p><em>Complex but gets the job done</em></p>

<p>As you can see, the majority of the network packets sent are done through SMB and in fact the RPC packets are encapsulated inside a specific SMB packet itself. The only part that is hard to describe in the process flow is the reading of the stdout and stderr pipes. What pypsexec does is runs those read requests as part of a separate thread while it is blocked waiting for the main PAExec pipe to return the process exit info. There can be multiple responses from the server during this process and these threads will continue to run until the remote process is finished. With the basic flow out of the way, let’s drill even deeper into each of the protocols that are used.</p>

<h2 id="smb">SMB</h2>

<p><a href="https://msdn.microsoft.com/en-us/library/cc246482.aspx">SMB</a> standards for Server Message Block and depending on who you ask, is also known as CIFS or Samba. SMB is the actual protocol name while CIFS is an older dialect used by Microsoft historically. Samba is a suite of programs for Linux or Unix that is designed to inter operate with various Microsoft products like SMB or Active Directory. It is a protocol that is used for providing shared access to file, printer and pipes that operates on the OSI Application layer.</p>

<p>It can send data over numerous transports;</p>

<ul>
  <li>Directly over TCP with port 445</li>
  <li>NetBIOS over TCP on ports 137 and 139</li>
  <li>Other legacy protocols like NBF, IPC/SPX</li>
</ul>

<p>We will only focus on the direct TCP transport over port 445 as that is what is most commonly used today and provided the largest packet sizes. Some key terms in used within the SMB protocol are;</p>

<ul>
  <li><code class="language-plaintext highlighter-rouge">Connection</code>: Refers to the main connection to the server over TCP, this is the level in which the negotiate process occurs and there is typically one Connection per server</li>
  <li><code class="language-plaintext highlighter-rouge">Session</code>: Refers to an authenticated session of a Connection, there is typically one Session per user per server</li>
  <li><code class="language-plaintext highlighter-rouge">Tree</code>: Refers to a connected SMB share, like <code class="language-plaintext highlighter-rouge">ADMIN$</code> and is run over a Session</li>
  <li><code class="language-plaintext highlighter-rouge">Open</code>: Refers to an open handle of a file, directory, printer, or pipe. This Open can govern what rights are allowed by a file operation based on the initial Open message and is run over a Tree</li>
  <li><code class="language-plaintext highlighter-rouge">Dialect</code>: The version of SMB that is supported and controls what features are available and in some limited scenarios, the format of a message</li>
</ul>

<h3 id="dialects">Dialects</h3>

<p>There have been numerous revisions and changes to the SMB protocol which ultimately results in a new dialect being created. The dialect controls what features are available to an SMB connection and can control what structure the messages ultimately takes. Here are some of the main SMB dialects that are still in use today</p>

<ul>
  <li><code class="language-plaintext highlighter-rouge">PC NETWORK PROGRAM 1.0</code>, <code class="language-plaintext highlighter-rouge">LANMAN1.0</code>, <code class="language-plaintext highlighter-rouge">Windows for Workgroups 3.1a</code>, <code class="language-plaintext highlighter-rouge">LM1.2X002</code>, <code class="language-plaintext highlighter-rouge">LANMAN2.1</code>, <code class="language-plaintext highlighter-rouge">NT LM 0.12</code>: All SMBv1 dialects and are not used at all by <code class="language-plaintext highlighter-rouge">smbprotocol</code></li>
  <li><code class="language-plaintext highlighter-rouge">2.0.0</code>: Introduced with Server 2008 and Windows Vista</li>
  <li><code class="language-plaintext highlighter-rouge">2.1.0</code>: Server 2008 R2 and Windows 7</li>
  <li><code class="language-plaintext highlighter-rouge">3.0.0</code>: Server 2012 and Windows 8</li>
  <li><code class="language-plaintext highlighter-rouge">3.0.2</code>: Server 2012 R2 and Windows 8.1</li>
  <li><code class="language-plaintext highlighter-rouge">3.1.1</code>: Server 2016 and Windows 10</li>
</ul>

<p>Starting with the <code class="language-plaintext highlighter-rouge">2.0.0</code> dialect, the structure of the SMB messages have remained consistent and is supported by all currently supported Windows versions. This means the benefits of supported the older SMB 1.0 dialects is quite minimal and can open a user up to more attack vectors which is something we want to avoid.</p>

<p>One of the biggest changes that affects end users of this project is the addition of message encryption in the <code class="language-plaintext highlighter-rouge">3.x</code> dialects. This means that only Windows hosts based on Server 2012 or Windows 8 and newer support the encryption of messages sent to and from the clients. In today’s environment, this is definitely something we want to have and it is enabled by default on <code class="language-plaintext highlighter-rouge">pypsexec</code>.</p>

<p>Who knows what Microsoft will introduce in newer dialects but currently <code class="language-plaintext highlighter-rouge">smbprotocol</code> supports dialects <code class="language-plaintext highlighter-rouge">2.0.0</code> to <code class="language-plaintext highlighter-rouge">3.1.1</code> and most of the features in each dialect.</p>

<h3 id="messages">Messages</h3>

<p>There are numerous types of messages in the SMBv2 protocol which I’ll briefly explain the major ones that are in use by <code class="language-plaintext highlighter-rouge">pypsexec</code>;</p>

<ul>
  <li><a href="https://msdn.microsoft.com/en-us/library/cc246529.aspx">SMB2 Packet Header</a>: The header of all requests and responses, it contains the metadata around the request and response</li>
  <li><a href="https://msdn.microsoft.com/en-us/library/cc246543.aspx">SMB2 NEGOTIATE</a>: Used to negotiate the capabilities of the client and the server such as the dialect and encryption setup</li>
  <li><a href="https://msdn.microsoft.com/en-us/library/cc246563.aspx">SMB2 SESSION_SETUP</a>: Used to authenticate a user and setup an SMB Session</li>
  <li><a href="https://msdn.microsoft.com/en-us/library/cc246567.aspx">SMB2 TREE_CONNECT</a>: Used to connect to a Tree/Share on the remote host</li>
  <li><a href="https://msdn.microsoft.com/en-us/library/cc246502.aspx">SMB2 CREATE</a>: Used to create an open handle to a file, directory, printer, or pipe</li>
  <li><a href="https://msdn.microsoft.com/en-us/library/cc246527.aspx">SMB2 READ</a>: Used to read bytes from a file or pipe</li>
  <li><a href="https://msdn.microsoft.com/en-us/library/cc246532.aspx">SMB2 WRITE</a>: Used to write bytes to a file or pipe</li>
  <li><a href="https://msdn.microsoft.com/en-us/library/cc246545.aspx">SMB2 IOCTL</a>: Used to issue an implementation-specific FSCTL or IOCTL command across the network like an RPC bind</li>
  <li><a href="https://msdn.microsoft.com/en-us/library/hh880787.aspx">SMB2 TRANSFORM_HEADER</a>: Used as the header for an encrypted message and can contain 1 or multiple SMB2 Packet Headers</li>
</ul>

<p>The <code class="language-plaintext highlighter-rouge">smbprotocol</code> library exposes a function that can be used to create and send each of these messages based on a few input parameters. This makes it quite simple to send an <code class="language-plaintext highlighter-rouge">SMB2 Read</code> request by only passing in the file handle and the offset to read from. In most circumstances, a single packet is sent to the server but the SMB protocol allows compounded packets to be sent in one request.</p>

<h3 id="authentication">Authentication</h3>

<p>One very important part of this process is to authenticate with a valid Windows account. This is most commonly done in SMB using the <a href="https://en.wikipedia.org/wiki/SPNEGO">SPNEGO</a> protocol to negotiate an authentication mechanism supports by both the client and the server. Currently <code class="language-plaintext highlighter-rouge">smbprotocol</code> can authenticate a local or domain account with either <code class="language-plaintext highlighter-rouge">NTLM</code> or <code class="language-plaintext highlighter-rouge">Kerberos</code> where <code class="language-plaintext highlighter-rouge">Kerberos</code> is the preferred option of the 2. The authentication process occurs straight after the negotiation response is received with the server’s SPNEGO token. This token contains a list of authentication mechanisms that are supported which <code class="language-plaintext highlighter-rouge">smbprotocol</code> compares against its own setup. If the Kerberos requirements are installed and setup up correctly and the remote host indicates it supports Kerberos in the <code class="language-plaintext highlighter-rouge">SPNEGO</code> token, <code class="language-plaintext highlighter-rouge">smbprotocol</code> will first attempt to authenticate with Kerberos before falling back to NTLM.</p>

<p>Once authenticated, both the NTLM and Kerberos protocols supply a unique session key which is then used by SMB to derive both the signing and encryption keys. The process to compute these keys are based on the dialect that was negotiated where newer dialects have a more complicated process for greater security. Once these keys are computed and an SMB Session is created, any future messages using that Session will be encrypted using that authenticated user context.</p>

<h3 id="encryption">Encryption</h3>

<p>If the <code class="language-plaintext highlighter-rouge">3.0.0</code> or newer dialect is negotiated then SMB allows messages to be encrypted to ensure confidentiality of the data sent to and from the server. Unlike other Microsoft protocols which typically uses the GSSAPI/SSPI <code class="language-plaintext highlighter-rouge">Wrap</code> and <code class="language-plaintext highlighter-rouge">Unwrap</code> functions based on an authenticated context, SMB relies on it’s own process for encryption. Currently there are two different types of encryption that are supported in SMB;</p>

<ul>
  <li>AES 128-bit CCM</li>
  <li>AES 128-bit GCM (Dialect <code class="language-plaintext highlighter-rouge">3.1.1</code> only)</li>
</ul>

<p>In Dialect <code class="language-plaintext highlighter-rouge">3.1.1</code>, the encryption cipher that is used is negotiated in the initial <code class="language-plaintext highlighter-rouge">SMB2 NEGOTIATE</code> message otherwise <code class="language-plaintext highlighter-rouge">AES 128-bit CCM</code> is used. Some servers require encryption on all shares and is set as a global setting otherwise it can be set as an individual share setting. This cannot be controlled by the client but rest assured, <code class="language-plaintext highlighter-rouge">smbprotocol</code> should support each scenario.</p>

<p>As an example, here is a Tree Connect message sent without encryption;</p>

<p><a href="/assets/images/2018/03/SMB-Tree-no-encryption.png"><img src="/assets/images/2018/03/SMB-Tree-no-encryption.png" alt="" /></a></p>

<p>Here is the same message sent with encrypted;</p>

<p><a href="/assets/images/2018/03/SMB-Tree-encryption.png"><img src="/assets/images/2018/03/SMB-Tree-encryption.png" alt="" /></a></p>

<p>In the message without encryption, I can easily see that I am connecting to the share <code class="language-plaintext highlighter-rouge">\\server2016.domain.local\IPC$</code> whereas the encryption example I cannot even see what type of SMB message is being sent. While hiding what share I am connecting to can be important, encryption becomes even more useful when reading and writing on files and pipes so that a nefarious lurker can’t see the data.</p>

<h2 id="rpc">RPC</h2>

<p><a href="http://pubs.opengroup.org/onlinepubs/9629399/">RPC</a> stands for Remote Procedure Call and is a way of running a procedure remotely but is coded like it would when running locally. Unfortunately the whole part of calling a procedure remotely like it would be done locally is lost when it comes to this process. This is because the usual RPC layer that handles this abstraction does not support the Windows specific functions. This means that the <code class="language-plaintext highlighter-rouge">pypsexec</code> library needs to implement that RPC layer when calling the functions that are required. For <code class="language-plaintext highlighter-rouge">pypsexec</code>, we use RPC to interact with the Windows Service Control Manager Remote (SCMR) API so that we can manage the Windows service that runs our remote payload. The RPC process is as follows;</p>

<ul>
  <li>A new SMB Open is created on the <code class="language-plaintext highlighter-rouge">IPC$</code> tree for the pipe <code class="language-plaintext highlighter-rouge">svcctl</code></li>
  <li>An SMB Write packet is sent to the opened pipe that contains the DCE/RPC Bind PDU structure</li>
  <li>The Bind Acknowledgement response is parsed to ensure the Bind didn’t fail</li>
  <li>Any SCMR calls will then send an SMB IOCTL request that contains the method and parameters to invoke on the remote host</li>
  <li>Once all the SCMR tasks are complete, the SMB Open is closed which also closes the binding</li>
</ul>

<p>This was a complicated protocol to understand and I only really just scratched the surface to get the Python library working with SCMR. I’m sure there are a lot of major details I am missing or misunderstood but so far it is working and I don’t have a full need to move past it.</p>

<h2 id="scmr">SCMR</h2>

<p><a href="https://msdn.microsoft.com/en-us/library/cc245832.aspx">SCMR</a> stands for Service Control Manager Remote and is a protocol that is used to remotely manage Windows services. It can do things remotely like;</p>

<ul>
  <li>Enumerate services</li>
  <li>Start/stop services</li>
  <li>Create/delete services</li>
  <li>Modify services</li>
  <li>Lots and lots more, see <a href="https://msdn.microsoft.com/en-us/library/cc245853.aspx">the MS-SCMR docs</a> for a full list of functions available</li>
</ul>

<p>It is run over RPC which in turn is run over SMB pipes and on a typical Windows setup, this is all abstracted with the local RPC implementation on that host. This implementation would marshal the data that is used in the function into a byte structure and send that through the network as well as parse and marshal the responses back to the client. As mentioned in the RPC section, this is unavailable on a non-Windows host and so we have to do all this work ourselves. The current <code class="language-plaintext highlighter-rouge">pypsexec</code> code only has to deal with 2 different types of variables, integers and strings. Integers are packed like normally in Python as a little-endian byte but strings are a bit more complex. String have a structure like</p>

<div class="language-plaintext highlighter-rouge"><div class="highlight"><pre class="highlight"><code>RCP string
{
    Int32 ReferenceID - A unique ID to set for the string, the uniqueness is not really implemented in pypsexec and we just set it as 1 if required otherwise it is a 0 byte value
    Int32 MaxCount - The numbers of chars in the Bytes field when returned by the server, this is just set to ActualCount
    Int32 Offset - The offset of the Bytes value
    Int32 ActualCount - The number of chars (not Bytes) of the Bytes field when encoded including the NULL terminator
    Bytes Bytes - The string that is encoded as a byte string, typically this is UTF-16-LE encoded with a null terminator
    Bytes Padding - The Bytes field must align to a 4-byte boundary so this is just some NULL bytes to pad the length
}
</code></pre></div></div>

<p>Now that the basic data marshaling is covered, <code class="language-plaintext highlighter-rouge">pypsexec</code> must add support for invoking the required functions in SCMR. This is done by creating a Request PDU as defined in the RCP/DCE 1.1 documentation and send that over as a <code class="language-plaintext highlighter-rouge">FSCTL_PIPE_TRANSCEIVE</code> SMB IOCTL Request. Each function has a particular operation number (opnum) that is set on the Request PDU and the data is just the marshaled bytes of the function’s input parameters. The response contains at least the return code that identifies the result of the invocation and can also contain other return values based on the function that was called.</p>

<p>As an example, let’s dive into the <a href="https://msdn.microsoft.com/en-us/library/cc245944.aspx">ROpenServiceW</a> function and show what happens with the data being passed to and from the client. The function is defined in MS-SCMR as;</p>

<div class="language-plaintext highlighter-rouge"><div class="highlight"><pre class="highlight"><code>DWORD ROpenServiceW(
  [in] SC_RPC_HANDLE hSCManager,
  [in, string, range(0, SC_MAX_NAME_LENGTH)] 
    wchar_t* lpServiceName,
  [in] DWORD dwDesiredAccess,
  [out] LPSC_RPC_HANDLE lpServiceHandle
 );
</code></pre></div></div>

<p>This means it takes in 3 input parameters <code class="language-plaintext highlighter-rouge">hSCManager</code>, <code class="language-plaintext highlighter-rouge">lpServiceName</code>, <code class="language-plaintext highlighter-rouge">dwDesiredAccess</code> and return 2 values; <code class="language-plaintext highlighter-rouge">lpServiceHandle</code> and a <code class="language-plaintext highlighter-rouge">DWORD/Int32</code> that indicates the function result. If we wanted to open a handle to the service called <code class="language-plaintext highlighter-rouge">Test Service</code> with the rights to query, start, and stop a service here is what it would look like;</p>

<p>The <code class="language-plaintext highlighter-rouge">hSCManager</code> was created as a unique handle as part of a previous call to <code class="language-plaintext highlighter-rouge">SCMR</code>, in this example we will just pretend it is 20 bytes of <code class="language-plaintext highlighter-rouge">0xFF</code>. The string <code class="language-plaintext highlighter-rouge">Test Service</code> does not need a unique/referent ID and the marshaled string structure would look like</p>

<div class="language-plaintext highlighter-rouge"><div class="highlight"><pre class="highlight"><code>MaxCount: 0D 00 00 00
Offset: 00 00 00 00
ActualCount: 0D 00 00 00
Bytes: 54 00 65 00 73 00 74 00 20 00 53 00 65 00 72 00 76 00 69 00 63 00 65 00 00 00
Padding: 00 00
</code></pre></div></div>

<p>The <code class="language-plaintext highlighter-rouge">MaxCount</code> and <code class="language-plaintext highlighter-rouge">ActualCount</code> is equal to <code class="language-plaintext highlighter-rouge">0x0D</code> which is 13 in decimal form while the string is encoded as a UTF-16-LE string with a null terminator. Because the UTF-16-LE encoded string is 26 bytes long, we need to pad it with 2 null bytes so it is aligned to the 4-byte boundary.</p>

<p>The <code class="language-plaintext highlighter-rouge">dwDesiredAccess</code> requires 3 flags that are set to get the query, start, and stop rights which are;</p>

<ul>
  <li><code class="language-plaintext highlighter-rouge">SERVICE_QUERY_STATUS</code>: 0x00000004</li>
  <li><code class="language-plaintext highlighter-rouge">SERVICE_START</code>: 0x00000010</li>
  <li><code class="language-plaintext highlighter-rouge">SERVICE_STOP</code>: 0x00000020</li>
</ul>

<p>When combined this results in an integer of 52 and the packed bytes value for this is <code class="language-plaintext highlighter-rouge">34 00 00 00</code>. Putting this all together, the byte structure that is sent with the RPC <code class="language-plaintext highlighter-rouge">Request PDU</code> is;</p>

<div class="language-plaintext highlighter-rouge"><div class="highlight"><pre class="highlight"><code>FF FF FF FF
FF FF FF FF
FF FF FF FF
FF FF FF FF
FF FF FF FF
0D 00 00 00
00 00 00 00
0D 00 00 00
54 00 65 00
73 00 74 00
20 00 53 00
65 00 72 00
76 00 69 00
63 00 65 00
00 00 00 00
34 00 00 00
</code></pre></div></div>

<p>When sent with the RPC Request PDU, the opnum is set to <code class="language-plaintext highlighter-rouge">16</code> and that packed as a Int16 is <code class="language-plaintext highlighter-rouge">10 00</code>. The server would then receive the request, unpack the data and execute the function and finally return the result under an RPC Response PDU. This response would look like;</p>

<div class="language-plaintext highlighter-rouge"><div class="highlight"><pre class="highlight"><code>AA AA AA AA
AA AA AA AA
AA AA AA AA
AA AA AA AA
AA AA AA AA
00 00 00 00
</code></pre></div></div>

<p>The first 20 bytes is the handle for the service <code class="language-plaintext highlighter-rouge">Test Service</code>, in this case is 20 bytes of <code class="language-plaintext highlighter-rouge">0xAA</code> while the return code is 0 which means it was successful.</p>

<h2 id="paexec">PAExec</h2>

<p>While all this is done on the client side, we still need some executable to run as the Windows service and execute the requested process. Unfortunately while PsExec is free it is not licensed for distribution which means I can’t legally use the PsExec executable to run as the service payload. In comes PAExec which is an open source alternative and can be distributed in other projects without a fee. PAExec is designed to be a drop in replacement to PsExec and offers the same features as well as some others that PsExec doesn’t supply and for this project I am just using the service component. If you are interested in delving into the code for PAExec you can find it on <a href="https://github.com/poweradminllc/PAExec">its own Github page</a>.</p>

<p>The process around PAExec is;</p>

<ul>
  <li>Copy the PAExec payload to <code class="language-plaintext highlighter-rouge">C:\Windows\PAExec-&lt;localhostname&gt;-&lt;localpid&gt;.exe</code></li>
  <li>Create a service that calls <code class="language-plaintext highlighter-rouge">C:\Windows\PAExec-&lt;localhostname&gt;-&lt;localpid&gt;.exe -service</code> to start the PAExec service</li>
  <li>This will create a Named Pipe on the remote host called <code class="language-plaintext highlighter-rouge">PAExec-&lt;localhostname&gt;-&lt;localpid&gt;.exe</code></li>
  <li>Send the PAExec process settings (contains info such as the executable to run) to that Named Pipe</li>
  <li>Send the PAExec start message to the main Named Pipe</li>
  <li>PAExec will start the process and create three more Named Pipes, <code class="language-plaintext highlighter-rouge">PaExecOut&lt;localhostname&gt;&lt;localpid&gt;</code>, <code class="language-plaintext highlighter-rouge">PaExecErr&lt;localhostname&gt;&lt;localpid&gt;</code>, <code class="language-plaintext highlighter-rouge">PaExecIn&lt;localhostname&gt;&lt;localpid&gt;</code> which is the <code class="language-plaintext highlighter-rouge">stdout</code>, <code class="language-plaintext highlighter-rouge">stderr</code> and <code class="language-plaintext highlighter-rouge">stdin</code> for the remote process</li>
  <li>The client will create a separate thread for both the stdout and stderr and continually read from that pipe</li>
  <li>The client will also create a read request for the main Named Pipe to get the process output</li>
  <li>This read on the main Named Pipe will wait until the remote process finishes, during this time the stdout and stderr thread will have stored each read response in a buffer</li>
  <li>Now the process has ended, the client has the stdout and stderr bytes as well as the return code from the remote process.</li>
</ul>

<p>This can be repeated multiple times and once everything is run, the client can then cleanup the payload and service that remains on the Windows host. One of the biggest challenges I faced when creating this process was how to read from the stdout and stderr pipe as the main named pipe will not complete until those buffers are read and empty. To ensure we don’t block any process in case there is no more data to be read from the pipes. What happens now is that the stdout and stderr pipes will keep on polling the remote pipe until it has been closed (the process is finished) as a separate thread. There is bound to be some more optimisations that can occur in this space but for a 1.0 product it works for me.</p>

<p>The biggest downfall of PAExec is that the initial settings end over the main Named Pipe is not encrypted but just encoded using a simple XOR pass. This means for Windows hosts that cannot use SMB encryption, any of these details can be viewed by anyone.</p>

<h1 id="for-the-future">For the future</h1>

<p>Currently the <code class="language-plaintext highlighter-rouge">pypsexec</code> and <code class="language-plaintext highlighter-rouge">smbprotocol</code> gives you the ability to run a process on a Windows host but it is not perfect. In the future I am looking to add in the following features;</p>

<ul>
  <li>I still occasionally see some deadlocks when running a command, this needs to be solved but it is quite hard to debug and reproduce on demand</li>
  <li>An interactive shell for <code class="language-plaintext highlighter-rouge">pypsexec</code> that takes input from <code class="language-plaintext highlighter-rouge">stdin</code> and outputs the responses to <code class="language-plaintext highlighter-rouge">stdout</code> and <code class="language-plaintext highlighter-rouge">stderr</code></li>
  <li>Simple script bundled with <code class="language-plaintext highlighter-rouge">pypsexec</code> to take in arguments and run the command like the <code class="language-plaintext highlighter-rouge">PsExec.exe</code> executable</li>
  <li>Add a higher level API to <code class="language-plaintext highlighter-rouge">smbprotocol</code> that does things like create/deleting files or reading/writing data to a file using simple functions</li>
  <li>Find ways to improve the speed of <code class="language-plaintext highlighter-rouge">smbprotocol</code></li>
  <li>Move beyond a simple Ansible module and turn it into a connection plugin so it can be used to run all the existing Windows modules instead of just commands</li>
</ul>

<p>Some of this stuff is easy to do but others are quite complex and depend on other things to be in place to be considered viable. If you feel up to the challenge or just come across a bug, feel free to submit an issue or a pull request on Github.</p>]]></content><author><name>Jordan Borean</name></author><category term="ansible" /><category term="windows" /><category term="winrm" /><summary type="html"><![CDATA[Over the past few months I’ve been trying to find a way that gives people more options around running commands on a Windows host remotely. Currently you have a few options available to you that enable this; Configure WinRM Bake in commands to the startup process, like a Windows answer file or AWS user data …]]></summary></entry><entry><title type="html">Demystifying WinRM</title><link href="https://bloggingforlogging.com/2018/01/24/demystifying-winrm/" rel="alternate" type="text/html" title="Demystifying WinRM" /><published>2018-01-24T04:41:55+00:00</published><updated>2018-01-24T04:41:55+00:00</updated><id>https://bloggingforlogging.com/2018/01/24/demystifying-winrm</id><content type="html" xml:base="https://bloggingforlogging.com/2018/01/24/demystifying-winrm/"><![CDATA[<p>One of the most common problems I come across today when it comes to remotely managing Windows is dealing with WinRM and its inconsistencies. I wanted to create a blog post that will help people understand what goes on with WinRM a bit more so that they can better use this resource on Windows. This blog post will cover the following part of WinRM</p>

<ul>
  <li>Common restrictions that occur with WinRM</li>
  <li>Authentication with WinRM</li>
  <li>Authorization with WinRM</li>
</ul>

<p>Before I continue further, I thought it best to note some of the major components and terms that are used or related to the WinRM protocol. Sometimes these terms are used interchangeably, but in reality, they represent distinct components. These components are;</p>

<ul>
  <li><code class="language-plaintext highlighter-rouge">WinRM</code>: Windows Remote Management, is Microsoft’s implementation of the <code class="language-plaintext highlighter-rouge">WS-Management</code> protocol</li>
  <li><code class="language-plaintext highlighter-rouge">WS-Management</code>: Web Services-Management, is an open standard that is based on SOAP messages to remotely exchange messaging data</li>
  <li><code class="language-plaintext highlighter-rouge">WinRS</code>: Windows Remote Shell is a function of <code class="language-plaintext highlighter-rouge">WinRM</code> and is used to create a shell remotely on a Windows host and execute commands. This is usually what most open source libraries that claim <code class="language-plaintext highlighter-rouge">WinRM</code> support work with</li>
  <li><code class="language-plaintext highlighter-rouge">PSRP</code>: PowerShell Remoting Protocol is a separate protocol that runs over <code class="language-plaintext highlighter-rouge">WinRM</code>, this is the protocol that is used when executing a command with <code class="language-plaintext highlighter-rouge">Invoke-Command</code> or <code class="language-plaintext highlighter-rouge">Enter-PSSession</code> and has some differences with <code class="language-plaintext highlighter-rouge">WinRS</code></li>
</ul>

<p>This post will mostly deal with <code class="language-plaintext highlighter-rouge">WinRM</code> and not <code class="language-plaintext highlighter-rouge">PSRP</code> but the same fundamental concepts apply to <code class="language-plaintext highlighter-rouge">PSRP</code> as well. The main difference between <code class="language-plaintext highlighter-rouge">WinRM</code> and <code class="language-plaintext highlighter-rouge">PSRP</code> is how it authorizes the user as they are protected by different ACL objects.</p>

<h1 id="restrictions">Restrictions</h1>

<p>Once WinRM is up and running, it may seem simple to run commands and install programs but you are inevitably going to come across some of the many restrictions that are placed upon a WinRM session. Some of the common restrictions people encounter are;</p>

<ul>
  <li>Cannot access network resources like a SMB share</li>
  <li>Windows Data Protection API <a href="https://msdn.microsoft.com/en-us/library/ms995355.aspx">DPAPI</a> is not accessible unless using CredSSP</li>
  <li>Windows Update is mostly locked down and the user will get <code class="language-plaintext highlighter-rouge">Access is Denied</code> when trying to use it</li>
  <li>Anything relying on an interactive logon session will fail</li>
</ul>

<p><em>Edit 2018-08-28: slightly modified the working to be more accurate and correct than before</em></p>

<p>Most of the time people think processes running under WinRM fail due to UAC and they need to “elevate” the process like they would locally but this is not entirely accurate. The complexity from this topic all comes down to the access token Windows creates when a user first signs on. This token contains the following components;</p>

<ul>
  <li>The user SID</li>
  <li>The groups associated with the access token</li>
  <li>The logon session ID</li>
  <li>The privileges that are enabled/disabled on the access token</li>
  <li>The integrity level of the token</li>
  <li>The token elevation type and linked token info</li>
</ul>

<p>The access token is not limited to the components above but they aren’t related to the topic at hand so we’ll ignore them for now. Each component is used in Windows to secure objects such as files, folders and API calls. When someone talks about “elevation” they are usually referring to the concept of running a process under a token that contains the full groups and rights usually restricted by default. The concept of split or linked tokens was introduced in Windows Vista to much vitriol under the name User Access Control (UAC). Personally I think UAC was a massive change in Windows and understand the frustrations some people had but it was definitely a step in the right direction from the wild wild west which was XP.</p>

<p>A linked or split token is when Windows produces two different tokens associated with a logon, a limited and full token. The full token contains all the groups and privileges of the user is associated with as well as the integrity level of high. A linked token is a copy of the full token but with the higher privileged groups like the <code class="language-plaintext highlighter-rouge">Administrators</code> group and privileges removed. This means that a process created under both a standard and admin user have similar rights by default. An admin can then explicitly run a process under the linked token with all their admin rights if they need to but this isn’t done by default.</p>

<p>Windows doesn’t always create a linked token but gives the user the full groups and rights they are allowed to have. A token without any filtering being done would happen in the following scenarios;</p>

<ul>
  <li>The process is created from a standard user who has no admin privileges to create a linked token for</li>
  <li>The process is created from the builtin Administrator account and <a href="https://docs.microsoft.com/en-us/windows/security/threat-protection/security-policy-settings/user-account-control-admin-approval-mode-for-the-built-in-administrator-account">Use Admin Approval Mode for the built-in Administrator account</a> is disabled (this mode is disabled by default)</li>
  <li>The process is created from a network logon and either a domain account is used or a local account with the <a href="https://support.microsoft.com/en-us/help/951016/description-of-user-account-control-and-remote-restrictions-in-windows">LocalAccountTokenFilterPolicy</a> set to 1</li>
  <li>UAC is disabled</li>
</ul>

<p>The part that is of interest to WinRM is the <code class="language-plaintext highlighter-rouge">LocalAccountTokenFilterPolicy</code> setting which tells Windows whether to create a linked/filtered token for a network authenticated process like WinRM. By default this value is set to filter network logon tokens but the WinRM setup scripts from Microsoft disable this. This effectively means running <code class="language-plaintext highlighter-rouge">Enable-PSRemoting</code> or <code class="language-plaintext highlighter-rouge">winrm quickconfig</code>, the <code class="language-plaintext highlighter-rouge">LocalAccountTokenFilterPolicy</code> registry setting will be set to 1 (no filtering occurs). What this means is that any processes created from a network logon token, like WinRM or RPC, will have the full admin rights and integrity level associated with the user. Unfortunately this cannot be selectively controlled for specific processes or services so once on anything that is able to authenticate as a network logon will have the full rights of a user.</p>

<p>We can see this in action by running a few simple steps, here is the output when running a non-elevated process locally;</p>

<p><a href="/assets/images/2018/01/Screen-Shot-2018-01-24-at-11.45.23-am.png"><img src="/assets/images/2018/01/Screen-Shot-2018-01-24-at-11.45.23-am.png" alt="" /></a></p>

<p><em>You can also see it has been denied the Administrators group</em></p>

<p>When running that same local process but now elevated (Run as Administrator) I get;</p>

<p><a href="/assets/images/2018/01/Screen-Shot-2018-01-24-at-11.45.47-am.png"><img src="/assets/images/2018/01/Screen-Shot-2018-01-24-at-11.45.47-am.png" alt="" /></a></p>

<p><em>Now I get the Administrators group</em></p>

<p>Finally when running a WinRM command with <code class="language-plaintext highlighter-rouge">winrs -r:http://127.0.0.1:5985/wsman -u:Administrator -p:Password whoami /groups</code>, here is what I get;</p>

<p><a href="/assets/images/2018/01/Screen-Shot-2018-01-24-at-11.47.22-am.png"><img src="/assets/images/2018/01/Screen-Shot-2018-01-24-at-11.47.22-am.png" alt="" /></a></p>

<p><em>The same label as an elevated process</em></p>

<p>You can see in the non-elevated local process, it has a label of <code class="language-plaintext highlighter-rouge">Medium</code> and the <code class="language-plaintext highlighter-rouge">Administrators</code> group is not associated with the process, e.g. it is running with the limited access token. Compare this to the elevated local process, it contains both the <code class="language-plaintext highlighter-rouge">High</code> integrity label and the <code class="language-plaintext highlighter-rouge">Administrators</code> group is associated with the access token. Finally when looking at the WinRM process, we can see that it has the same label and groups as the elevated local process, so where is the <code class="language-plaintext highlighter-rouge">Access is Denied</code> error coming from?</p>

<p>In reality, all these issues stem from the logon type associated with the logon session ID on the token. When the Local Security Authority <code class="language-plaintext highlighter-rouge">LSA</code> creates a new access token for the user, it can create them with a few different logon types and Microsoft uses this internally for securing some objects. So really the only way to bypass these issues under WinRM is to create a new access token that is associated with a different logon type. But before we get into that, we would need to first clarify what a logon type is. There are numerous logon types within Windows, the core/relevant types are;</p>

<ul>
  <li>Interactive – typical logon when logging onto the local console or through RDP</li>
  <li>Network</li>
  <li>Network Cleartext</li>
  <li>Batch – logon uses by task scheduler is most cases</li>
  <li>Service – logon that used by processes run by <code class="language-plaintext highlighter-rouge">LocalSystem</code>, <code class="language-plaintext highlighter-rouge">NetworkService</code>, and <code class="language-plaintext highlighter-rouge">LocalService</code></li>
  <li>New Credentials</li>
</ul>

<h2 id="network-and-network-cleartext-logon">Network and Network Cleartext Logon</h2>

<p>A Network or Network Cleartext logon means that the logon occurred from the network and so it makes sense that WinRM processes have a network logon type. Unfortunately a network logon has a few restrictions enforced by Windows which casuses the issues I wrote about above, I’ve put some more details about each restriction below.</p>

<h3 id="network-access">Network Access</h3>

<p>When LSA handles a network logon, it usually receives a hash or token of the user’s password and not the password itself. This becomes a problem when the process running on that logon then tries to access a network resource. This is because this request does not have the password for the account which is usually available on interactive or batch logons. Without this password, any network requests are done under an <code class="language-plaintext highlighter-rouge">Anonymous</code> user. This is a problem as Windows will not allow anonymous access on an SMB share even if it is explicitly set in the ACL of the folder. This can be overridden by editing the local security policy but it is not recommended.</p>

<p>In the case of a <code class="language-plaintext highlighter-rouge">Network Cleartext</code> logon (CredSSP), this isn’t the case as the password was provided to LSA during the logon and so the process is able to then use that password to authenticate with network shares. Kerberos is the similar where you can set a delegation flag when retrieving the initial ticket and pass that along to the server. This flag means that the process that is run on the network logon is able to then use that same Kerberos ticket to authenticate with another network server.</p>

<h3 id="dpapi">DPAPI</h3>

<p>DPAPI is a Microsoft interface used to provide easy access to crypto functions like managing private keys or credentials for a user account. Like the network access issue, it requires that LSA has access to the password of the user for it to work. In the case of a network logon this is not available for the reasons stated above. Because a <code class="language-plaintext highlighter-rouge">Network Cleartext</code> logon has the actual password, it’s processes are able to interact with DPAPI like usual and will not error out.</p>

<p>While using DPAPI is not a common scenario like accessing network shares, it is used in a few key scenarios like;</p>

<ul>
  <li>Installing SQL Server requires access to DPAPI to complete the install</li>
  <li>Managing private keys in the certificate store</li>
</ul>

<h3 id="wua">WUA</h3>

<p>Not much to say on this unfortunately, Microsoft restricts certain calls to the Windows Update API under a <code class="language-plaintext highlighter-rouge">Network</code> or <code class="language-plaintext highlighter-rouge">Network Cleartext</code> logon. Any attempt to install or uninstall updates using the COM API or even just <code class="language-plaintext highlighter-rouge">wusa.exe</code> will fail in these scenarios. I am not sure why Microsoft enforces this restriction so I cannot really explain this further.</p>

<h2 id="new-credentials">New Credentials</h2>

<p>The <code class="language-plaintext highlighter-rouge">New Credentials</code> logon is a special logon compared to the others that I have mentioned. It is designed as a way to run a process locally that needs to access a network resource with a different set of credentials. The access token of the process is a clone of the token used to logon on the user but any outbound connections are authenticated as the user specified in the logon.</p>

<p>For example, if I want to open <code class="language-plaintext highlighter-rouge">dsa.msc</code> and run as a higher privileged domain user I can run the following</p>

<p><code class="language-plaintext highlighter-rouge">runas.exe /netonly /user:DOMAIN\admin dsa.msc</code></p>

<p>The <code class="language-plaintext highlighter-rouge">dsa.msc</code> process running locally is run by the user who ran <code class="language-plaintext highlighter-rouge">runas.exe</code> but when it makes a connection to the domain controller it will be with the credentials I specified. Even better is that the user specified does not need to have the logon rights on the host and it can be any user/password combination. Because the access token that is created is a clone of the one who ran <code class="language-plaintext highlighter-rouge">runas.exe</code>, any local actions are still under the same limitations of the caller logon, e.g. <code class="language-plaintext highlighter-rouge">runas.exe /netonly</code> from a <code class="language-plaintext highlighter-rouge">Network</code> logon will still not be able to interact with DPAPI or WUA.</p>

<h2 id="bypassing-the-network-logon-restrictions">Bypassing the Network Logon Restrictions</h2>

<p>Now that you know more info into how these restrictions occur, getting past them is as simple as spawning a new process from the WinRM session under a different logon. There are a few ways that this can be done such as;</p>

<ul>
  <li>Use Task Scheduler</li>
  <li>Use <code class="language-plaintext highlighter-rouge">runas.exe</code> with the <code class="language-plaintext highlighter-rouge">/profile</code> argument</li>
  <li>Use <a href="https://docs.microsoft.com/en-us/sysinternals/downloads/psexec">psexec</a></li>
</ul>

<p>Personally I don’t like Task Scheduler as it can be problematic when it comes to starting tasks and cleaning them up once finished. Saying that, it is still a relatively simple way to run processes under a different account and achieves similar results to using <code class="language-plaintext highlighter-rouge">psexec</code>. If you still want to use Task Scheduler, there are 3 main tools that you can use;</p>

<ul>
  <li><code class="language-plaintext highlighter-rouge">schtasks.exe</code> – Use this only if you aren’t running in PowerShell</li>
  <li>PowerShell Scheduled Tasks cmdlets like <code class="language-plaintext highlighter-rouge">New-ScheduledTaskAction</code> – useful as a quick and easy way to build and execute tasks in PowerShell</li>
  <li><a href="https://msdn.microsoft.com/en-us/library/windows/desktop/aa383607.aspx">Task Scheduler Scripting</a> COM objects – gives you finer control over Scheduled Tasks and execution</li>
</ul>

<p>Using <code class="language-plaintext highlighter-rouge">runas.exe /profile</code> is a quick and easy way to run a process as another user account with an <code class="language-plaintext highlighter-rouge">Interactive</code> logon as it is a builtin tool that comes with Windows. The trouble will be passing in the password in the command, there is no <code class="language-plaintext highlighter-rouge">/pass:password</code> argument and the value must be sent in the stdin of the spawned process. PsExec is easier still as you specify the password as an argument as well as run the process as <code class="language-plaintext highlighter-rouge">NT AUTHORITY\SYSTEM</code>. The only trouble is that the program is not included with Windows and needs to be downloaded separately.</p>

<p>Unfortunately most of these options make it harder to read the output and return codes of processes as they run in a separate shell. You will have to implement some shell pipes to redirect the <code class="language-plaintext highlighter-rouge">stdout</code> and <code class="language-plaintext highlighter-rouge">stderr</code> to some local files in order to save the output.</p>

<p>As I am an Ansible user, I’ve been coming across these issues repeatedly as Ansible uses WinRM as the transport mechanism. I first decided to implement a Python library that added support for CredSSP support with Ansible and that solved the issues I had at then. Over time, I’ve come across more things where CredSSP was just not enough and I was not able to run certain processes through Ansible without resorting to the hacks above. Ansible’s solution to this is to use their become <code class="language-plaintext highlighter-rouge">runas</code> implementation which handles all the logon processes internally. Not only does <code class="language-plaintext highlighter-rouge">become</code> allow me to run a process as a different user, but for Windows, it allows me to escape the <code class="language-plaintext highlighter-rouge">Network</code> logon hell.</p>

<p>For example, I can upgrade PowerShell with Chocolatey using the <code class="language-plaintext highlighter-rouge">win_chocolatey</code> module like so</p>

<div class="language-plaintext highlighter-rouge"><div class="highlight"><pre class="highlight"><code>---
- name: upgrade PowerShell to v5
  hosts: windows
  tasks:
  - name: upgrade PowerShell
    win_chocolatey:
      name: powershell
      state: latest
    become: yes
    become_user: SYSTEM
    become_method: runas
</code></pre></div></div>

<p>Without <code class="language-plaintext highlighter-rouge">become</code> this would fail due to the Chocolatey process being under a <code class="language-plaintext highlighter-rouge">Network</code> logon and the PowerShell install failing due to the logon type. In the past I would have had to fall back to using a scheduled task and a custom script to execute the command but in this process I loose out on the idempotency and simplicity of an Ansible module.</p>

<p>One other great feature with Ansible 2.5 is that you are able to use become to set network credentials like you would with the <code class="language-plaintext highlighter-rouge">New Credentials</code> logon type. This is extremely useful if I am running on a Windows host that is not part of a domain network but I needed to authenticate with a domain account. I would achieve this with</p>

<div class="language-plaintext highlighter-rouge"><div class="highlight"><pre class="highlight"><code>---
- name: install program from domain share
  hosts:
  tasks:
  - name: copy the executable to a local path
    win_copy:
      src: \\192.168.1.10\programs\program.msi
      dest: C:\temp\program.msi
    become: yes
    become_method: runas
    become_flags: logon_type=new_credentials logon_flags=netcredentials_only
    vars:
      ansible_become_user: DOMAIN\username
      ansible_become_pass: Password01

  - name: install program
    win_package:
      path: C:\temp\program.msi
      state: present
</code></pre></div></div>

<p>More information on Become in Ansible can be found <a href="http://docs.ansible.com/ansible/devel/become.html">here</a>.</p>

<h2 id="speed-of-winrm">Speed of WinRM</h2>

<p>To put it simply, the WinRM protocol was not designed for speed, the protocol itself goes through multiple encoding processes and the numerous network packets required to setup a shell and run a command slow this down considerably. While the speed isn’t abysmally slow and is tolerable, one area where WinRM really does falter is the copy speed. There is no native file transfer implementation within WinRM which means that most implementations copy files across the protocol by;</p>

<ul>
  <li>Encoding the source file in Base64 to get an ASCII output</li>
  <li>Execute a command on the Windows host to create a blank file locally</li>
  <li>Send the Base64 string along the stdin of the WinRM pipe in small chunks</li>
  <li>The process will read the stdin, decode the Base64 string and append the bytes to the file</li>
</ul>

<p>This is slow as the packet size for WinRM is a lot smaller than other implementations like SFTP so it requires more round trips. The other issue is that Base64 encoding takes time to complete and each stdin packer is then serialized in an XML packet which takes up more processing time.</p>

<p>Ultimately there is not much that can be done to fix this with WinRM as it is a limitation of the protocol itself. Moving towards using SSH and SFTP would improve this scenario a lot more but currently Microsoft’s SSH implementation is still in beta.</p>

<h1 id="authentication">Authentication</h1>

<p>Authentication in WinRM is a major part of the protocol and can have a big impact on how the process will run once it starts. You can use the following protocols to authenticate the user with WinRM;</p>

<ul>
  <li>Basic</li>
  <li>Certificate</li>
  <li>Negotiate (Covers both NTLM and Kerberos but in this article will refer to NTLM)</li>
  <li>Kerberos</li>
  <li>CredSSP</li>
</ul>

<p>If you want to find out what options are currently enabled or disabled for a WinRM service on a Windows host, run <code class="language-plaintext highlighter-rouge">winrm get winrm/config/service/auth</code> on the host.</p>

<p><a href="/assets/images/2018/01/Screen-Shot-2018-01-22-at-4.34.52-pm.png"><img src="/assets/images/2018/01/Screen-Shot-2018-01-22-at-4.34.52-pm.png" alt="" /></a></p>

<p><em>On this server Basic, Kerberos, Negotiate and CredSSP auth has been enabled</em></p>

<p>By default both <code class="language-plaintext highlighter-rouge">Negotiate</code> and <code class="language-plaintext highlighter-rouge">Kerberos</code> are enabled for an active WinRM service and between the 2, can be used for both local and domain accounts. Here is a brief map of the options and some of the differences between them;</p>

<table>
  <thead>
    <tr>
      <th>Auth</th>
      <th>Local Accounts</th>
      <th>Domain Accounts</th>
      <th>Credential Delegation</th>
      <th>Message Encryption</th>
      <th>Logon Type</th>
    </tr>
  </thead>
  <tbody>
    <tr>
      <td>Basic</td>
      <td>Yes</td>
      <td>No</td>
      <td>No</td>
      <td>No</td>
      <td>Network</td>
    </tr>
    <tr>
      <td>Certificate</td>
      <td>Yes</td>
      <td>No</td>
      <td>No</td>
      <td>No</td>
      <td>Network</td>
    </tr>
    <tr>
      <td>Negotiate</td>
      <td>Yes</td>
      <td>Yes</td>
      <td>No</td>
      <td>Yes</td>
      <td>Network</td>
    </tr>
    <tr>
      <td>Kerberos</td>
      <td>No</td>
      <td>Yes</td>
      <td>Yes (set explicitly)</td>
      <td>Yes</td>
      <td>Network</td>
    </tr>
    <tr>
      <td>CredSSP</td>
      <td>Yes</td>
      <td>Yes</td>
      <td>Yes (always)</td>
      <td>Yes</td>
      <td>Network Cleartext</td>
    </tr>
  </tbody>
</table>

<p>Here are what each of the columns mean;</p>

<ul>
  <li><code class="language-plaintext highlighter-rouge">Local Accounts</code>: Whether the auth type can be used to authenticate as a local account</li>
  <li><code class="language-plaintext highlighter-rouge">Domain Accounts</code>: Whether the auth type can be used to authenticate as a domain account</li>
  <li><code class="language-plaintext highlighter-rouge">Credential Delegation</code>: Whether the credentials used in the authentication can be delegated to another server, like an SMB share</li>
  <li><code class="language-plaintext highlighter-rouge">Message Encryption</code>: When not running on a HTTPS endpoint, whether the auth type can encrypt the payload using a provider specific protocol</li>
  <li><code class="language-plaintext highlighter-rouge">Logon Type</code>: The type of logon that was used in the logon process, see the <code class="language-plaintext highlighter-rouge">Restrictions</code> section for more info</li>
</ul>

<p>As WinRM is run over the HTTP protocol, the authentication process is done through HTTP headers, in specific the <code class="language-plaintext highlighter-rouge">WWW-Authenticate</code> and <code class="language-plaintext highlighter-rouge">Authorization</code> headers. Depending on the auth type chosen, this can either occur in just one message or as a result of a series of challenge/response messages sent by the client to the server.</p>

<h2 id="basic-auth">Basic Auth</h2>

<p>Basic authentication is pretty much what the name describes, it is a very simplistic method used to encode a credential over a HTTP request. It encodes the username and password for the account with Base64 encoding and sets that to the HTTP headers of the request. For example;</p>

<p><code class="language-plaintext highlighter-rouge">username:password</code></p>

<p>would become</p>

<p><code class="language-plaintext highlighter-rouge">dXNlcm5hbWU6cGFzc3dvcmQ=</code></p>

<p>This seems simple enough, but unfortunately its simplicity is its downfall. Anybody would be able to decode these credentials and be able to see the plaintext username and password. This can be mitigated by sending the requests over HTTPS as the headers are encrypted using the cipher negotiated in the TLS connection. Using pywinrm and Wireshark, here is an example request that is sent to the WinRM service</p>

<p><a href="/assets/images/2018/01/Screen-Shot-2018-01-22-at-5.14.36-pm.png"><img src="/assets/images/2018/01/Screen-Shot-2018-01-22-at-5.14.36-pm.png" alt="" /></a></p>

<p><em>I’ll let you see how easy it is to find my password from this capture</em></p>

<p>Ultimately, the only advantage I see with Basic auth is that it only requires a single HTTP request and so would be one of the fastest options when network latency is an issue. In my opinion, the security concerns and lack of extra functionality like message encryption largely outweighs this positive. My recommendation is to avoid using Basic auth wherever possible and if it is needed, always run it with a HTTPS endpoint!</p>

<p>More details can be found in the <a href="https://tools.ietf.org/html/rfc7617">RFC 7617</a> standard for Basic auth.</p>

<h2 id="certificate-auth">Certificate Auth</h2>

<p>Let me just quickly sum this up in one sentence, Certificate auth is really fun to use…. not!</p>

<p>The name may give you false hopes that you can use SSH keys and just create an <code class="language-plaintext highlighter-rouge">authorized_keys</code> file with a list of authorized keys for a user but unfortunately this is not the case. Certificate auth for WinRM is the use of TLS with Client Authentication which uses X509 certificates as part of the TLS handshake process to authenticate a user.</p>

<p>Here is a basic flow of what the TLS process looks like with client authentication</p>

<p><a href="/assets/images/2018/01/TLS-Mutual-Auth.png"><img src="/assets/images/2018/01/TLS-Mutual-Auth.png" alt="" /></a></p>

<p>Now the hard part is actually generating and mapping these certificates to a local user account. As my usual test bed is focused around Ansible and the pywinrm library, I have not tested the examples with the PowerShell native client and have heard that some of these steps may be incompatible. Unfortunately the lack of documentation makes this very hard to get right and I may revisit this at some point in the future.</p>

<p>This is the high level process that you would need to follow to successfully set up certificate authentication;</p>

<ol>
  <li>Enable Certificate auth for the WinRM service: <code class="language-plaintext highlighter-rouge">Set-Item -Path WSMan:\localhost\Service\Auth\Certificate -Value $true</code></li>
  <li>Generate key and certificate using OpenSSL</li>
  <li>Copy the certificate key to the Windows host</li>
  <li>Import the certificate to the <code class="language-plaintext highlighter-rouge">Trusted People</code> and <code class="language-plaintext highlighter-rouge">Trusted Root Certificate Authorities</code> store</li>
  <li>Map the certificate to the local account</li>
</ol>

<p>To generate a certificate with OpenSSL, run the following;</p>

<div class="language-bash highlighter-rouge"><div class="highlight"><pre class="highlight"><code><span class="c"># set this variable to the value of the username the cert will map to</span>
<span class="nv">USERNAME</span><span class="o">=</span><span class="s2">"username"</span>

<span class="nb">cat</span> <span class="o">&gt;</span> openssl.conf <span class="o">&lt;&lt;</span> <span class="no">EOL</span><span class="sh">
distinguished_name = req_distinguished_name
[req_distinguished_name]
[v3_req_client]
extendedKeyUsage = clientAuth
subjectAltName = otherName:1.3.6.1.4.1.311.20.2.3;UTF8:</span><span class="nv">$USERNAME</span><span class="sh">@localhost
</span><span class="no">EOL

</span><span class="nb">export </span><span class="nv">OPENSSL_CONF</span><span class="o">=</span>openssl.conf
openssl req <span class="nt">-x509</span> <span class="nt">-nodes</span> <span class="nt">-days</span> 3650 <span class="nt">-newkey</span> rsa:2048 <span class="nt">-out</span> cert.pem <span class="nt">-outform</span> PEM <span class="nt">-keyout</span> cert_key.pem <span class="nt">-subj</span> <span class="s2">"/CN=</span><span class="nv">$USERNAME</span><span class="s2">"</span> <span class="nt">-extensions</span> v3_req_client
<span class="nb">unset </span>OPENSSL_CONF
<span class="nb">rm </span>openssl.conf
</code></pre></div></div>

<p>Once copied to the Windows server, run the following to import and map the certificate;</p>

<div class="language-powershell highlighter-rouge"><div class="highlight"><pre class="highlight"><code><span class="bp">$Error</span><span class="n">ActionPreference</span><span class="w"> </span><span class="o">=</span><span class="w"> </span><span class="s2">"Stop"</span><span class="w">

</span><span class="c"># set the username and password for the local account to map here</span><span class="w">
</span><span class="nv">$username</span><span class="w"> </span><span class="o">=</span><span class="w"> </span><span class="s2">"username"</span><span class="w">
</span><span class="nv">$password</span><span class="w"> </span><span class="o">=</span><span class="w"> </span><span class="s2">"password"</span><span class="w">
</span><span class="nv">$password</span><span class="w"> </span><span class="o">=</span><span class="w"> </span><span class="n">ConvertTo-SecureString</span><span class="w"> </span><span class="nt">-String</span><span class="w"> </span><span class="nv">$password</span><span class="w"> </span><span class="nt">-AsPlainText</span><span class="w"> </span><span class="nt">-Force</span><span class="w">
</span><span class="nv">$credential</span><span class="w"> </span><span class="o">=</span><span class="w"> </span><span class="n">New-Object</span><span class="w"> </span><span class="nt">-TypeName</span><span class="w"> </span><span class="nx">System.Management.Automation.PSCredential</span><span class="w"> </span><span class="nt">-ArgumentList</span><span class="w"> </span><span class="nv">$username</span><span class="p">,</span><span class="w"> </span><span class="nv">$password</span><span class="w">

</span><span class="nv">$cert</span><span class="w"> </span><span class="o">=</span><span class="w"> </span><span class="n">New-Object</span><span class="w"> </span><span class="nt">-TypeName</span><span class="w"> </span><span class="nx">System.Security.Cryptography.X509Certificates.X509Certificate2</span><span class="w">
</span><span class="nv">$cert</span><span class="o">.</span><span class="nf">Import</span><span class="p">(</span><span class="s2">"cert.pem"</span><span class="p">)</span><span class="w">

</span><span class="nv">$store_name</span><span class="w"> </span><span class="o">=</span><span class="w"> </span><span class="p">[</span><span class="n">System.Security.Cryptography.X509Certificates.StoreName</span><span class="p">]::</span><span class="n">Root</span><span class="w">
</span><span class="nv">$store_location</span><span class="w"> </span><span class="o">=</span><span class="w"> </span><span class="p">[</span><span class="n">System.Security.Cryptography.X509Certificates.StoreLocation</span><span class="p">]::</span><span class="n">LocalMachine</span><span class="w">
</span><span class="nv">$store</span><span class="w"> </span><span class="o">=</span><span class="w"> </span><span class="n">New-Object</span><span class="w"> </span><span class="nt">-TypeName</span><span class="w"> </span><span class="nx">System.Security.Cryptography.X509Certificates.X509Store</span><span class="w"> </span><span class="nt">-ArgumentList</span><span class="w"> </span><span class="nv">$store_name</span><span class="p">,</span><span class="w"> </span><span class="nv">$store_location</span><span class="w">
</span><span class="nv">$store</span><span class="o">.</span><span class="nf">Open</span><span class="p">(</span><span class="s2">"MaxAllowed"</span><span class="p">)</span><span class="w">
</span><span class="nv">$store</span><span class="o">.</span><span class="nf">Add</span><span class="p">(</span><span class="nv">$cert</span><span class="p">)</span><span class="w">
</span><span class="nv">$store</span><span class="o">.</span><span class="nf">Close</span><span class="p">()</span><span class="w">

</span><span class="nv">$store_name</span><span class="w"> </span><span class="o">=</span><span class="w"> </span><span class="p">[</span><span class="n">System.Security.Cryptography.X509Certificates.StoreName</span><span class="p">]::</span><span class="n">TrustedPeople</span><span class="w">
</span><span class="nv">$store_location</span><span class="w"> </span><span class="o">=</span><span class="w"> </span><span class="p">[</span><span class="n">System.Security.Cryptography.X509Certificates.StoreLocation</span><span class="p">]::</span><span class="n">LocalMachine</span><span class="w">
</span><span class="nv">$store</span><span class="w"> </span><span class="o">=</span><span class="w"> </span><span class="n">New-Object</span><span class="w"> </span><span class="nt">-TypeName</span><span class="w"> </span><span class="nx">System.Security.Cryptography.X509Certificates.X509Store</span><span class="w"> </span><span class="nt">-ArgumentList</span><span class="w"> </span><span class="nv">$store_name</span><span class="p">,</span><span class="w"> </span><span class="nv">$store_location</span><span class="w">
</span><span class="nv">$store</span><span class="o">.</span><span class="nf">Open</span><span class="p">(</span><span class="s2">"MaxAllowed"</span><span class="p">)</span><span class="w">
</span><span class="nv">$store</span><span class="o">.</span><span class="nf">Add</span><span class="p">(</span><span class="nv">$cert</span><span class="p">)</span><span class="w">
</span><span class="nv">$store</span><span class="o">.</span><span class="nf">Close</span><span class="p">()</span><span class="w">

</span><span class="nv">$thumbprint</span><span class="w"> </span><span class="o">=</span><span class="w"> </span><span class="nv">$cert</span><span class="o">.</span><span class="nf">Thumbprint</span><span class="w">

</span><span class="n">New-Item</span><span class="w"> </span><span class="nt">-Path</span><span class="w"> </span><span class="nx">WSMan:\localhost\ClientCertificate</span><span class="w"> </span><span class="se">`
</span><span class="w">    </span><span class="nt">-Subject</span><span class="w"> </span><span class="s2">"</span><span class="nv">$username</span><span class="s2">@localhost"</span><span class="w"> </span><span class="se">`
</span><span class="w">    </span><span class="nt">-URI</span><span class="w"> </span><span class="o">*</span><span class="w"> </span><span class="se">`
</span><span class="w">    </span><span class="nt">-Issuer</span><span class="w"> </span><span class="nv">$thumbprint</span><span class="w"> </span><span class="se">`
</span><span class="w">    </span><span class="nt">-Credential</span><span class="w"> </span><span class="nv">$credential</span><span class="w"> </span><span class="se">`
</span><span class="w">    </span><span class="nt">-Force</span><span class="w">
</span></code></pre></div></div>

<p>If everything goes to plan, you can now authenticate with certificate auth, both the certificate and private key must be accessible by the process running the WinRM command. For Ansible or pywinrm, this is easy as OpenSSL has already exported the key and cert as separate files.</p>

<p>I have heard on the grape vine that you can set up certificates using AD CS (Active Directory Certificate Services) and GPO to issue those certs to servers and map them to user accounts. This would make the implementation on servers quite simple and painless once AD CS and GPO part has been set up. Unfortunately there is little documentation around this that I can find and I have yet to try it. I may create another blog post one day to go through this process in greater detail but for now I can’t give you any examples.</p>

<h2 id="negotiate-auth">Negotiate Auth</h2>

<p>Negotiate auth is not a specific auth protocol but rather a Microsoft provider that is used to “negotiate” a protocol to use based on the input. Currently it can be used to select either <code class="language-plaintext highlighter-rouge">NTLM</code> or <code class="language-plaintext highlighter-rouge">Kerberos</code> in the authentication process depending on the environment and server requirements. This is usually all transparent to the end user when using Microsoft tools but some third party tools, like Ansible or pywinrm, it is explicitly split between <code class="language-plaintext highlighter-rouge">NTLM</code> and <code class="language-plaintext highlighter-rouge">Kerberos</code>. For the sake of this section I’ll talk about <code class="language-plaintext highlighter-rouge">NTLM</code> authentication as that is what people sometimes refer to when mentioning Negotiate.</p>

<p>NTLM is an older security protocol that has evolved over time from the old LAN Manager days and Microsoft recommends that Kerberos is used instead in modern environments. Unlike <code class="language-plaintext highlighter-rouge">Basic</code> auth, the password is a hash and not just an encoded form. The strength of this hash is dependent on the version of NTLM that is being used, currently these are the main 3 permutations;</p>

<ul>
  <li>NTLMv1</li>
  <li>NTLMv1 with Extended Session Security (otherwise referred to as NTLM2)</li>
  <li>NTLMv2</li>
</ul>

<p>If you are still using NTLM, please make sure NTLMv2 is in use as it is relatively easy to crack NTLM hashes and using NTLMv2 helps to avoid some of the existing exploits. One other issue with NTLM is that the strength of the session key and encryption process is based on the 128-bit RC4 cipher which is mostly considered broken these days. This means that message encryption used by WinRM can technically be cracked and the plaintext of the messages can be decrypted through some difficulty.</p>

<p>Microsoft’s stance on NTLM is to use Kerberos if available and fall back to NTLM if it is required. Unfortunately due to the nature of Kerberos, this can be a common occurrence and NTLM can’t be fully avoided in some scenarios. When using NTLM I would recommend that you;</p>

<ul>
  <li>Make sure your password is of a decent length</li>
  <li>When on a Microsoft environment, ensure <a href="https://technet.microsoft.com/en-us/library/cc960646.aspx">LmCompatibilityLevel</a> is set to <code class="language-plaintext highlighter-rouge">3</code> for the client</li>
  <li>When not on a Microsoft environment, ensure the library that is generating the NTLM hashes supports NTLMv2</li>
  <li>Run over HTTPS which encrypts the messages with a stronger cipher suite than what NTLM can do (AES is considered secured compared to RC4)</li>
</ul>

<h2 id="kerberos-auth">Kerberos Auth</h2>

<p>Kerberos authentication is the best option to use when in a domain environment. It is based on the MIT Kerberos v5 protocol and is mostly interchangeable with the GSSAPI implementations on most Unix systems. Kerberos is a good choice in most circumstances as;</p>

<ul>
  <li>The encryption mechanism can use strong ciphers like AES</li>
  <li>The password is not sent to the server, only a short lived token is sent</li>
  <li>Kerberos supports mutual authentication by default</li>
  <li>Kerberos usually send just 1 request to commplete the auth process</li>
  <li>Kerberos can support credential delegation allowing the spawned process to access network resources</li>
</ul>

<p>While it is technically used under the <code class="language-plaintext highlighter-rouge">Negotiate</code> auth provider, it can be explicitly used to ensure the process does not fall back to NTLM if it fails. Unfortunately the Achilles heel of Kerberos is that it requires a specific setup to work properly, you would need to have the following setup;</p>

<ul>
  <li>A domain environment, Kerberos does not work with local account</li>
  <li>DNS is required, IP addresses cannot be used</li>
  <li>The client is configured to talk to the same realm/domain as the server so that is can acquire Kerberos tickets</li>
</ul>

<p>When on a Microsoft operating system, the client setup is as simple as joining the workstation to the domain but for non Microsoft operating systems it requires some system packages to be installed and then configured. The packages that need to be installed differ based on the distribution that is being used but these are the ones for Debian and RedHat based Distros;</p>

<div class="language-bash highlighter-rouge"><div class="highlight"><pre class="highlight"><code><span class="c"># Debian/Ubuntu</span>
<span class="nb">sudo </span>apt-get <span class="nb">install </span>gcc python-dev libkrb5-dev

<span class="c"># Centos/RHEL</span>
<span class="nb">sudo </span>yum <span class="nb">install </span>gcc python-devel krb5-devel krb5-workstation python-devel

<span class="c"># Fedora</span>
<span class="nb">sudo </span>dnf <span class="nb">install </span>gcc python-devel krb5-devel krb5-workstation python-devel
</code></pre></div></div>

<p>Once installed, the client Kerberos configuration is set through the file <code class="language-plaintext highlighter-rouge">/etc/krb5.conf</code>. The the example below configured the server to understand the realm <code class="language-plaintext highlighter-rouge">DOMAIN.LOCAL</code> and configure the KDC (domain controller) to be <code class="language-plaintext highlighter-rouge">dc01.domain.local</code>.</p>

<div class="language-plaintext highlighter-rouge"><div class="highlight"><pre class="highlight"><code>[libdefaults]
    default_realm = DOMAIN.LOCAL

[realms]
    DOMAIN.LOCAL = {
      kdc = dc01.domain.local
      admin_server = dc01.domain.local
    }

[domain_realm]
.domain.local = DOMAIN.LOCAL
</code></pre></div></div>

<p>While this is default configuration, there are more options that can be set to control things like the ciphers that are allowed to be used for encryption and so on. Once configured, you can run <code class="language-plaintext highlighter-rouge">kinit user@realm.com</code> to get a Kerberos ticket for a particular domain account. This ticket is then used in the authentication process with the service meaning that that user’s password is never sent in the authentication process.</p>

<h2 id="credssp-auth">CredSSP Auth</h2>

<p>CredSSP (Credential Security Support Provider) is a Microsoft protocol that is designed to pass the user’s credentials to a server in a secure way. This is unlike most other authentication protocols, as the username and password is provided to the logon process itself (Basic sends the encoded credentials but they are not available to the logon process). Because of this, a process that was created with CredSSP authentication is able to connect to a network with it’s credentials.</p>

<p>Summed up the basic process flow for CredSSP is;</p>

<ul>
  <li>The initial response returns a HTTP 401 error with <code class="language-plaintext highlighter-rouge">CredSSP</code> in the <code class="language-plaintext highlighter-rouge">WWW-Authenticate</code> header</li>
  <li>The client sets up a TLS connection and starts the TLS Handshake which includes things like cipher suite negotiation</li>
  <li>Once the handshake is complete, the client will send either an NTLM or Kerberos token to authenticate the user</li>
  <li>After authenticating the user, the client will encrypt the server’s CredSSP public key with the authentication wrap function and send that to the server</li>
  <li>The server validates that the correct public key was used and there is no middle man in between the client and the server</li>
  <li>The server then sends it’s public key again with the first bit set to 1 also encrypted with the authentication wrap function</li>
  <li>The client will verify the public key and verify the first bit was set to 1</li>
  <li>Once both the client and server have verified each other, the client will then encrypt the username and password with the authentication wrap function and send that to the server</li>
</ul>

<p>Here is Microsoft’s diagram of the process flow</p>

<p><a href="/assets/images/2018/01/IC869577.png"><img src="/assets/images/2018/01/IC869577.png" alt="" /></a></p>

<p><em>Source: https://msdn.microsoft.com/en-us/library/cc226794.aspx</em></p>

<p>Except for the initial TLS handshake, all messages sent to and from the client are encrypted with the TLS protocol and messages that contain more sensitive info are doubly encrypted with the authentication wrap function as well.</p>

<p>As I spoke about in the logon type section, CredSSP is different from the other authentication protocols as the logon type spawned from CredSSP auth is <code class="language-plaintext highlighter-rouge">Network Cleartext</code>. This is what enables the process to access a network resource or protected internal resource like DPAPI work under CredSSP and fail on most other auth protocols.</p>

<p>Unfortunately CredSSP does have its downsides as there are numerous requests that are required to set up the authentication process compared to Kerberos or even NTLM which has 1 or 3 requests respectively. It also is not fully supported by third party libraries due to the complexity of the protocol but there are cases where there is third party integration.</p>

<p>Ultimately I believe it is an ok auth to use if Kerberos is not available in your environment and credential delegation is needed but the user should understand the implications that CredSSP creates before moving ahead.</p>

<h1 id="authorization">Authorization</h1>

<p>Once the user has been authenticated, the authorization process will occur and checks whether the user is authorized to access the endpoint it is connecting to. By default, all members of the local Administrators group is able to connect on the WinRM endpoint, while <code class="language-plaintext highlighter-rouge">PSRP</code> is accessibly by both the local administrators and the <code class="language-plaintext highlighter-rouge">BUILTIN\Remote Management Users</code> group.</p>

<p>This gets somewhat confusing as some people are under the assumption that if you are a member of the <code class="language-plaintext highlighter-rouge">Remote Management Users</code> you automatically have the rights to run commands over WinRM. This is only the case for PowerShell Remoting, e.g. <code class="language-plaintext highlighter-rouge">Invoke-Command</code>, <code class="language-plaintext highlighter-rouge">Enter-PSSession</code> and not for commands run with <code class="language-plaintext highlighter-rouge">winrs</code> or most third party tools like Ansible.</p>

<p>The base WinRM process gets its rights from the permission set on the default root SDDL for WinRM, this can be modified by running</p>

<p><code class="language-plaintext highlighter-rouge">winrm configSDDL default</code></p>

<p>The command will open up a security permissions window like the below</p>

<p><a href="/assets/images/2018/01/Screen-Shot-2018-01-24-at-9.23.28-am.png"><img src="/assets/images/2018/01/Screen-Shot-2018-01-24-at-9.23.28-am.png" alt="" /></a></p>

<p><em>Default permissions on WinRM</em></p>

<p>As you can see, the <code class="language-plaintext highlighter-rouge">Administrators</code> group has full control over the endpoint, and to allow a non administrator to connect, they would need the <code class="language-plaintext highlighter-rouge">Read</code> and <code class="language-plaintext highlighter-rouge">Execute</code> rights. This can also be set programmatically but it can get a bit complex due to how Microsoft deals with Security Objects. When viewing the permissions, they are usually expressed in the SDDL form which is a “human readable” string of the Security Object. To get the SDDL of the WinRM endpoint, you can run <code class="language-plaintext highlighter-rouge">(Get-Item -Path WSMan:\localhost\Service\RootSDDL).Value</code> in PowerShell. The default SDDL for WinRM is;</p>

<p><code class="language-plaintext highlighter-rouge">O:NSG:BAD:P(A;;GA;;;BA)(A;;GR;;;IU)S:P(AU;FA;GA;;;WD)(AU;SA;GXGW;;;WD)</code></p>

<p>When I added a single user Read and Execute rights, it changes to;</p>

<p><code class="language-plaintext highlighter-rouge">O:NSG:BAD:P(A;;GA;;;BA)(A;;GR;;;IU)(A;;GXGR;;;S-1-5-21-4043990918-2312884405-1850620780-1003)S:P(AU;FA;GA;;;WD)(AU;SA;GXGW;;;WD)</code></p>

<p>Breaking down the string, an SDDL is comprised of the following</p>

<ul>
  <li>Owner <code class="language-plaintext highlighter-rouge">O</code></li>
  <li>Group <code class="language-plaintext highlighter-rouge">G</code></li>
  <li>DACL entries <code class="language-plaintext highlighter-rouge">D</code></li>
  <li>SACL entries <code class="language-plaintext highlighter-rouge">S</code></li>
</ul>

<p>Let’s break down the SDDL for the modified WinRM entry into each group</p>

<div class="language-plaintext highlighter-rouge"><div class="highlight"><pre class="highlight"><code>Owner: O:NS
Group: G:BA
DACL: D:P(A;;GA;;;BA)(A;;GR;;;IU)(A;;GXGR;;;S-1-5-21-4043990918-2312884405-1850620780-1003)
SACL: S:P(AU;FA;GA;;;WD)(AU;SA;GXGW;;;WD)
</code></pre></div></div>

<p>Right off the bat, we can see that the owner is <code class="language-plaintext highlighter-rouge">NS</code> which represents the <code class="language-plaintext highlighter-rouge">Network Service</code> SID and the primary group is <code class="language-plaintext highlighter-rouge">BA</code> which represents the <code class="language-plaintext highlighter-rouge">BUILTIN\Administrators</code> SID. The DACL has 3 protected entries as designated by the <code class="language-plaintext highlighter-rouge">P</code>;</p>

<ul>
  <li><code class="language-plaintext highlighter-rouge">(A;;GA;;;BA)</code></li>
  <li><code class="language-plaintext highlighter-rouge">(A;;GR;;;IU)</code></li>
  <li><code class="language-plaintext highlighter-rouge">(A;;GXGR;;;S-1-5-21-4043990918-2312884405-1850620780-1003)</code></li>
</ul>

<p>Each of the entries follow the format <code class="language-plaintext highlighter-rouge">ace_type;ace_flags;rights;object_guid;inherit_object_guid;account_sid;(resource_attribute)</code> where <code class="language-plaintext highlighter-rouge">resource_attribute</code> is an optional field. Splitting up each of the entries we can see what each entry represents</p>

<div class="language-plaintext highlighter-rouge"><div class="highlight"><pre class="highlight"><code>(A;;GA;;;BA)
Type: A = Allow
Flags: none
Rights: GA = Generic All (Full Control)
Object Guid: None
Inherit Object Guid: None
Sid: BA = BUILTIN\Administrators

(A;;GR;;;IU)
Type: A = Allow
Flags: none
Rights: GR = Generic Read
Object Guid: None
Inherit Object Guid: None
Sid: IU = Interactive Users

(A;;GXGR;;;S-1-5-21-4043990918-2312884405-1850620780-1003)
Type: A = Allow
Flags: none
Rights: GXGR = Generic Execute and Generic Read
Object Guid: None
Inherit Object Guid: None
Sid: S-1-5-21-4043990918-2312884405-1850620780-1003 = The SID for the "user" account
</code></pre></div></div>

<p>The same applies to the SACL entries but I won’t go into them as they define the auditing rules and not access rules that this is about.</p>

<p>While it is straightforward to manipulate the permissions when you are able to use a GUI, there are definitely cases where doing this under a script is preferable. You can always just manually manipulate the string but this would be a headache inducing process and luckily there is a better way. Using PowerShell and .NET 4.5, you can import the SDDL to a <code class="language-plaintext highlighter-rouge">CommonSecurityDescriptor</code> object and manipulate it from there in a more programmatic fashion.</p>

<p>Here is an example of taking in the existing security object and adding the user read and execute rights, note this would not be idempotent and more checks are required to ensure the ACE is not already there;</p>

<div class="language-powershell highlighter-rouge"><div class="highlight"><pre class="highlight"><code><span class="nv">$GENERIC_READ</span><span class="w"> </span><span class="o">=</span><span class="w"> </span><span class="mi">0</span><span class="n">x80000000</span><span class="w">
</span><span class="nv">$GENERIC_WRITE</span><span class="w"> </span><span class="o">=</span><span class="w"> </span><span class="mi">0</span><span class="n">x40000000</span><span class="w">
</span><span class="nv">$GENERIC_EXECUTE</span><span class="w"> </span><span class="o">=</span><span class="w"> </span><span class="mi">0</span><span class="n">x20000000</span><span class="w">
</span><span class="nv">$GENERIC_ALL</span><span class="w"> </span><span class="o">=</span><span class="w"> </span><span class="mi">0</span><span class="n">x10000000</span><span class="w">

</span><span class="c"># get SID of user/group to add</span><span class="w">
</span><span class="nv">$user</span><span class="w"> </span><span class="o">=</span><span class="w"> </span><span class="s2">"user"</span><span class="w">
</span><span class="nv">$user_sid</span><span class="w"> </span><span class="o">=</span><span class="w"> </span><span class="p">(</span><span class="n">New-Object</span><span class="w"> </span><span class="nt">-TypeName</span><span class="w"> </span><span class="nx">System.Security.Principal.NTAccount</span><span class="w"> </span><span class="nt">-ArgumentList</span><span class="w"> </span><span class="nv">$user</span><span class="p">)</span><span class="o">.</span><span class="nf">Translate</span><span class="p">([</span><span class="n">System.Security.Principal.SecurityIdentifier</span><span class="p">])</span><span class="w">

</span><span class="c"># get the existing SDDL of the WinRM listener</span><span class="w">
</span><span class="nv">$sddl</span><span class="w"> </span><span class="o">=</span><span class="w"> </span><span class="p">(</span><span class="n">Get-Item</span><span class="w"> </span><span class="nt">-Path</span><span class="w"> </span><span class="nx">WSMan:\localhost\Service\RootSDDL</span><span class="p">)</span><span class="o">.</span><span class="nf">Value</span><span class="w">

</span><span class="c"># convert the SDDL string to a SecurityDescriptor object</span><span class="w">
</span><span class="nv">$sd</span><span class="w"> </span><span class="o">=</span><span class="w"> </span><span class="n">New-Object</span><span class="w"> </span><span class="nt">-TypeName</span><span class="w"> </span><span class="nx">System.Security.AccessControl.CommonSecurityDescriptor</span><span class="w"> </span><span class="nt">-ArgumentList</span><span class="w"> </span><span class="bp">$false</span><span class="p">,</span><span class="w"> </span><span class="bp">$false</span><span class="p">,</span><span class="w"> </span><span class="nv">$sddl</span><span class="w">

</span><span class="c"># apply a new DACL to the SecurityDescriptor object</span><span class="w">
</span><span class="nv">$sd</span><span class="o">.</span><span class="nf">DiscretionaryAcl</span><span class="o">.</span><span class="nf">AddAccess</span><span class="p">(</span><span class="w">
    </span><span class="p">[</span><span class="n">System.Security.AccessControl.AccessControlType</span><span class="p">]::</span><span class="n">Allow</span><span class="p">,</span><span class="w">
    </span><span class="nv">$user_sid</span><span class="p">,</span><span class="w">
    </span><span class="p">(</span><span class="nv">$GENERIC_READ</span><span class="w"> </span><span class="o">-bor</span><span class="w"> </span><span class="nv">$GENERIC_EXECUTE</span><span class="p">),</span><span class="w">
    </span><span class="p">[</span><span class="n">System.Security.AccessControl.InheritanceFlags</span><span class="p">]::</span><span class="n">None</span><span class="p">,</span><span class="w">
    </span><span class="p">[</span><span class="n">System.Security.AccessControl.PropagationFlags</span><span class="p">]::</span><span class="n">None</span><span class="w">
</span><span class="p">)</span><span class="w">

</span><span class="c"># get the SDDL string from the changed SecurityDescriptor object</span><span class="w">
</span><span class="nv">$new_sddl</span><span class="w"> </span><span class="o">=</span><span class="w"> </span><span class="nv">$sd</span><span class="o">.</span><span class="nf">GetSddlForm</span><span class="p">([</span><span class="n">System.Security.AccessControl.AccessControlSections</span><span class="p">]::</span><span class="nx">All</span><span class="p">)</span><span class="w">

</span><span class="c"># apply the new SDDL to the WinRM listener</span><span class="w">
</span><span class="n">Set-Item</span><span class="w"> </span><span class="nt">-Path</span><span class="w"> </span><span class="nx">WSMan:\localhost\Service\RootSDDL</span><span class="w"> </span><span class="nt">-Value</span><span class="w"> </span><span class="nv">$new_sddl</span><span class="w"> </span><span class="nt">-Force</span><span class="w">
</span></code></pre></div></div>

<p>SDDL strings can get a lot more complex than this and you can learn more about SDDL string formats at <a href="https://msdn.microsoft.com/en-us/library/windows/desktop/aa379570(v=vs.85).aspx">Security Descriptor String Format</a>.</p>

<h1 id="the-future">The Future</h1>

<p>Looking to the future, I don’t see anything major changing with WinRM and we will still have some of the issues we see today around complex configuration and annoying restrictions. I do have some hope around Microsoft’s <a href="https://github.com/PowerShell/Win32-OpenSSH">Win32-OpenSSH</a> port as that solves the speed and some authentication complexity issues. Unfortunately the <code class="language-plaintext highlighter-rouge">Network</code> logon type problem is still an issue there as those restrictions are limitations set by Windows and isn’t just a WinRM thing.</p>

<p>It seems like Microsoft is starting to embrace some of the good standards that are in place in the Unix land which is great for everybody but let’s just hope they don’t lapse into their previous cycle of embrace, extend, extinguish like in the past.</p>]]></content><author><name>Jordan Borean</name></author><category term="ansible" /><category term="windows" /><category term="winrm" /><summary type="html"><![CDATA[One of the most common problems I come across today when it comes to remotely managing Windows is dealing with WinRM and its inconsistencies. I wanted to create a blog post that will help people understand what goes on with WinRM a bit more so that they can better use this resource on Windows. This …]]></summary></entry><entry><title type="html">Using Packer to create Windows images</title><link href="https://bloggingforlogging.com/2017/11/23/using-packer-to-create-windows-images/" rel="alternate" type="text/html" title="Using Packer to create Windows images" /><published>2017-11-23T22:30:15+00:00</published><updated>2017-11-23T22:30:15+00:00</updated><id>https://bloggingforlogging.com/2017/11/23/using-packer-to-create-windows-images</id><content type="html" xml:base="https://bloggingforlogging.com/2017/11/23/using-packer-to-create-windows-images/"><![CDATA[<p><img src="/assets/images/2017/10/packer-vagrant.png" alt="" /></p>

<p>As part of my role as a developer for Ansible on everything Windows, I have a need to test my code on a wide variety of Windows and PowerShell versions. I ended up having a setup of the following to cover my bases;</p>

<ul>
  <li>Windows Server 2008 64-bit (PowerShell 3.0)</li>
  <li>Windows Server 2008 R2 (PowerShell 3.0)</li>
  <li>Windows Server 2012 (PowerShell 3.0)</li>
  <li>Windows Server 2012 R2 (PowerShell 4.0)</li>
  <li>Windows Server 2016 (PowerShell 5.1)</li>
</ul>

<p>This allows me to test new modules and core functionality over all the supported PS versions (3.0-5.1) as well as test any OS specific components, the latter being quite troublesome.</p>

<p>As you can see this is quite a matrix of test hosts that I needed to manage and I ended up doing this myself. Creating and managing these images was an entirely manual process from start to finish and the end result was a collection of offline OVF files I had backed up online. Because this was a manual process I was repeatedly coming across the same issues such as;</p>

<ul>
  <li>Wasting hours manually installing Updates and rebooting the server when ready</li>
  <li>Forgetting the some important steps required in the image creation which required in more work when starting a VM from an image, e.g. not installing the WMF 3.0 hotfix</li>
  <li>Older Windows versions were limited with what commands I could run to shrink the base image size and I kept on forgetting what the rules were</li>
  <li>I still had to manually run sysprep after restoring an image to clear the system configuration info and then create the new WinRM listeners</li>
  <li>I could not really share the work that I did with others very easily</li>
</ul>

<p>Because of the effort involved I ended up having a collection of images which were over 6 months old and everytime I created a new VM with them, I would spend some time getting the new VM’s up to date or manually fixing things I missed in the image creation. I could have solved this by just creating a new set of images or trying to update the existing ones, but this was not a fun process so I kept on putting it off.</p>

<p>In the end what I decided that manually maintaining images would be too time consuming and I decided to find another solution. I could either find an existing set of images online and reuse those or I could automate the entire process from start to finish myself and just run that script every few months or so. There were some existing repo’s online I could use and just fork to cover what I required, the closest I could find was Matt Wrock’s <a href="https://github.com/mwrock/packer-templates">packer-templates</a> Github repo and his excellent blog post <a href="http://www.hurryupandwait.io/blog/creating-windows-base-images-for-virtualbox-and-hyper-v-using-packer-boxstarter-and-vagrant">here</a>. Unfortunately I had a few issues with his implementation as it did not support OS’ older than 2012 R2 and there was a lot of duplication of code and configuration which made it hard to follow how it works.</p>

<p>In the end I decided to do the work myself and create a way to generate the images I required but to fit the following requirements;</p>

<ul>
  <li>Can be run by anybody that has access to a host with Ansible and VirtualBox installed</li>
  <li>Works with Server 2008 all the way to Server 2016</li>
  <li>The image must be created without any manual steps, and the resulting image can be started by Vagrant and ready to use without any manual intervention</li>
  <li>Easy to make changes or add future images/features</li>
  <li>Produces an image that is as lightweight as can be</li>
</ul>

<h1 id="end-result">End Result</h1>

<p>The fruits of my labour can be found in the repo <a href="https://github.com/jborean93/packer-windoze">packer-windoze</a>, I’m still tweaking it as I go along but the current iteration probably won’t change dramatically anytime soon. You can find the actual Vagrant images by searching <a href="https://app.vagrantup.com/boxes/search?utf8=%E2%9C%93&amp;sort=downloads&amp;provider=&amp;q=jborean93">jborean93</a> on Vagrant Cloud.</p>

<p><img src="/assets/images/2017/10/Screen-Shot-2017-10-30-at-8.45.47-am.png" alt="" /></p>

<p><em>You can tell they are mine due to my ugly mug staring right back at you</em></p>

<p>You can skip the rest of the blog post if all you want is to use it (I won’t judge) but I will go in depth through how the process works and some of the challenges I came across.</p>

<p>If you want to continue along and wish to run the build process in packer-windoze, you will need to ensure your system has the following set up</p>

<ul>
  <li><a href="https://www.packer.io/docs/install/index.html">Packer</a> &gt;= 1.0.0</li>
  <li><a href="https://www.virtualbox.org/wiki/Downloads">VirtualBox</a> &gt;= 5.1.12</li>
  <li><a href="https://github.com/ansible/ansible">Ansible</a> &gt;= 2.5 or devel</li>
  <li>The <a href="https://github.com/jborean93/packer-windoze">packer-windoze</a> repo cloned down to a local folder</li>
</ul>

<p>As of writing this, Ansible 2.5 has not been officially released, please clone the Ansible repo from GitHub and checkout to the devel branch. You can learn more about how to do this as well as about Ansible in general by reading <a href="/2017/10/12/managing-windows-servers-with-ansible/">Managing Windows Server with Ansible</a>.</p>

<h1 id="enter-packer">Enter Packer</h1>

<p><img src="/assets/images/2017/10/logo_packer.png" alt="" /></p>

<p>When starting this project I really wanted to find a way to use Ansible to create the image from start to finish but I always came across the issue of how to interact with VirtualBox and spin up a brand new VM from nothing. I could have just run some commands using <code class="language-plaintext highlighter-rouge">VBoxManage</code> but any implementation based on that would have been fragile at best. I decided to look around to see what other tools were around that I could use, in the end I went with a product called <a href="https://www.packer.io/">Packer</a>. Packer is a tool from Hashicorp, who make other great tools like <a href="https://www.vagrantup.com/">Vagrant</a> and in their words, Packer is</p>

<blockquote>
  <p>an open source tool for creating identical machine images for multiple platforms from a single source configuration</p>
</blockquote>

<p>By using Packer I gained the following for free;</p>

<ul>
  <li>Interaction with VirtualBox to start a new VM from nothing</li>
  <li>The ability to in the future to use other providers like VMWare, Hyper-V, Parallels if I so desire</li>
  <li>Integration with Vagrant Cloud to automatically upload new images</li>
</ul>

<h1 id="generate-packer-template-and-build-files">Generate Packer Template and Build Files</h1>

<p>A lot of the Packer repo’s I’ve seen on Github all fall prey to having multiple <code class="language-plaintext highlighter-rouge">.json</code> files, one for each image generated. While this isn’t a major issue, I found that there was so much duplication between the different template files as well as the Windows answer files and I was hoping to remove this. My solution to this was to create an Ansible role that would generate the required Packer template and answer file required for each specific host type. This role will take in predefined variables for that host type, like where to download the evaluation ISO and what image name to set in the answer file, and generate it on the fly.</p>

<p>To generate these files run;</p>

<div class="language-bash highlighter-rouge"><div class="highlight"><pre class="highlight"><code>ansible-playbook packer-setup.yml <span class="nt">-e</span> <span class="nv">man_packer_setup_host_type</span><span class="o">=</span>&lt;host <span class="nb">type</span><span class="o">&gt;</span>
</code></pre></div></div>

<p>The var <code class="language-plaintext highlighter-rouge">man_packer_setup_host_type</code> corresponds to one of the host types that have been defined in the role, I’ll save you some trouble by giving you the current options here;</p>

<ul>
  <li><code class="language-plaintext highlighter-rouge">2008-x86</code>: Windows Server 2008 Standard 32-bit</li>
  <li><code class="language-plaintext highlighter-rouge">2008-x64</code>: Windows Server 2008 Standard 64-bit</li>
  <li><code class="language-plaintext highlighter-rouge">2008r2</code>: Windows Server 2008 R2 Standard</li>
  <li><code class="language-plaintext highlighter-rouge">2012</code>: Windows Server 2012 Standard</li>
  <li><code class="language-plaintext highlighter-rouge">2012r2</code>: Windows Server 2012 R2 Standard</li>
  <li><code class="language-plaintext highlighter-rouge">2016</code>: Windows Server 2016 Standard</li>
</ul>

<p><img src="/assets/images/2017/10/Screen-Shot-2017-10-30-at-3.19.17-pm.png" alt="" /></p>

<p><em>Output for generating files for Server 2016</em></p>

<p>Once the script has been run, a new folder will be created named to what was set under <code class="language-plaintext highlighter-rouge">man_packer_setup_host_type</code>. This folder contains 4 files</p>

<p><img src="/assets/images/2017/10/Screen-Shot-2017-10-30-at-3.20.56-pm.png" alt="" /></p>

<p>Here is what each file is for;</p>

<ul>
  <li><code class="language-plaintext highlighter-rouge">Autounattend.xml</code>: Attached to the new VM and is used by Windows setup to install Windows without asking the user what to do</li>
  <li><code class="language-plaintext highlighter-rouge">bootstrap.ps1</code>: A script called after Windows is installed to setup WinRM and any other pre-requisites for Ansible</li>
  <li><code class="language-plaintext highlighter-rouge">hosts.ini</code>: An Ansible inventory file that contains the required host entries and vars for the provisioning phase of Packer</li>
  <li><code class="language-plaintext highlighter-rouge">packer.json</code>: The Packer definition that tells Packer how to setup the VM and what to do with that image once it is finished</li>
</ul>

<p>Once these files are generated you are free to run Packer by running the command <code class="language-plaintext highlighter-rouge">packer build -force &lt;host_type&gt;/packer.json</code> where <code class="language-plaintext highlighter-rouge">&lt;host_type&gt;</code> is the host type you specified. Running this command will take quite some time so be prepared to run it in the background or get very comfortable in your chair.</p>

<p>By dynamically generating these files, I do trade off some ease of use and make things more complicated, but in the end I gain the following benefits;</p>

<ul>
  <li>All the unique configure for each host type is in one location so I can easily compare without opening multiple files</li>
  <li>I am no longer limited to JSON and can use comments in definition to make it easier to understand what is happening</li>
  <li>If I have any pre-tasks required to be run before Packer starts I can do it in this phase, this is important for Server 2008 64-bit</li>
  <li>Any shared configuration like the username and password is now stored in one location and can easily be changed by passing in separate variables</li>
  <li>I don’t need to duplicate a Packer JSON and Windows Answer file when adding a new build, just need to tweak the host config in the role vars file instead and it will generate it for me</li>
</ul>

<h1 id="packer-components">Packer Components</h1>

<p>To create an image with Packer, a template file is used to define the steps and configuration that is required. The template is written in JSON and must contain these three components;</p>

<ul>
  <li>Builders: a set of plugins used to build the base image on a machine, in this case we use the virtualbox-iso plugin to create a VM from an ISO</li>
  <li>Provisioners: a set of actions the perform on the image after it has been built by the builder, we use this to install updates and streamline the Windows image</li>
  <li>Post-Processors: after the image is shutdown at the end of the provisioning phase, these plugins control what happens to the VM such as create a Vagrant box and upload it to Vagrant Cloud.</li>
</ul>

<p>Here is an example <code class="language-plaintext highlighter-rouge">packer.json</code> file generated by packer-windoze for Server 2016;</p>

<div class="language-json highlighter-rouge"><div class="highlight"><pre class="highlight"><code><span class="p">{</span><span class="w">
    </span><span class="nl">"builders"</span><span class="p">:</span><span class="w"> </span><span class="p">[</span><span class="w">
        </span><span class="p">{</span><span class="w">
            </span><span class="nl">"communicator"</span><span class="p">:</span><span class="w"> </span><span class="s2">"winrm"</span><span class="p">,</span><span class="w">
            </span><span class="nl">"floppy_files"</span><span class="p">:</span><span class="w"> </span><span class="p">[</span><span class="w">
                </span><span class="s2">"2016/Autounattend.xml"</span><span class="p">,</span><span class="w">
                </span><span class="s2">"2016/bootstrap.ps1"</span><span class="w">
            </span><span class="p">],</span><span class="w">
            </span><span class="nl">"guest_additions_mode"</span><span class="p">:</span><span class="w"> </span><span class="s2">"disable"</span><span class="p">,</span><span class="w">
            </span><span class="nl">"guest_os_type"</span><span class="p">:</span><span class="w"> </span><span class="s2">"Windows2016_64"</span><span class="p">,</span><span class="w">
            </span><span class="nl">"headless"</span><span class="p">:</span><span class="w"> </span><span class="kc">false</span><span class="p">,</span><span class="w">
            </span><span class="nl">"iso_checksum"</span><span class="p">:</span><span class="w"> </span><span class="s2">"70721288bbcdfe3239d8f8c0fae55f1f"</span><span class="p">,</span><span class="w">
            </span><span class="nl">"iso_checksum_type"</span><span class="p">:</span><span class="w"> </span><span class="s2">"md5"</span><span class="p">,</span><span class="w">
            </span><span class="nl">"iso_url"</span><span class="p">:</span><span class="w"> </span><span class="s2">"http://care.dlservice.microsoft.com/dl/download/1/4/9/149D5452-9B29-4274-B6B3-5361DBDA30BC/14393.0.161119-1705.RS1_REFRESH_SERVER_EVAL_X64FRE_EN-US.ISO"</span><span class="p">,</span><span class="w">
            </span><span class="nl">"shutdown_command"</span><span class="p">:</span><span class="w"> </span><span class="s2">"schtasks.exe /Run /TN </span><span class="se">\"</span><span class="s2">packer-shutdown</span><span class="se">\"</span><span class="s2">"</span><span class="p">,</span><span class="w">
            </span><span class="nl">"shutdown_timeout"</span><span class="p">:</span><span class="w"> </span><span class="s2">"15m"</span><span class="p">,</span><span class="w">
            </span><span class="nl">"type"</span><span class="p">:</span><span class="w"> </span><span class="s2">"virtualbox-iso"</span><span class="p">,</span><span class="w">
            </span><span class="nl">"vboxmanage"</span><span class="p">:</span><span class="w"> </span><span class="p">[</span><span class="w">
                </span><span class="p">[</span><span class="w"> </span><span class="s2">"modifyvm"</span><span class="p">,</span><span class="w"> </span><span class="s2">"{{.Name}}"</span><span class="p">,</span><span class="w"> </span><span class="s2">"--memory"</span><span class="p">,</span><span class="w"> </span><span class="s2">"2048"</span><span class="w"> </span><span class="p">],</span><span class="w">
                </span><span class="p">[</span><span class="w"> </span><span class="s2">"modifyvm"</span><span class="p">,</span><span class="w"> </span><span class="s2">"{{.Name}}"</span><span class="p">,</span><span class="w"> </span><span class="s2">"--vram"</span><span class="p">,</span><span class="w"> </span><span class="s2">"48"</span><span class="w"> </span><span class="p">],</span><span class="w">
                </span><span class="p">[</span><span class="w"> </span><span class="s2">"modifyvm"</span><span class="p">,</span><span class="w"> </span><span class="s2">"{{.Name}}"</span><span class="p">,</span><span class="w"> </span><span class="s2">"--cpus"</span><span class="p">,</span><span class="w"> </span><span class="s2">"2"</span><span class="w"> </span><span class="p">],</span><span class="w">
                </span><span class="p">[</span><span class="w"> </span><span class="s2">"modifyvm"</span><span class="p">,</span><span class="w"> </span><span class="s2">"{{.Name}}"</span><span class="p">,</span><span class="w"> </span><span class="s2">"--natpf1"</span><span class="p">,</span><span class="w"> </span><span class="s2">"winrm,tcp,127.0.0.1,55986,,5986"</span><span class="w"> </span><span class="p">]</span><span class="w">
            </span><span class="p">],</span><span class="w">
            </span><span class="nl">"winrm_insecure"</span><span class="p">:</span><span class="w"> </span><span class="kc">true</span><span class="p">,</span><span class="w">
            </span><span class="nl">"winrm_password"</span><span class="p">:</span><span class="w"> </span><span class="s2">"vagrant"</span><span class="p">,</span><span class="w">
            </span><span class="nl">"winrm_port"</span><span class="p">:</span><span class="w"> </span><span class="s2">"5986"</span><span class="p">,</span><span class="w">
            </span><span class="nl">"winrm_use_ssl"</span><span class="p">:</span><span class="w"> </span><span class="kc">true</span><span class="p">,</span><span class="w">
            </span><span class="nl">"winrm_username"</span><span class="p">:</span><span class="w"> </span><span class="s2">"vagrant"</span><span class="w">
        </span><span class="p">}</span><span class="w">
    </span><span class="p">],</span><span class="w">
    </span><span class="nl">"provisioners"</span><span class="p">:</span><span class="w"> </span><span class="p">[</span><span class="w">
        </span><span class="p">{</span><span class="w">
            </span><span class="nl">"command"</span><span class="p">:</span><span class="w"> </span><span class="s2">"ansible-playbook main.yml -i 2016/hosts.ini -vv"</span><span class="p">,</span><span class="w">
            </span><span class="nl">"type"</span><span class="p">:</span><span class="w"> </span><span class="s2">"shell-local"</span><span class="w">
        </span><span class="p">}</span><span class="w">
    </span><span class="p">],</span><span class="w">
    </span><span class="nl">"post-processors"</span><span class="p">:</span><span class="w"> </span><span class="p">[</span><span class="w">
        </span><span class="p">{</span><span class="w">
            </span><span class="nl">"output"</span><span class="p">:</span><span class="w"> </span><span class="s2">"2016/virtualbox.box"</span><span class="p">,</span><span class="w">
            </span><span class="nl">"type"</span><span class="p">:</span><span class="w"> </span><span class="s2">"vagrant"</span><span class="w">
        </span><span class="p">}</span><span class="w">
    </span><span class="p">]</span><span class="w">
</span><span class="p">}</span><span class="w">
</span></code></pre></div></div>

<p>I will explain more about each component below and what each of the keys mean.</p>

<h2 id="builders">Builders</h2>

<p>The first component that is run by Packer and is used to build a new machine and set it up so it is ready for provisioning. There are numerous plugins that can be used in this stage which govern where and how the host is actually created for the build process. You can build the image in AWS, a local VM using the VirtualBox, VMWare provider and so on. In packer-windoze we are are using the <code class="language-plaintext highlighter-rouge">virtualbox-iso</code> provider which takes in an ISO image and create a VM from that image.</p>

<p>Going through the template above, here is what each key does (note: some keys are specific to the <code class="language-plaintext highlighter-rouge">virtualbox-iso</code> type);</p>

<ul>
  <li><code class="language-plaintext highlighter-rouge">communicator</code>: The mechanism used by Packer to execute commands, by default the <code class="language-plaintext highlighter-rouge">SSH</code> communicator is used but we need <code class="language-plaintext highlighter-rouge">winrm</code>
    <ul>
      <li>This is only used to send the <code class="language-plaintext highlighter-rouge">shutdown_command</code> and sets Packer to monitor the <code class="language-plaintext highlighter-rouge">winrm_port</code> so it knows when to star the <code class="language-plaintext highlighter-rouge">Provisioners</code> component</li>
    </ul>
  </li>
  <li><code class="language-plaintext highlighter-rouge">floppy_files</code>: A list of files (relative to the <code class="language-plaintext highlighter-rouge">cwd</code>) to add to the floppy drive of the VM
    <ul>
      <li>This is seen under the <code class="language-plaintext highlighter-rouge">A:</code> drive during Windows setup and is how we start the Windows setup process with our <code class="language-plaintext highlighter-rouge">Autounattend.xml</code> file</li>
    </ul>
  </li>
  <li><code class="language-plaintext highlighter-rouge">guest_additions_mode</code>: We set to <code class="language-plaintext highlighter-rouge">disable</code> as we don’t care about installing the VirtualBox tools, this governs how the install ISO is accessed on the VM</li>
  <li><code class="language-plaintext highlighter-rouge">guest_os_type</code>: The guest OS type that is being installed, to get the best performance this should be set to the OS we are creating
    <ul>
      <li>To view all the available values for the local install of VirtualBox, run <code class="language-plaintext highlighter-rouge">VBoxManage list ostypes</code></li>
    </ul>
  </li>
  <li><code class="language-plaintext highlighter-rouge">headless</code>: Whether to show the console window during the Packer execution, this is set to <code class="language-plaintext highlighter-rouge">false</code> by default but it can be quite useful to set to <code class="language-plaintext highlighter-rouge">true</code> to debug any issues that may come up</li>
  <li><code class="language-plaintext highlighter-rouge">iso_checksum</code>: The checksum for the ISO file, Packer will bail out if the checksum does not match the ISO specified at <code class="language-plaintext highlighter-rouge">iso_url</code></li>
  <li><code class="language-plaintext highlighter-rouge">iso_url</code>: Either a URL or local path to the Windows ISO to install, if it is a URL Packer will download it to a temporary directory</li>
  <li><code class="language-plaintext highlighter-rouge">shutdown_command</code>: The command to run to shutdown the host after the full build process is complete (this is after the provisioning stage)
    <ul>
      <li>packer-windoze calls a scheduled task that will delete the WinRM listeners and then shutdown the host using this command</li>
    </ul>
  </li>
  <li><code class="language-plaintext highlighter-rouge">shutdown_timeout</code>: The amount of time to wait after <code class="language-plaintext highlighter-rouge">shutdown_command</code> is run before erroring out</li>
  <li><code class="language-plaintext highlighter-rouge">type</code>: Tells packer that we are using the <code class="language-plaintext highlighter-rouge">virtualbox-iso</code> plugin</li>
  <li><code class="language-plaintext highlighter-rouge">vboxmanage</code>: A list of commands to run before starting the VM
    <ul>
      <li>We set the CPU, RAM to make sure the build process is not abysmally slow</li>
      <li>We also set a port forwarder so that Ansible can talk to the new Windows host during the provisioning component</li>
    </ul>
  </li>
  <li><code class="language-plaintext highlighter-rouge">winrm_insecure</code>: Tells packer to ignore any certificate errors when connecting to the HTTPS WinRM host</li>
  <li><code class="language-plaintext highlighter-rouge">winrm_password</code>: The password for <code class="language-plaintext highlighter-rouge">winrm_username</code></li>
  <li><code class="language-plaintext highlighter-rouge">winrm_port</code>: The local port on Windows (not forwarded port) that is used to check when WinRM is active</li>
  <li><code class="language-plaintext highlighter-rouge">winrm_use_ssl</code>: Use HTTPS (port 5986) instead of HTTP, Packer does not support message encryption over HTTP so we use HTTPS instead of disabling the message encryption check</li>
  <li><code class="language-plaintext highlighter-rouge">winrm_username</code>: The local account that Packer connects with over WinRM to run remote commands like <code class="language-plaintext highlighter-rouge">shutdown_command</code></li>
</ul>

<p>While we are only using one builder with packer-windoze, it shouldn’t be too difficult to add support for another builder like VMWare as all it would take another entry in <code class="language-plaintext highlighter-rouge">builders</code> for the VMWare type.</p>

<h3 id="windows-answer-file--autounattendxml">Windows Answer File – Autounattend.xml</h3>

<p>When starting up the VM, a file called <code class="language-plaintext highlighter-rouge">Autounattend.xml</code> is placed at <code class="language-plaintext highlighter-rouge">A:\Autounattend.xml</code>, this is a special file which is used during the Windows setup process that tells Windows what to install and configure on the new host. Unfortunately Microsoft’s love of XML really becomes apparent here and this answer file can be quite verbose. On a basic level the answer file is split up into the following components</p>

<ul>
  <li><code class="language-plaintext highlighter-rouge">windowsPE</code>: Set’s the Windows PE environment used by the setup wizard such as language, disk/partition setup and install image name</li>
  <li><code class="language-plaintext highlighter-rouge">generalize</code>: Set’s Sysprep and PnP info, this doesn’t play a big part in the setup process</li>
  <li><code class="language-plaintext highlighter-rouge">oobeSystem</code>: Set’s box specific information such as username/passwords and logon commands</li>
  <li><code class="language-plaintext highlighter-rouge">specialize</code>: Stops Windows from starting up annoying programs like the server manager on logon and so on</li>
</ul>

<p>I’ll go into more details on the <code class="language-plaintext highlighter-rouge">windowsPE</code> and <code class="language-plaintext highlighter-rouge">oobeSystem</code> section as they configure most of the settings with Windows. Let’s start with the first section <code class="language-plaintext highlighter-rouge">windowsPE</code>, here is a snippet for Server 2016;</p>

<div class="language-xml highlighter-rouge"><div class="highlight"><pre class="highlight"><code><span class="nt">&lt;component</span> <span class="na">xmlns:wcm=</span><span class="s">"http://schemas.microsoft.com/WMIConfig/2002/State"</span> <span class="na">xmlns:xsi=</span><span class="s">"http://www.w3.org/2001/XMLSchema-instance"</span> <span class="na">name=</span><span class="s">"Microsoft-Windows-International-Core-WinPE"</span> <span class="na">processorArchitecture=</span><span class="s">"amd64"</span> <span class="na">publicKeyToken=</span><span class="s">"31bf3856ad364e35"</span> <span class="na">language=</span><span class="s">"neutral"</span> <span class="na">versionScope=</span><span class="s">"nonSxS"</span><span class="nt">&gt;</span>
    <span class="nt">&lt;SetupUILanguage&gt;</span>
        <span class="nt">&lt;UILanguage&gt;</span>en-US<span class="nt">&lt;/UILanguage&gt;</span>
    <span class="nt">&lt;/SetupUILanguage&gt;</span>
    <span class="nt">&lt;InputLocale&gt;</span>en-US<span class="nt">&lt;/InputLocale&gt;</span>
    <span class="nt">&lt;SystemLocale&gt;</span>en-US<span class="nt">&lt;/SystemLocale&gt;</span>
    <span class="nt">&lt;UILanguage&gt;</span>en-US<span class="nt">&lt;/UILanguage&gt;</span>
    <span class="nt">&lt;UILanguageFallback&gt;</span>en-US<span class="nt">&lt;/UILanguageFallback&gt;</span>
    <span class="nt">&lt;UserLocale&gt;</span>en-US<span class="nt">&lt;/UserLocale&gt;</span>
<span class="nt">&lt;/component&gt;</span>
<span class="nt">&lt;component</span> <span class="na">xmlns:wcm=</span><span class="s">"http://schemas.microsoft.com/WMIConfig/2002/State"</span> <span class="na">xmlns:xsi=</span><span class="s">"http://www.w3.org/2001/XMLSchema-instance"</span> <span class="na">name=</span><span class="s">"Microsoft-Windows-Setup"</span> <span class="na">processorArchitecture=</span><span class="s">"amd64"</span> <span class="na">publicKeyToken=</span><span class="s">"31bf3856ad364e35"</span> <span class="na">language=</span><span class="s">"neutral"</span> <span class="na">versionScope=</span><span class="s">"nonSxS"</span><span class="nt">&gt;</span>
    <span class="nt">&lt;DiskConfiguration&gt;</span>
        <span class="nt">&lt;Disk</span> <span class="na">wcm:action=</span><span class="s">"add"</span><span class="nt">&gt;</span>
            <span class="nt">&lt;CreatePartitions&gt;</span>
                <span class="nt">&lt;CreatePartition</span> <span class="na">wcm:action=</span><span class="s">"add"</span><span class="nt">&gt;</span>
                    <span class="nt">&lt;Type&gt;</span>Primary<span class="nt">&lt;/Type&gt;</span>
                    <span class="nt">&lt;Order&gt;</span>1<span class="nt">&lt;/Order&gt;</span>
                    <span class="nt">&lt;Size&gt;</span>350<span class="nt">&lt;/Size&gt;</span>
                <span class="nt">&lt;/CreatePartition&gt;</span>
                <span class="nt">&lt;CreatePartition</span> <span class="na">wcm:action=</span><span class="s">"add"</span><span class="nt">&gt;</span>
                    <span class="nt">&lt;Order&gt;</span>2<span class="nt">&lt;/Order&gt;</span>
                    <span class="nt">&lt;Type&gt;</span>Primary<span class="nt">&lt;/Type&gt;</span>
                    <span class="nt">&lt;Extend&gt;</span>true<span class="nt">&lt;/Extend&gt;</span>
                <span class="nt">&lt;/CreatePartition&gt;</span>
            <span class="nt">&lt;/CreatePartitions&gt;</span>
            <span class="nt">&lt;ModifyPartitions&gt;</span>
                <span class="nt">&lt;ModifyPartition</span> <span class="na">wcm:action=</span><span class="s">"add"</span><span class="nt">&gt;</span>
                    <span class="nt">&lt;Active&gt;</span>true<span class="nt">&lt;/Active&gt;</span>
                    <span class="nt">&lt;Format&gt;</span>NTFS<span class="nt">&lt;/Format&gt;</span>
                    <span class="nt">&lt;Label&gt;</span>boot<span class="nt">&lt;/Label&gt;</span>
                    <span class="nt">&lt;Order&gt;</span>1<span class="nt">&lt;/Order&gt;</span>
                    <span class="nt">&lt;PartitionID&gt;</span>1<span class="nt">&lt;/PartitionID&gt;</span>
                <span class="nt">&lt;/ModifyPartition&gt;</span>
                <span class="nt">&lt;ModifyPartition</span> <span class="na">wcm:action=</span><span class="s">"add"</span><span class="nt">&gt;</span>
                    <span class="nt">&lt;Format&gt;</span>NTFS<span class="nt">&lt;/Format&gt;</span>
                    <span class="nt">&lt;Label&gt;</span>Windows 2016<span class="nt">&lt;/Label&gt;</span>
                    <span class="nt">&lt;Letter&gt;</span>C<span class="nt">&lt;/Letter&gt;</span>
                    <span class="nt">&lt;Order&gt;</span>2<span class="nt">&lt;/Order&gt;</span>
                    <span class="nt">&lt;PartitionID&gt;</span>2<span class="nt">&lt;/PartitionID&gt;</span>
                <span class="nt">&lt;/ModifyPartition&gt;</span>
            <span class="nt">&lt;/ModifyPartitions&gt;</span>
            <span class="nt">&lt;DiskID&gt;</span>0<span class="nt">&lt;/DiskID&gt;</span>
            <span class="nt">&lt;WillWipeDisk&gt;</span>true<span class="nt">&lt;/WillWipeDisk&gt;</span>
        <span class="nt">&lt;/Disk&gt;</span>
    <span class="nt">&lt;/DiskConfiguration&gt;</span>
    <span class="nt">&lt;ImageInstall&gt;</span>
        <span class="nt">&lt;OSImage&gt;</span>
            <span class="nt">&lt;InstallFrom&gt;</span>
                <span class="nt">&lt;MetaData</span> <span class="na">wcm:action=</span><span class="s">"add"</span><span class="nt">&gt;</span>
                    <span class="nt">&lt;Key&gt;</span>/IMAGE/NAME <span class="nt">&lt;/Key&gt;</span>
                    <span class="nt">&lt;Value&gt;</span>Windows Server 2016 SERVERSTANDARD<span class="nt">&lt;/Value&gt;</span>
                <span class="nt">&lt;/MetaData&gt;</span>
            <span class="nt">&lt;/InstallFrom&gt;</span>
            <span class="nt">&lt;InstallTo&gt;</span>
                <span class="nt">&lt;DiskID&gt;</span>0<span class="nt">&lt;/DiskID&gt;</span>
                <span class="nt">&lt;PartitionID&gt;</span>2<span class="nt">&lt;/PartitionID&gt;</span>
            <span class="nt">&lt;/InstallTo&gt;</span>
        <span class="nt">&lt;/OSImage&gt;</span>
    <span class="nt">&lt;/ImageInstall&gt;</span>
    <span class="nt">&lt;UserData&gt;</span>
        <span class="nt">&lt;ProductKey&gt;</span>
            <span class="nt">&lt;WillShowUI&gt;</span>OnError<span class="nt">&lt;/WillShowUI&gt;</span>
        <span class="nt">&lt;/ProductKey&gt;</span>
        <span class="nt">&lt;AcceptEula&gt;</span>true<span class="nt">&lt;/AcceptEula&gt;</span>
        <span class="nt">&lt;FullName&gt;</span>Vagrant<span class="nt">&lt;/FullName&gt;</span>
        <span class="nt">&lt;Organization&gt;</span>Vagrant<span class="nt">&lt;/Organization&gt;</span>
    <span class="nt">&lt;/UserData&gt;</span>
<span class="nt">&lt;/component&gt;</span>
</code></pre></div></div>

<p>This example above does the following;</p>

<ul>
  <li>Set the language and locale of the Windows setup wizard to <code class="language-plaintext highlighter-rouge">en-US</code></li>
  <li>Create 2 partitions on the disk, 1 for the recovery/boot partition and the 2nd for the Windows OS</li>
  <li>Install Windows Server 2016 Standard on Disk 0 Partition 2</li>
  <li>Accept any EULA agreements and don’t set a product key</li>
</ul>

<p>As part of the packer-windows <code class="language-plaintext highlighter-rouge">packer-setup.yml</code> playbook, the main component that changes depending on the OS host type is <code class="language-plaintext highlighter-rouge">ImageInstall.OSImage.InstallFrom.MetaData</code> as that is dependent on the OS version. The disk configuration is also different for Server 2008 as it does not need a recovery partition.</p>

<p>The second major component of the answer file is <code class="language-plaintext highlighter-rouge">oobeSystem</code>, here is the setup for the same Server 2016 setup;</p>

<div class="language-xml highlighter-rouge"><div class="highlight"><pre class="highlight"><code><span class="nt">&lt;component</span> <span class="na">name=</span><span class="s">"Microsoft-Windows-International-Core"</span> <span class="na">processorArchitecture=</span><span class="s">"amd64"</span> <span class="na">publicKeyToken=</span><span class="s">"31bf3856ad364e35"</span> <span class="na">language=</span><span class="s">"neutral"</span> <span class="na">versionScope=</span><span class="s">"nonSxS"</span> <span class="na">xmlns:wcm=</span><span class="s">"http://schemas.microsoft.com/WMIConfig/2002/State"</span> <span class="na">xmlns:xsi=</span><span class="s">"http://www.w3.org/2001/XMLSchema-instance"</span><span class="nt">&gt;</span>
    <span class="nt">&lt;InputLocale&gt;</span>en-US<span class="nt">&lt;/InputLocale&gt;</span>
    <span class="nt">&lt;SystemLocale&gt;</span>en-US<span class="nt">&lt;/SystemLocale&gt;</span>
    <span class="nt">&lt;UILanguage&gt;</span>en-US<span class="nt">&lt;/UILanguage&gt;</span>
    <span class="nt">&lt;UserLocale&gt;</span>en-US<span class="nt">&lt;/UserLocale&gt;</span>
<span class="nt">&lt;/component&gt;</span>
<span class="nt">&lt;component</span> <span class="na">name=</span><span class="s">"Microsoft-Windows-Shell-Setup"</span> <span class="na">processorArchitecture=</span><span class="s">"amd64"</span> <span class="na">publicKeyToken=</span><span class="s">"31bf3856ad364e35"</span> <span class="na">language=</span><span class="s">"neutral"</span> <span class="na">versionScope=</span><span class="s">"nonSxS"</span> <span class="na">xmlns:wcm=</span><span class="s">"http://schemas.microsoft.com/WMIConfig/2002/State"</span> <span class="na">xmlns:xsi=</span><span class="s">"http://www.w3.org/2001/XMLSchema-instance"</span><span class="nt">&gt;</span>
    <span class="nt">&lt;OOBE&gt;</span>
        <span class="nt">&lt;HideEULAPage&gt;</span>true<span class="nt">&lt;/HideEULAPage&gt;</span>
        <span class="nt">&lt;NetworkLocation&gt;</span>Home<span class="nt">&lt;/NetworkLocation&gt;</span>
        <span class="nt">&lt;ProtectYourPC&gt;</span>1<span class="nt">&lt;/ProtectYourPC&gt;</span>
        <span class="nt">&lt;HideWirelessSetupInOOBE&gt;</span>true<span class="nt">&lt;/HideWirelessSetupInOOBE&gt;</span>
        <span class="nt">&lt;HideLocalAccountScreen&gt;</span>true<span class="nt">&lt;/HideLocalAccountScreen&gt;</span>
        <span class="nt">&lt;HideOEMRegistrationScreen&gt;</span>true<span class="nt">&lt;/HideOEMRegistrationScreen&gt;</span>
        <span class="nt">&lt;HideOnlineAccountScreens&gt;</span>true<span class="nt">&lt;/HideOnlineAccountScreens&gt;</span>
    <span class="nt">&lt;/OOBE&gt;</span>
    <span class="nt">&lt;TimeZone&gt;</span>UTC<span class="nt">&lt;/TimeZone&gt;</span>
    <span class="nt">&lt;UserAccounts&gt;</span>
        <span class="nt">&lt;LocalAccounts&gt;</span>
            <span class="nt">&lt;LocalAccount</span> <span class="na">wcm:action=</span><span class="s">"add"</span><span class="nt">&gt;</span>
                <span class="nt">&lt;Group&gt;</span>Administrators<span class="nt">&lt;/Group&gt;</span>
                <span class="nt">&lt;DisplayName&gt;</span>vagrant<span class="nt">&lt;/DisplayName&gt;</span>
                <span class="nt">&lt;Name&gt;</span>vagrant<span class="nt">&lt;/Name&gt;</span>
                <span class="nt">&lt;Description&gt;</span>vagrant<span class="nt">&lt;/Description&gt;</span>
                <span class="nt">&lt;Password&gt;</span>
                    <span class="nt">&lt;Value&gt;</span>vagrant<span class="nt">&lt;/Value&gt;</span>
                    <span class="nt">&lt;PlainText&gt;</span>true<span class="nt">&lt;/PlainText&gt;</span>
                <span class="nt">&lt;/Password&gt;</span>
            <span class="nt">&lt;/LocalAccount&gt;</span>
        <span class="nt">&lt;/LocalAccounts&gt;</span>
        <span class="nt">&lt;AdministratorPassword&gt;</span>
            <span class="nt">&lt;Value&gt;</span>vagrant<span class="nt">&lt;/Value&gt;</span>
            <span class="nt">&lt;PlainText&gt;</span>true<span class="nt">&lt;/PlainText&gt;</span>
        <span class="nt">&lt;/AdministratorPassword&gt;</span>
    <span class="nt">&lt;/UserAccounts&gt;</span>
    <span class="nt">&lt;AutoLogon&gt;</span>
        <span class="nt">&lt;Enabled&gt;</span>true<span class="nt">&lt;/Enabled&gt;</span>
        <span class="nt">&lt;Username&gt;</span>vagrant<span class="nt">&lt;/Username&gt;</span>
        <span class="nt">&lt;Password&gt;</span>
            <span class="nt">&lt;Value&gt;</span>vagrant<span class="nt">&lt;/Value&gt;</span>
            <span class="nt">&lt;PlainText&gt;</span>true<span class="nt">&lt;/PlainText&gt;</span>
        <span class="nt">&lt;/Password&gt;</span>
    <span class="nt">&lt;/AutoLogon&gt;</span>
    <span class="nt">&lt;FirstLogonCommands&gt;</span>
        <span class="nt">&lt;SynchronousCommand</span> <span class="na">wcm:action=</span><span class="s">"add"</span><span class="nt">&gt;</span>
            <span class="nt">&lt;CommandLine&gt;</span>C:\Windows\System32\WindowsPowerShell\v1.0\powershell.exe -Command "Set-ExecutionPolicy -ExecutionPolicy Unrestricted -Force"<span class="nt">&lt;/CommandLine&gt;</span>
            <span class="nt">&lt;Order&gt;</span>1<span class="nt">&lt;/Order&gt;</span>
        <span class="nt">&lt;/SynchronousCommand&gt;</span>
        <span class="nt">&lt;SynchronousCommand</span> <span class="na">wcm:action=</span><span class="s">"add"</span><span class="nt">&gt;</span>
            <span class="nt">&lt;CommandLine&gt;</span>C:\Windows\System32\WindowsPowerShell\v1.0\powershell.exe -File a:\bootstrap.ps1 winrm-listener<span class="nt">&lt;/CommandLine&gt;</span>
            <span class="nt">&lt;Order&gt;</span>2<span class="nt">&lt;/Order&gt;</span>
        <span class="nt">&lt;/SynchronousCommand&gt;</span>
    <span class="nt">&lt;/FirstLogonCommands&gt;</span>
<span class="nt">&lt;/component&gt;</span>
</code></pre></div></div>

<p>The example above does the following;</p>

<ul>
  <li>Set the language and locale for the installed version of Windows to <code class="language-plaintext highlighter-rouge">en-US</code></li>
  <li>Hides some post setup screens like connect to a wireless network or add an online account</li>
  <li>Sets the builtin Administrator password to <code class="language-plaintext highlighter-rouge">vagrant</code></li>
  <li>Create a new local Administrator called <code class="language-plaintext highlighter-rouge">vagrant</code> with the password <code class="language-plaintext highlighter-rouge">vagrant</code></li>
  <li>Set the new account called <code class="language-plaintext highlighter-rouge">vagrant</code> to automatically logon when the computer boots</li>
  <li>Have the <code class="language-plaintext highlighter-rouge">vagrant</code> account set the PowerShell execution policy to <code class="language-plaintext highlighter-rouge">Unrestricted</code> and then run the <code class="language-plaintext highlighter-rouge">bootstrap.ps1</code> script when it firsts logs on</li>
</ul>

<p>Ultimately what this answer file does is install Windows onto the VM, create the necessary accounts and finally run the <code class="language-plaintext highlighter-rouge">bootstrap.ps1</code> script to setup up the host so that Ansible can connect to it.</p>

<h3 id="bootstrapping-script--bootstrapps1">Bootstrapping Script – bootstrap.ps1</h3>

<p>Now that we have a way to install Windows without manual intervention, we need a way to setup the new host so that Ansible can connect to it and run the provisioning process. This means that the host must have at least an install of PowerShell v3.0 and .NET 4.0 as well a an active HTTPS listener configured. From Server 2012 this is not too much of an issue as it comes with PS v3 or newer but on Server 2008 and 2008 R2, multiple components need to be upgraded before we can configure WinRM. The best way to achieve this is to create a script that is set in the <code class="language-plaintext highlighter-rouge">Autounattend.xml</code> file to run on first logon, in this case the script is called <a href="https://github.com/jborean93/packer-windoze/blob/master/roles/packer-setup/files/bootstrap.ps1">bootstrap.ps1</a>. This script needs to meet the following requirements;</p>

<ul>
  <li>Support PowerShell 1.0, for core functions, as the evaluation ISO of Server 2008 is pre SP2 and only comes with PowerShell 1.0
    <ul>
      <li>Functions that download files, run processes, reboot and resume the script, need to support this version</li>
    </ul>
  </li>
  <li>Have the ability to reboot and resume the script after the reboot automatically as most steps require a reboot to complete</li>
  <li>Give some form of logging to help debug any errors, this is because if the script fails there is no indication it failed as the console window automatically closes</li>
  <li>Support multiple OS types and architectures and download the required hotfixes for those OS’</li>
</ul>

<p>The script itself is split up into separate actions defined in a <code class="language-plaintext highlighter-rouge">switch</code> statement, e.g. there is a single action called <code class="language-plaintext highlighter-rouge">dotnet</code> to update .NET to v4.5. At the end of the action, the script will call the <code class="language-plaintext highlighter-rouge">Reboot-AndResume</code> function and specify the next task under the <code class="language-plaintext highlighter-rouge">-action</code> parameter. This continues until <code class="language-plaintext highlighter-rouge">winrm-listener</code> is called and instead of rebooting, the script exits normally as we now have an active WinRM listener for Ansible to use.</p>

<p>The <code class="language-plaintext highlighter-rouge">Reboot-AndResume</code> function, is is designed to reboot the host and rerun the script with the action specified. While I believe this could be done natively in PowerShell, this featured required v3 or newer to be installed which in our case is not guaranteed. In the end I created a function to use the same technology as what the answer files use. Here is the function in the <code class="language-plaintext highlighter-rouge">bootstrap.ps1</code> script;</p>

<div class="language-powershell highlighter-rouge"><div class="highlight"><pre class="highlight"><code><span class="kr">Function</span><span class="w"> </span><span class="nf">Reboot-AndResume</span><span class="p">(</span><span class="nv">$action</span><span class="p">)</span><span class="w"> </span><span class="p">{</span><span class="w">
    </span><span class="c"># need to reboot the server and rerun this script at the next action</span><span class="w">
    </span><span class="nv">$command</span><span class="w"> </span><span class="o">=</span><span class="w"> </span><span class="s2">"</span><span class="nv">$</span><span class="nn">env</span><span class="p">:</span><span class="nv">SystemDrive</span><span class="s2">\Windows\System32\WindowsPowerShell\v1.0\powershell.exe A:\bootstrap.ps1 </span><span class="nv">$action</span><span class="s2">"</span><span class="w">
    </span><span class="nv">$reg_key</span><span class="w"> </span><span class="o">=</span><span class="w"> </span><span class="s2">"HKLM:\SOFTWARE\Microsoft\Windows\CurrentVersion\RunOnce"</span><span class="w">
    </span><span class="nv">$reg_property_name</span><span class="w"> </span><span class="o">=</span><span class="w"> </span><span class="s2">"bootstrap"</span><span class="w">
    </span><span class="n">Set-ItemProperty</span><span class="w"> </span><span class="nt">-Path</span><span class="w"> </span><span class="nv">$reg_key</span><span class="w"> </span><span class="nt">-Name</span><span class="w"> </span><span class="nv">$reg_property_name</span><span class="w"> </span><span class="nt">-Value</span><span class="w"> </span><span class="nv">$command</span><span class="w">
    </span><span class="n">Write-Log</span><span class="w"> </span><span class="nt">-message</span><span class="w"> </span><span class="s2">"rebooting server and continuing bootstrap.ps1 with action '</span><span class="nv">$action</span><span class="s2">'"</span><span class="w">
    </span><span class="kr">if</span><span class="w"> </span><span class="p">(</span><span class="n">Get-Command</span><span class="w"> </span><span class="nt">-Name</span><span class="w"> </span><span class="nx">Restart-Computer</span><span class="w"> </span><span class="nt">-ErrorAction</span><span class="w"> </span><span class="nx">SilentlyContinue</span><span class="p">)</span><span class="w"> </span><span class="p">{</span><span class="w">
        </span><span class="n">Restart-Computer</span><span class="w"> </span><span class="nt">-Force</span><span class="w">
    </span><span class="p">}</span><span class="w"> </span><span class="kr">else</span><span class="w"> </span><span class="p">{</span><span class="w">
        </span><span class="c"># PS v1 (Server 2008) doesn't have the cmdlet Restart-Computer, use el-traditional</span><span class="w">
        </span><span class="n">shutdown</span><span class="w"> </span><span class="nx">/r</span><span class="w"> </span><span class="nx">/t</span><span class="w"> </span><span class="nx">0</span><span class="w">
    </span><span class="p">}</span><span class="w">
</span><span class="p">}</span><span class="w">
</span></code></pre></div></div>

<p>The function will create a property under the registry key <code class="language-plaintext highlighter-rouge">HKLM:\SOFTWARE\Microsoft\Windows\CurrentVersion\RunOnce</code> which, when Windows logs on with an account, will run the same script again but with the next action in line. This continues until there is no actions left to run and the WinRM listener is up and running. In a normal situation this may not be ideal as to achieve the automatic login on boot, the username and password must be set in plaintext in the registry. Because these are dev boxes where the passwords don’t matter it is an acceptable solution.</p>

<p>The script itself is designed to do as little work as possible and the end result is to just have a WinRM listener up and running. This is because debugging and error handling in this stage is quite difficult and because the output is not shown on the Packer console we cannot easily track the progress. This is why the majority of the setup is actually done in the provisioning stage with Ansible.</p>

<h2 id="provisioners">Provisioners</h2>

<p>Once Packer detects that WinRM is up and running, it knows that the build stage is complete and moves on to the provisioners component. In packer-windoze this is a simple local shell command <code class="language-plaintext highlighter-rouge">ansible-playbook main.yml -i &lt;host_type&gt;/hosts.ini -vv</code>. There is an <code class="language-plaintext highlighter-rouge">ansible</code> provisioner available where you can specify just the playbook file but it requires a custom connection plugin to be set up to enable Windows support. I preferred to use the inbuilt WinRM connection within Ansible as the custom connection plugin in my experience is broken in a few places. To use the <code class="language-plaintext highlighter-rouge">winrm</code> connection I just had to manually run the Ansible command through the local shell plugin.</p>

<p>The playbook <code class="language-plaintext highlighter-rouge">main.yml</code> currently has 6 roles that are run which are;</p>

<ul>
  <li><code class="language-plaintext highlighter-rouge">update</code>: Install all the updates that are available for the OS</li>
  <li><code class="language-plaintext highlighter-rouge">personalise</code>: Configure the Windows profile to be more developer friendly and install useful tools</li>
  <li><code class="language-plaintext highlighter-rouge">cleanup-winsxs</code>: Try and reduce the size of the WinSXS folder</li>
  <li><code class="language-plaintext highlighter-rouge">cleanup-features</code>: If <a href="https://technet.microsoft.com/en-us/library/jj127275.aspx">Features on Demand</a> is supported, remove all unused features</li>
  <li><code class="language-plaintext highlighter-rouge">cleanup</code>: Remove any temp files, defrag the C drive and 0 out empty space for the image compression to be effective</li>
  <li><code class="language-plaintext highlighter-rouge">sysprep</code>: Setup the sysprep process and shutdown scheduled task to be called by Packer</li>
</ul>

<p>I’ll go into more details about each role below</p>

<h3 id="updates">Updates</h3>

<p>By far, one of the more complex roles that is being used. This role will ensure that all updates that match the categories <code class="language-plaintext highlighter-rouge">CriticalUpdates</code>, <code class="language-plaintext highlighter-rouge">SecurityUpdates</code>, <code class="language-plaintext highlighter-rouge">Updates</code>, <code class="language-plaintext highlighter-rouge">UpdateRollups</code>, and <code class="language-plaintext highlighter-rouge">FeaturePacks</code> are installed on the Windows host. To do this, I used the <a href="http://docs.ansible.com/ansible/latest/win_updates_module.html">win_updates</a> module and specified those categories. When creating this role I came across the following issues</p>

<ul>
  <li>Ansible does not support until loops on blocks or includes, makes it difficult to loop through call win_updates and rebooting after an update was installed</li>
  <li>Once all the <code class="language-plaintext highlighter-rouge">CriticalUpdates</code> are installed and I move onto <code class="language-plaintext highlighter-rouge">SecurityUpdates</code>, more <code class="language-plaintext highlighter-rouge">CriticalUpdates</code> may now be available and I would need to rerun it again for the previous categories</li>
  <li>Each call with WSUS takes a long time so I needed to minimize the number of times I called the API</li>
  <li>Running <code class="language-plaintext highlighter-rouge">win_updates</code> with all the categories above failed on older hosts as it was too much for it to handle, ended up splitting each task per category</li>
  <li>WUA is very temperamental and I came across transient errors that would not fail when running a second time</li>
  <li>When installing lots of updates and rebooting, Windows may reboot a second time but not before WinRM is active making Ansible think the host is ready</li>
  <li>Server 2008 kept on failing with the error C8000266, turning on verbose logging for WUA seemed to fix this</li>
</ul>

<p>To bypass these issues I created a complex role which followed the following structure (you can click on it to unblurrify it);</p>

<p><a href="/assets/images/2017/10/Windows-Update-Flowchart.jpg"><img src="/assets/images/2017/10/Windows-Update-Flowchart.jpg" alt="" /></a></p>

<p><em>Not the prettiest but it get’s the job done</em></p>

<p>What this means is that there is a global var that states whether it believes there are no more updates available for that category. It loops from 1 to 10 and then loops through each category to run an update process. If it is the 3rd iteration and there are no updates available then it will set the global var for that category to say do not check for more updates in this category. This is repeated until the end of the 10th iteration where it will do one last check for all categories in case we missed any.</p>

<p>As I said complex and annoying but I’ve run it multiple times and it hasn’t let me down. There is work underway in Ansible for the 2.5 release to make this process a lot easier than it is today. This change will add in the functionality for Ansible to reboot the Windows host if a reboot is required and to continue installing updates until there is none left.</p>

<p>Once the changes have been made, this process should just be a simple task like;</p>

<div class="language-plaintext highlighter-rouge"><div class="highlight"><pre class="highlight"><code>- name: install all Windows Updates
  win_updates:
    category_names:
    - ...
    - ...
    state: installed
    reboot: yes
</code></pre></div></div>

<h2 id="personalise">Personalise</h2>

<p>One of my common annoyances with Windows is the fact that it hides file extensions, does not show hidden files and folders in Windows Explorer, and it does not come with the very useful tools within <a href="https://docs.microsoft.com/en-us/sysinternals/">Sysinternals</a> like <code class="language-plaintext highlighter-rouge">Procmon</code>, <code class="language-plaintext highlighter-rouge">Procexp</code>, and <code class="language-plaintext highlighter-rouge">PsExec</code>. I decided to make a role that can make these changes for me so I don’t have to enable it everytime. On the plus side, it also installs <a href="https://chocolatey.org/">Chocolatey</a> which is a fantastic and easy to use package manager for Windows.</p>

<h3 id="cleanup-winsxs">Cleanup-Winsxs</h3>

<p>Since Windows Server 2008 and Windows Vista, Microsoft has introduced the concept of <code class="language-plaintext highlighter-rouge">Windows Side by Side</code> and storing each Windows component as a separate package. From my limited understanding this has allowed Windows to keep multiple versions of a component within the same OS. When a new update is installed a new package is added to the folder <code class="language-plaintext highlighter-rouge">C:\Windows\WinSxs</code> and it will keep on growing as time comes. What this role does is try to cleanup as much of this component store as possible. Unfortunately, some of the older Windows versions don’t have a number of these functions so the effectiveness of the role can vary. Here is what it tries to run;</p>

<ul>
  <li><code class="language-plaintext highlighter-rouge">DISM.exe /Online /Cleanup-Image /StartComponentCleanup /ResetBase</code>
    <ul>
      <li>This is the best thing since sliced bread when it comes to cleaning up the WinSxS folder as it removes all the uneeded older components.</li>
      <li>Unfortunately this is only available from Server 2012 R2 onwards</li>
    </ul>
  </li>
  <li><code class="language-plaintext highlighter-rouge">DISM.exe /Online /Cleanup-Image /SPSuperseded</code>
    <ul>
      <li>Cleans up older installs of service packs</li>
      <li>Only available from Server 2008 R2 onwards</li>
      <li>While we only install a service pack for 2008, which doesn’t support this command, it doesn’t hurt to run it anyway</li>
    </ul>
  </li>
  <li><code class="language-plaintext highlighter-rouge">compcln.exe /quiet</code>
    <ul>
      <li>Cleans up older installs of service packs</li>
      <li>Only available for Server 2008, newer OS’ use the above command instead</li>
    </ul>
  </li>
  <li><code class="language-plaintext highlighter-rouge">cleanmgr.exe</code>
    <ul>
      <li>Only run for hosts that cannot run the DISM <code class="language-plaintext highlighter-rouge">/ResetBase</code> command</li>
      <li>Not as effective as the DISM command but it does clear some older update components</li>
      <li>Because Windows Server does not have <code class="language-plaintext highlighter-rouge">cleanmgr</code> setup by default, the role will copy the relevant binaries from the WinSxS folder and place them where it is required, this bypasses the need to install the Desktop Experience features</li>
    </ul>
  </li>
</ul>

<p>I’m hoping as time goes on I can find more effective ways to reduce the size of the WinSxS folder, especially for older hosts, but a lot of my issues stem from the fact that DISM only really became useful for this process from Server 2012 R2. I thought about slipstreaming the updates in the install ISO so that when Windows is installed only the latest components exists in the WinSxS folder and we don’t have to install any updates separately. This is a pretty big change and I think pretty hard to automate so it’s just a pipe dream right now.</p>

<h3 id="cleanup-features">Cleanup-Features</h3>

<p>By default, Windows ships with the majority of its features in the install even when they are not enabled by default. This means there is a lot of disk space being used for things that aren’t being used like the IIS components. To help alleviate this issue, Microsoft introduced the concept of <code class="language-plaintext highlighter-rouge">Features on Demand</code> in Server 2012. Features on Demand allows you to fully remove a feature that is not being used. Before you could only turn off a feature with the cmdlet;</p>

<p><code class="language-plaintext highlighter-rouge">Remove-WindowsFeature -Name &lt;feature name&gt;</code></p>

<p>Now you can use the new cmdlet with the <code class="language-plaintext highlighter-rouge">-Remove</code> command to completely remove a feature like;</p>

<p><code class="language-plaintext highlighter-rouge">Uninstall-WindowsFeature -Name &lt;feature name&gt; -Remove</code></p>

<p>The main disadvantage of this process is that it takes a longer time to enable a removed feature. This is because Windows needs to either source the feature files from Windows Update or from the source install media. In the end, the amount of space you save with this process outweighs the tradeoffs in this example and so I run it where possible.</p>

<h3 id="cleanup">Cleanup</h3>

<p>I also have a generic cleanup role which does the following</p>

<ul>
  <li>Remove the pagefile and reboot the server</li>
  <li>Cleanup any temporary folders like <code class="language-plaintext highlighter-rouge">C:\Temp</code>, <code class="language-plaintext highlighter-rouge">C:\Windows\Temp</code></li>
  <li>Clear out the WinSXS ManifestCache folder</li>
  <li>Defragment the drive, this is done to ensure the next step is more effective</li>
  <li>0 out the empty space of the drive by creating one large file of 0 byte blocks and then finally removing it</li>
</ul>

<p>The last step may seem weird but what it does is to create one large file that takes up the full space available on the hard drive. This data is just a binary file of 0 bits and removed once the whole drive is filled. This is done so that compression of the image, run after provisioning is complete, is able to compress all unused space. Without this, there would be sections in the image’s data with 1’s instead of 0’s and the compression process cannot compress that as easily.</p>

<p>None of these steps save a lot of space but altogether they can be quite useful and are better than nothing.</p>

<h3 id="sysprep">Sysprep</h3>

<p>The final role is the one which set’s up the sysprep process and what the new image will do once Vagrant starts it up. These are the tasks it runs;</p>

<ul>
  <li>Ensure the directories <code class="language-plaintext highlighter-rouge">C:\Windows\Panther\Unattend</code> and <code class="language-plaintext highlighter-rouge">C:\temp</code> exist</li>
  <li>Download the <a href="https://raw.githubusercontent.com/ansible/ansible/devel/examples/scripts/ConfigureRemotingForAnsible.ps1">ConfigureRemotingForAnsible.ps1</a> script to <code class="language-plaintext highlighter-rouge">C:\temp</code>
    <ul>
      <li>This is used during the Vagrant startup process to create the WinRM listeners</li>
    </ul>
  </li>
  <li>Template out the <code class="language-plaintext highlighter-rouge">unattend.xml</code> file which is used by the sysprep process to generalise the Windows image without manual intervention</li>
  <li>Create a run once registry entry to run the sysprep process on the next startup (when Vagrant first starts up the image)</li>
  <li>Create a scheduled task which is used by Packer to remove the WinRM listeners and then shutdown the host</li>
  <li>Set a flag that tells Windows to recreate the pagefile after the next reboot (after the image is created)</li>
</ul>

<p>I wrote this role so that the sysprep process is run when Vagrant starts up the image so that the evaluation timer is reset back to the maximum allowed when the image is created but this does not seem to be the case. I am planning on revisiting this so the sysprep process is run before the image is created to reduce the startup time needed for the Vagrant images.</p>

<h2 id="post-processors">Post-Processors</h2>

<p>Once the OS has been provisioned and shutdown, Packer will finally run the post-processors that are configured in the <code class="language-plaintext highlighter-rouge">packer.json</code> file. By default this is just a step to export the VM as a Vagrant box file called <code class="language-plaintext highlighter-rouge">vagrant.box</code>. I have added the ability to add a step to upload the newly created Vagrant image to the Vagrant Cloud. To create the Packer template with this ability run the below where you would replace the values in <code class="language-plaintext highlighter-rouge">&lt;&gt;</code> with whatever is relevant to your Vagrant Cloud account.</p>

<div class="language-bash highlighter-rouge"><div class="highlight"><pre class="highlight"><code>ansible-playbook packer-setup.yml <span class="nt">-e</span> <span class="nv">man_packer_setup_host_type</span><span class="o">=</span>2016 <span class="nt">-e</span> <span class="nv">opt_packer_setup_access_token</span><span class="o">=</span>&lt;api_token&gt; <span class="nt">-e</span> <span class="nv">opt_packer_setup_version</span><span class="o">=</span>0.0.1 <span class="nt">-e</span> <span class="nv">opt_packer_setup_box_tag</span><span class="o">=</span>&lt;vagrant_cloud_box_tag&gt;
</code></pre></div></div>

<h1 id="problems">Problems</h1>

<p>When creating this process I came across a few problems that either needed to be fixed or bypassed. Some of these problems still exist today but I am planning on trying to fix them as time goes on.</p>

<h2 id="json-and-comments">JSON and Comments</h2>

<p>One of the main things I disliked about Packer was that the config files are in JSON. While JSON is a lot simpler than XML I find the fact you cannot add comments into the file very annoying and makes it harder for new people to understand why you did what you did. This was one of the primary drivers of moving the Packer configuration to a YAML file which Ansible uses to produce the final JSON file used by Packer.</p>

<h2 id="reboot">Reboot</h2>

<p>A major issue when it came to using Ansible with Packer was that you could not reboot the host without setting up a local only network adapter for the VM. This is because Packer uses a NAT network adapter with forwarded ports as the default network adapter to use in VirtualBox. This is a problem as the older reboot behaviour for Ansible was to;</p>

<ul>
  <li>Send the shutdown command over WinRM</li>
  <li>Wait until the WinRM port is not reachable (host is shutdown)</li>
  <li>Wait until the WinRM port is reachable (host is back up)</li>
  <li>Run a test command to ensure the host is back online and ready</li>
</ul>

<p>When the port is forwarded by VirtualBox, the WinRM port will never go down as VirtualBox is still active and listening on that port even if Windows is not.</p>

<p>One solution I started with was to also create a host only network adapter and get Ansible to communicate over that one. I was able to successfully set this up but I was unhappy with the solution as it required that network adapter to actually exist beforehand and made things more complicated when it came to reserving IP addresses.</p>

<p>The final solution was to fix up the Ansible code to actually work in situations where the port is being forwarded by another device. I raised a pull request to change the reboot behaviour to;</p>

<ul>
  <li>Get the system boot time</li>
  <li>Send the shutdown command over WinRM</li>
  <li>Change the connection timeout value to something really low like 5 seconds</li>
  <li>Keep on getting the system boot time until it is different from step 1, ignore any connection errors as the host may be offline</li>
  <li>Run a test command to ensure the host is back online and ready</li>
</ul>

<p>With these changes, Ansible no longer uses the port to determine whether the host actually rebooted but uses the system boot time instead. These changes have been merged into the devel branch and will be made available in the 2.5 release. Until that time you can use checkout the devel branch and run <code class="language-plaintext highlighter-rouge">source hacking/env-setup</code> to use the pre-release code.</p>

<h2 id="installing-windows-updates">Installing Windows Updates</h2>

<p>Installing Windows Update over WinRM has always been an issue due to the restrictions that Microsoft has placed on a Network logon session. Ansible makes it easier by having a module <a href="http://docs.ansible.com/ansible/latest/win_updates_module.html">win_updates</a> that run the relevant WUA calls in a scheduled task so you don’t have to do it yourself. This is similar to the <code class="language-plaintext highlighter-rouge">elevated_user/password/command</code> process that Packer has for running “elevated” commands. While the module makes it easier to actually install the updates I still had the following issues;</p>

<ul>
  <li>To reboot after the updates are installed, a separate Ansible task calling <code class="language-plaintext highlighter-rouge">win_reboot</code> is needed</li>
  <li>You cannot use an <code class="language-plaintext highlighter-rouge">until</code> loop over multiple tasks in Ansible right now which makes it impossible to loop these 2 tasks until no updates are left</li>
  <li>Scheduled tasks can be problematic when it comes to starting up and I had a few issues when it came to Ansible trying to create/start the scheduled task</li>
</ul>

<p>Like the reboot issues, I’ve raised a few pull requests in the Ansible repo to update the <code class="language-plaintext highlighter-rouge">win_updates</code> task to;</p>

<ul>
  <li>Get Ansible to automatically use the <a href="http://docs.ansible.com/ansible/latest/become.html">become</a> process when executing the <code class="language-plaintext highlighter-rouge">win_updates</code> module
    <ul>
      <li>This removes the need for running with a scheduled task as become on Windows means the process runs under an interactive logon session</li>
    </ul>
  </li>
  <li>Convert the <code class="language-plaintext highlighter-rouge">win_updates</code> module to an action plugin which automatically reboots the host when required and continues to install updates until there is nothing left
    <ul>
      <li>This removes the need for the convoluted workflow that currently exists in the update role</li>
    </ul>
  </li>
</ul>

<p>The first PR has been merged into Ansible while the 2nd one is in review but should be in relatively shortly. Like the <code class="language-plaintext highlighter-rouge">win_reboot</code> changes, these features should be available in the 2.5 release or in the devel branch right now.</p>

<h2 id="sourcing-evaluation-isos">Sourcing Evaluation ISOs</h2>

<p>Microsoft makes it easy today to get the evaluation ISOs for the newer OS’. You can currently get the Server 2012, 2012 R2 and 2016 evaluation ISO from the <a href="https://www.microsoft.com/en-us/evalcenter/">Microsoft Evaluation Centre</a> which makes them easy. Server 2008 and 2008 R2 are a bit different where they are not in the evaluation centre but are still available by doing a quick google search. Server 2008 makes it even more difficult by only offering an ISO based on the RTM release and not on SP2 which is required by Ansible (see below for more 2008 woes).</p>

<h2 id="server-2008">Server 2008</h2>

<p>Ahh Server 2008, how I loathe thee. Still supported by Microsoft until 2020 but different enough it requires some special handling to get it working. Here are some of the differences/use cases I needed to handle to get this process working for this OS version-;</p>

<ul>
  <li>2008 comes in a 32-bit variant, this means the unattend.xml files used in the install and sysprep process needed to dynamically change the architecture string used to support 32-bit</li>
  <li>The unattend.xml is not completely different from the other OS’ but different enough to warrant some head banging to get things working properly on this version</li>
  <li>The 2008 evaluation ISO does not come preloaded with SP2, this needed to be manually installed in the bootstrapping process so that PowerShell 3.0 could then be installed</li>
  <li>The base image only came with PowerShell 1.0 which needed to be upgraded to 2.0 before 3.0 could be installed, this also meant the bootstrapping script needed to support the 1.0 version for the majority of its steps</li>
  <li>The Internet Explorer 9 update does not play nice with the Ansible <code class="language-plaintext highlighter-rouge">win_updates</code> module, I had to manually install this update in the bootstrapping process so it wouldn’t fail later on</li>
</ul>

<p>Once I got through these issues, the end result is a working image for Server 2008 but due to the age of the OS, it still has further limitations when it comes to what it can do. The only reason why I included this version is because it is still supported by Microsoft and Ansible and I needed a way to test on this version without manually creating an image for it.</p>

<h1 id="looking-to-the-future">Looking to the Future</h1>

<p>This project is definitely not complete and I picture having to change some of these processes as time goes on and bugs are found. A few things I know off already that I want to change/add are;</p>

<ul>
  <li>Re-arrange the sysprep process to run before the image is created</li>
  <li>Get the sysprep process to re-arm the evaluation key so the full evaluation period is available when Vagrant starts up</li>
  <li>Setup the registry keys to enable TLSv1.1 and TLSv1.2 on Server 2008 R2</li>
  <li>Add the ability to create an image for Windows Nano Server</li>
  <li>Add the ability to create an image for Windows 10</li>
</ul>

<p>As with everything, it will take some time to implement some of the things above but feel free to raise a PR on <a href="https://github.com/jborean93/packer-windoze">packer-windoze</a> if you’ve done the hard yards.</p>]]></content><author><name>Jordan Borean</name></author><category term="ansible" /><category term="packer" /><category term="windows" /><summary type="html"><![CDATA[As part of my role as a developer for Ansible on everything Windows, I have a need to test my code on a wide variety of Windows and PowerShell versions. I ended up having a setup of the following to cover my bases; Windows Server 2008 64-bit (PowerShell 3.0) Windows Server 2008 R2 (PowerShell 3.0) …]]></summary></entry></feed>